Showing posts with label Historical - Interwar. Show all posts

Saturday, December 17, 2022

Paint Queuemas Day 5: Pulp Germans

"On the fifth day of Paint Queuemas...."

Today's entry is a group of 28mm Interwar German mercenaries/baddies for pulp gaming from Copplestone Castings CC's Back of Beyond range carries a lot of dynamic and unique figures from a period that doesn't get much attention. Best of all, they are clean castings so require little prep work to get started.

These were zenithal primed and painted using glaze techniques.The Freikorps uniforms are one coat of Dark Green ink wash and then 2-3 coats of GW Camoshade. Their stalhelms were painted with Vallejo Golden Olive, sponge chipped with Vallejo Light Rust, and edged with AK Gunmetal, then washed in diluted Camoshade. The skull emblems are handpainted.

The naval officer is one coat of Secret Weapon Soft Body Black and then ~3 coats of Blue ink wash. His pants are Vallejo German Grey and his boots and gloves are black ink wash. I just realized I forgot to paint the buttons of his peacoat! The femme fatale is one coat of dilute Purple ink wash (for extra shading) and then 3 coats of Dark red ink wash.

All the leather was done using two coats of GW Sepia wash. The weapons are all AK Gunmetal washed with Soft Body Black. All the flesh tones are some combination of Vallejo Flat Flesh, Basic Skin tone, Salmon Red, and/or Luftwaffe Uniform. I opted for very basic urban rubble bases painted with a variety of thinned craft paints.

I now have a crew for the resin MkIV tank I painted up years ago.

Stay tuned for tomorrow's post


Monday, November 22, 2021

1/48 scale Citroen CV11

(EDIT: I noticed the tide marks on the tires and above the windshield as I was editing these photos. They've since been cleaned up.)
Tamiya 1/48 Citroen 11CV in Luftwaffe service, Berlin
Well, this was my first ever Tamiya kit and I'm legitimately blown away by how easy it was to assemble and how nicely it looks finished - so much so I picked up the 1/48 Kubelwagen last week!
This build is straight out of the box, with the exception of the license decals. As its scaled perfectly with 28mm figures, I wanted this to represent a vehicle for my Battle of Berlin army and needed the 300 series. The car is painted overall in Tamiya Field Blue - with a few drops of Tamiya Neutral Grey to tone the blue down - with detailed painting done with Vallejo acrylics. Unfortunately, you can't see the interior in the photos, but that is well detailed, fully painted to represent brown leather seating, and weathered.
As this is a staff car, weathering was lighter than what I normally do, mostly consisting of oil pin washes, some acrylic dried mud spatter (Secret Weapon Caked Dirt is perfect for this effect), and AK enamels to represent petrol spills and the rusty muffler.
Definitely my most enjoyable build of 2021 so far.


Monday, September 2, 2019

Afrika Korps Schutzen Trucks...on a budget!

To transport my squads of Afrika Korps troops around the Western Desert, I needed some trucks. Not wanting to shell out another $30+ on some 1/56 scale plastic kits for an army that was really done as a fun side project, I went looking for alternatives and stumbled on Matchbox's Models of Yesteryear. I liked the look of the WW1-era British Crossley Tenders and picked up two for $10. And I can already hear the rivet counters say in unison "Well, actually..." and they would be right - it's ahistorical to drop these 25 years on in the middle of Egypt or Libya, but my headcanon says they picked these up from some old British fuel dump somewhere and borrowed them, permanently. 

I disassembled and primed them in Krylon Red Oxide, then applied a layer of hairspray for chipping and airbrushed on a 50/50 mix of Tamiya Olive Drab and Medium Green. Once dry, I worked on chipping that paint, oversprayed it with Krylon Flat to maintain colorfastness, applied another layer of hairspray for chipping, then airbrushed on a 75/25 mix of Tamiya Dark Yellow and Yellow Green. Once chipped, this makes it appear that the truck was originally painted in British Drab and then oversprayed in Afrika Korps Sand Yellow after capture. Details were then painted, the trucks reassembled, and then decals were applied from the Rubicon Opel Blitz sheet. After sealing, the trucks were weathered in oils and dry pigments.

They look old fashioned and aren't perfect, but for $10, I'm not complaining. 


Sunday, September 1, 2019

1/56 Renault "Adventuring" Van

Back into the swing of things after a long break from modeling, here's my converted Renault "Adventuring" Van. It started as a Matchbox "Models of Yesteryear" diecast toy that I stripped down, primed, painted, and added stowage to use in Pulp, Back of Beyond, and World War 2 gaming, as both a vehicle and objective. In the past, I've used a lot of Lledo diecast which, while passable, aren't as nice and lack realistic tires.

I disassembled and then primed this model in Krylon Red Oxide, then used hairspray to create the chipping effect. The chassis is straight Tamiya Black and the body itself is Tamiya Light Blue. When chipped, the light tone blue and reddish-orange create a nice contrast (you see it a lot in movie posters lately). The large ying-yang symbol was from a 1/32 WW1 biplane kit and the rest of the decals are from various 1/56 Rubicon vehicle kits. The stowage itself is a mix of 1/48 Tamiya fuel canisters & stowage, beads, and basswood. I then reassembled and heavily weathered the model with oils and pigments. As the tires are soft plastic, I just gave them a heavy wash of watered-down Secret Weapon Basic Dirt to simulate road dust.


Tuesday, June 25, 2019

Pulp Alley - Carmen, Jack, & Bugsy

One of the nice things about Pulp Alley is that it affords you the opportunity to use miniatures that are generally overlooked, unused, or generally out of place in larger, more organized miniatures games. All three of these minis I received as swag and have sat neglected in my bitz box for a long time. After some cleanup, slottatab removal and a nice white primer coat, they painted up relatively quickly.


Carmen is a world-traveling thief, known for always eluding local police and private eyes. Her criminal network reaches from poor slums to the seats of government power. Among her most trusted associates are....


Jack - Not much is known about the man who calls himself Jack besides his experiences in the last days of World War 1 and his disillusionment with government, especially the military. He carries multiple identification tags around his neck but it is unknown whether these were from fallen compatriots or his victims.


Bugsy - a young gangster from Chicago, Bugsy has an extensive criminal record despite his age. After a statewide manhunt, Bugsy was thrown into Joliet prison but managed to escape and find his way into the employ of Carmen. He has a passion for automatic weapons, fast cars, and jazz music.


Monday, June 10, 2019

Product Review: Pulp Alley version 2 Rulebook and Cards

While at Adepticon, I was finally able to play a large demo game of Pulp Alley after years of interest. Blown away by how much fun the system was, I went to order a copy and found out that the game designer, David Phipps, had a Kickstarter campaign for version 2. $50 and a few months later, I received my pledge - a PDF of the rulebook, an 8.5"x6" softcover rulebook, a small 6" ruler/rules reminder, two packs of Fortune cards, and a pack of Known Associates cards. 


You have to understand that this game is completely self-made by the creator, without any assistance from a larger game company, from (as far as I can tell) his own home. With that in mind, this game is as good (if not better) than many of the games put out by much larger game companies. The rulebook is well bound, in a nice handheld size with a glossy cover. The cards are all good quality, having the thickness of playing cards and a satin/semi-gloss finish. I would recommend putting these in some card protectors to extend their life and keep them looking brand new.


What is "Pulp"? Pulps were cheap, often lurid magazines popular in the early 20th century, usually before the widespread use of television, that entertained the masses with stories of brave explorers, cowboys, fighter pilots, and other heroes. Characters such as Tarzan, The Shadow, and Doc Savage were popular Pulp heroes and served as the template for other heroic characters that would be popularized in film long after the pulps had disappeared - Indiana Jones, The Rocketeer, Jack Burton. Pulp Alley focuses on these types of of heroic adventures however, the system is so open-ended that it could be used for a wide variety of miniature gaming from the Old West, early 20th century wars, and into Science Fiction.


Pulp Alley games are usually two or more players (though solo play is possible) who choose a warband or unit of between 3-6 characters (though larger size units, known as Mobs, are possible) who fight over control of themed objectives known as "Plot Points". Each character has a variety of stats and special abilities. Uniquely, Pulp Alley does not force your miniatures to be WYSIWYG (though it's still encouraged), as each character is defined by their statistics and abilities. Additionally, Pulp Alley uses a multiple dice system (from d6 to d12) to represent various levels of ability, difficulty, and damage with "successes" be consistently measured by rolling 4+ on any one dice.


In keeping with a cinematic feel, each turn, the initiative of play is dictated by "The Director" and this role can (and will!) switch between players every turn. The Director chooses which player may act and the chosen player activates one of their characters. Each activation the character can move and choose one action or attack. Once that character has completed its activation, The Director assigns play to the next player (or the same player), until all characters have activated.

And I hear the complaints now - "so I just have to sit around while other players act?". No, this is where the Fortune deck (and your hand of cards) comes into play. You may play Fortune cards to steal The Director's role, force other characters to activate, force characters to re-roll or re-do an action....if you can think of it, there is very likely a card that allows you to do it. This provides a feeling of suspense and dynamism as inactive players can change the fortunes of the active player and (in a group with more players) often will end up attempting to out-do each other with who can change the game quicker.


Character creation is very straightforward and user-friendly with a long list of special abilities, perks, and backgrounds. Want to have a debonaire secret agent with his secret agent buddies? You can do that. A world-traveling archeologist with a spunky female sidekick and his native guide? You can do that. Nefarious villain from the Far East with mystic henchmen? Lovecraftian cult leader with a gang of flunkies? Disguised aliens bent on world conquest? You can do all of it. Version 2 has also introduced an expanded weapons section, mounts and vehicles, as well as backgrounds and resources to give your warband a unique feel.


All in all, I've really enjoyed this game and have been surprised by just how easy it is to pick up and get hooked by. How this game doesn't have a much larger fan base is a mystery, as it would seem to attract the same crowd that have made other skirmish games like Frostgrave such massive hits. If you can, I would highly suggest picking up a copy and trying out a few games yourself.


Pros:
  • Engaging, fast-paced game suitable for nearly any genre
  • Well laid out, concise rulebook
  • Lots of gameplay examples
  • Despite overall book/card size, clear and legible font is easy to read
  • Good quality cardstock
  • Known associates cards are double-sided (edit!)
Cons:

  • Interior paper of rulebook is somewhat flimsy

Wednesday, April 24, 2019

El Alamien Table Updated!

Hi everyone! Sorry I've been out of touch lately, the post-Adepticon modeling slump added to some health issues made getting things finished a little tough. Now that's over, I thought I'd share the updated El Alamein table I've been working for my birthday! Some of you may have seen the old table at the Adepticon Bolt Action tournaments - I even played on it the first round of Doubles - and decided to change a few things.

I took some extra cobblestone roads and repainted them, adding some short dead grass tufts along the edges in an attempt to mimic the crushed gravel roads that were quickly laid down along the Africa coast as the armies vied for position. I also took out the quonset huts and the larger crate stacks in favor of some modular crates from Tabletop Scenics and some grain sack stacks to represent the supply dump around the train station itself.

In an attempt to add visual appeal to the desert half of the table, I added a crashed Italian plane and some removeable barbed wire. I had an ancient 1/48 Smer Reggaine R2000 monoplane I threw together over a couple of sittings, doing some AA damage, and adding a simple base. The barbed wire obstacles are just 24ga steel wire woven together, clipped into 6" long sections, and spray painted. Since they are moveable, they can be formed into squares to represent minefields, positioned in depth, or removed if an AFV or engineer team destroys them. In an attempt to liven up the otherwise drab appearance of the dunes and plateau, I added some more dead grass and low groundcover.

Some of you may note that this table appears slightly cluttered and you wouldn't be wrong - the mat itself is actually 7x4, so I can add another foot of length for larger games without sacrificing much cover and concealment.


Wednesday, December 26, 2018

Brave Little Tankette - Hungarian CV33


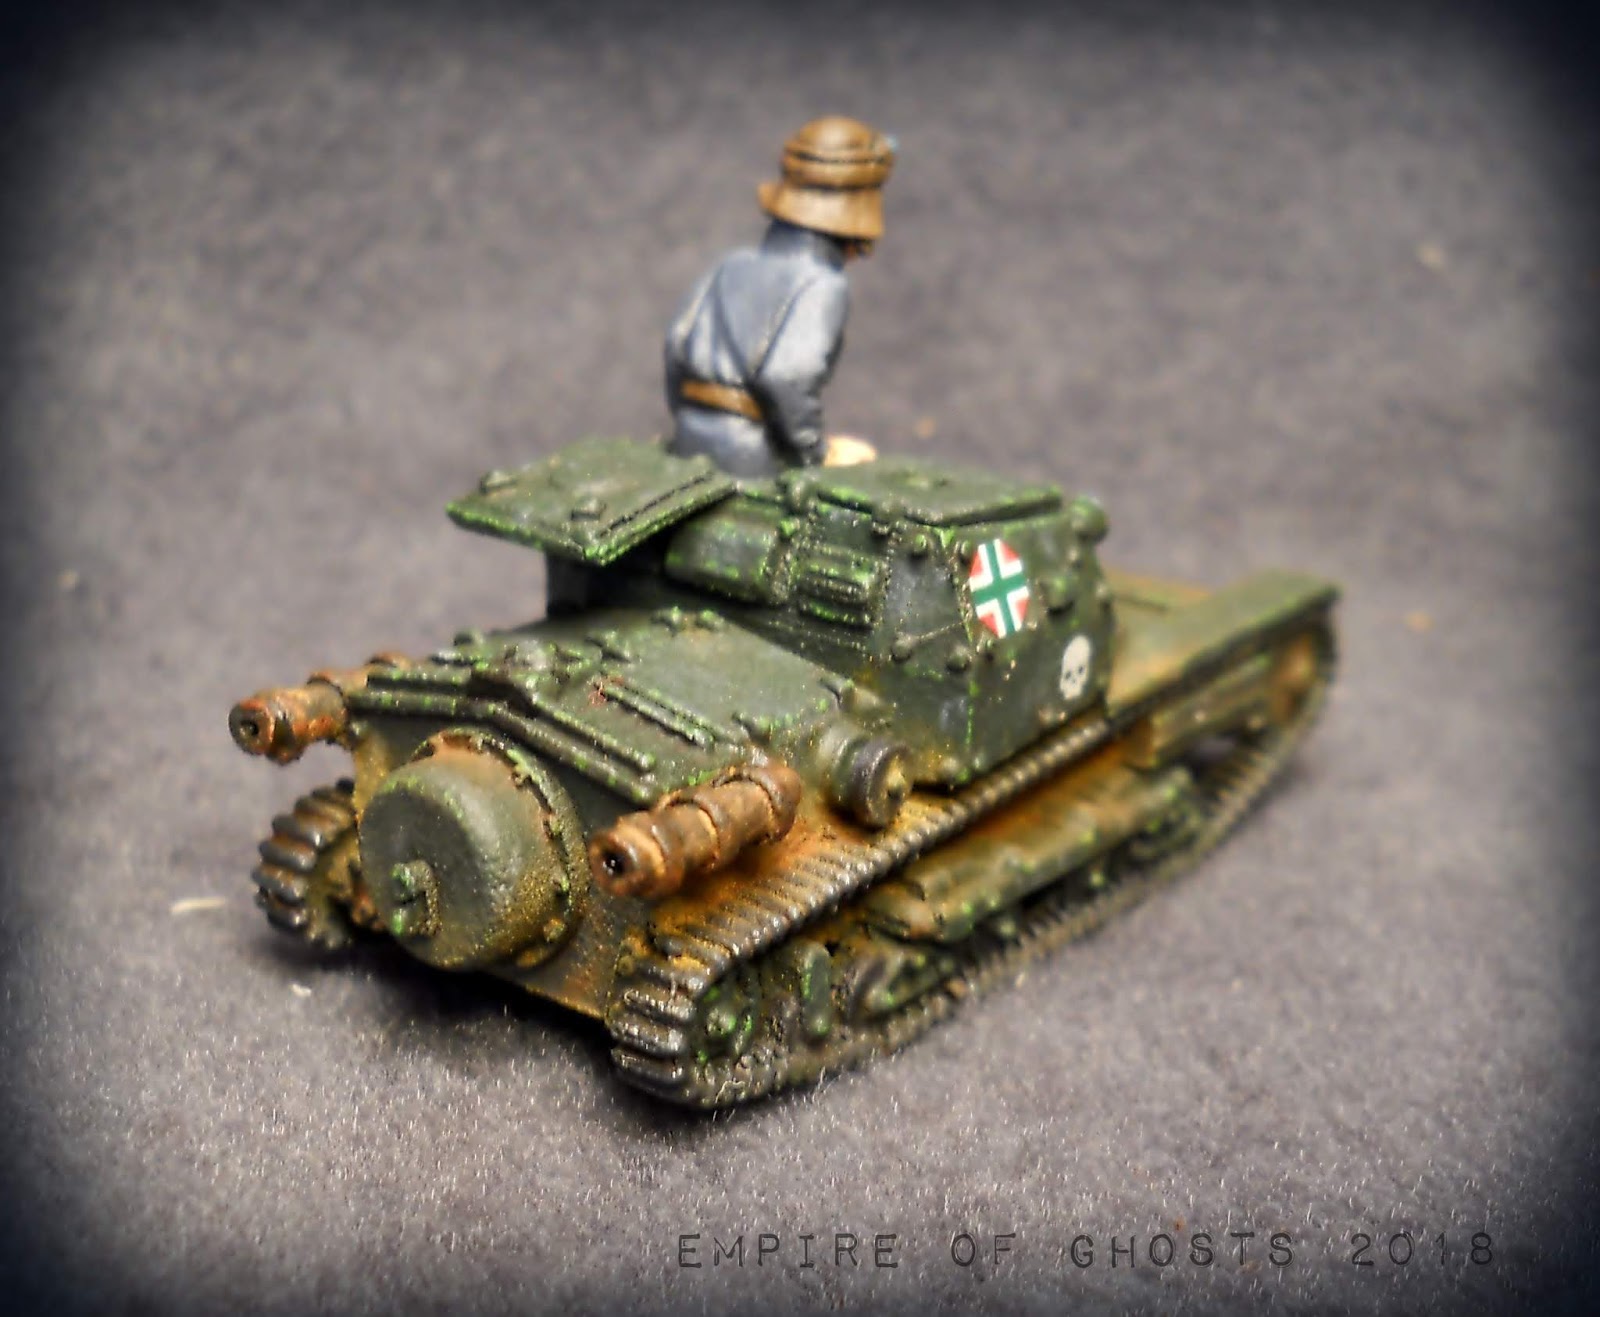
A little something different today - the diminutive CV-33 tankette. The Hungarians bought a couple dozen from the Italians at the beginning of the war...and quickly realized the AFV's limitations. All the sources I've found seem to indicate that the few that were left operational after the invasion of Yugoslavia in 1941 were transferred to the Gendarmerie for use in anti-partisan operations inside Hungary itself. 

The tankette itself is (IIRC) a 1/56 resin kit from Mad Bob or Empress that I received in 2017. I removed the original armament and added a new plasticard gun mounting with brass barrels to simulate the twin Gebauer MGs the Hungarians re-armed their tankettes with. I also added the side visors, headlamps, and tow hook. It is painted in a 50/50 mix of Tamiya Olive Drab and Olive Green with some edge highlighting/chipping done in VMC Medium Olive. The mufflers are done in Tamiya Olive Drab (but are so heavily weathered, it's difficult to tell). Decals are a mix of Mad Bob, Games Workshop, and Battlefront. Weathering is done with oil pin washes with some panel highlights in oils, and finally finished with dry pigments. I really wanted to give this tankette a dusty look, as most of the Hun tankettes traveled the roads under their own power and likely accumulated heavy amounts of dust and dirt.

The crewman is a Warlord Games' Italian figure. His overalls are successive highlights of VMC German Grey, VMC Grey Blue, and VMC Luftwaffe Uniform. His helmet, belt, and goggles are basecoated in VMC Leather Brown, with a highlight of 75/25 Leather Brown & VMC Red Leather. Skintones are various shades of VMC fleshtones, with a hint of VMC Old Rose in the cheeks to give him an angry appearance. 


Monday, October 29, 2018

Tutorial: Early 20th century Urban Barricades

In the increasingly urbanized conflicts that the enveloped the world after World War 1, troops often found themselves with little to no cover or concealment in the broad thoroughfares, plazas, and parks that had come to dominate the civil planning of cities after the crowded conditions of medieval Europe. In response, many assembled and scrounged whatever they could to provide protection against enemy fire and prevent enemy troops from maneuvering quickly in the form of barricades. In this tutorial, I'll show you how to easily assemble three common barricade types. But first, let's take a look at some historical inspiration...


Materials

  • 2-3mm MDF
  • 1/2" to 2" thick Foamboard 
  • Balsa, Basswood or other scale lumber in planks, square, and round 
  • Pre-mixed vinyl spackle
  • Sand, gravel, and assorted rubble
  • 1/48 and/or 1/56 scale bricks (I prefer Pegasus Hobbies' small red brick)
  • Paints (black, greys, and browns are prevalent with reds, red-brown, tans, and yellow being less so)
  • Dry pigments (optional)
  • Glaze or pigment medium (optional)
  • Greenstuff (optional)
  • Craft wood shapes (small pickle barrels, circles, etc. - optional)
  • Old or broken 1/48 or 1/56 softskin vehicles, civilian vehicles, farm/construction implement (Lledo, DeAgostini, and Ertl "Vintage Vehicles" work well)
  • Bits and gubbinz (optional)

Rubble Pile Barricades

One form of barricade was a simple breastwork, formed by pushing or dumping large quantities of rubble into a slope, backed with lumber boards. In heavily-bombed cities, this barricade was fairly easy to assemble, but was non-existent in cities that had not suffered bombing or shelling.

1. Cut a rectangular piece of MDF measuring 6" x 1.5". Along ONE of the long edges, bevel with a dremel or piece of sandpaper (be sure to wear a dust mask or respirator).

2. Cut a piece of 1/2" or 3/4" insulation board measuring 6" x (a bit under) 1.5". Using a utility knife, carefully cut the board lengthwise at a 45 degree angle, so you're left with two sloping pieces.

3. Glue the sloped board on to the MDF with the slope facing the beveled edge (see below), weigh it down, and let dry thoroughly . You may need to clean the board up slightly so the transition between MDF and insulation isn't too apparent. It's OK if there's a slight difference, as this will be covered in rubble, but the pieces should be mostly flush.


4. Measure out and cut enough wood strips to cover the back and sides of the barricade (see below). The sides can stick out slightly towards the top.


5. Add some thicker strips of wood vertically at the corners and halfway along each edge to represent supports

6. To prevent vehicles and tanks from simply driving over the slope, workers would take railroad ties or thick wooden beams and jam them into the rubble, jutting out at angles and reinforced by the weight of the rubble on top of them. To represent this, cut or break off 1-2" long pieces of thick wood rod (either square or rectangular, I used 1/2" x 1/4" inch basswood), sharpen one end, put a small dab of glue on the point, and shove it into the foamboard at odd angles. Don't overdo it - the beams and ties were heavy and it would have been time-consuming to place many on each barricade. 


7. Cover the slope with a mixture of 50% spackle/25% glue/25% paint and sprinkle your rubble mixture on. Be sure to include bricks if you have them. Allow to dry thoroughly (at least overnight is best).

8. Once dry, simply paint the rubble itself. The wood can be stained with washes or diluted paint.


Rubble "Cribs"

Another form of barricade was the "crib" or box. This was used heavily by the Germans after mid-1944. It required a lot of manpower, time, and materials to construct, so - as far as I can tell - doesn't seemed to have been used outside of Germany itself.

1. Cut a rectangular piece of MDF measuring 6" x 1.5"


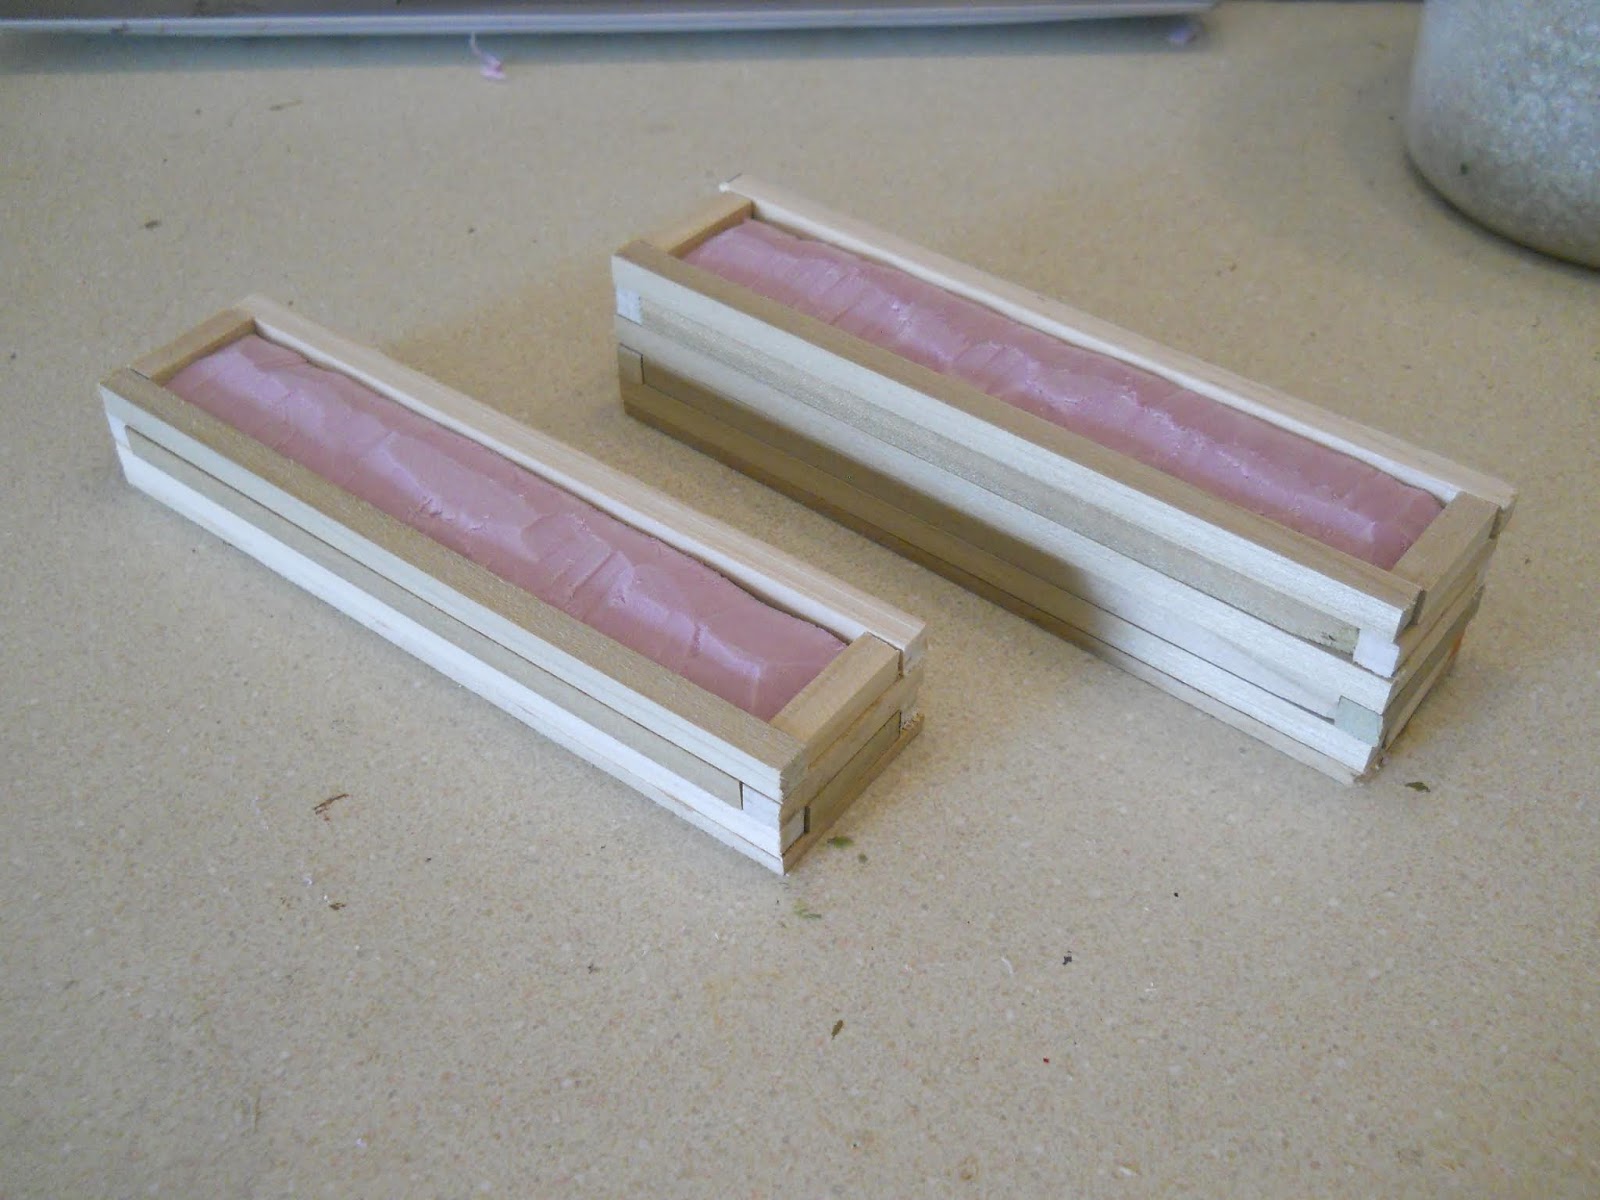
2. Cut a rectangular piece of 2" foamboard with enough space to accommodate the dowels, this is going to require some math. For my cribs, I used 1/4" square wooden dowels which seemed to be about the right size for 28mm. Since I needed to place pieces of dowels on either side, that would mean I had to subtract 1/2" from both sides (0.25 x 2 = 0.50), so my foamboard measured 5.5" x 1". Glue the foamboard to the base, weigh it down, and let dry thoroughly.


3. Measure out and cut enough pieces of wooden dowel to form the walls of the crib. As the pieces are stacking in alternating rows (remember building with Lincoln Logs as kid?), you will need some pieces measuring the full length and width of the base itself, and some measuring the length and width of the foamboard. Before gluing it down, be sure to dry fit the pieces to ensure they look right - it's okay if some pieces are slightly too long or too short, these barricades were assembled in haste! You can also make them any height you wish - there are some pictures showing cribs that were used as breastworks and many more showing cribs taller than the height of a grown man.

Once you have decided on the height of your cribs, make the top of the wood with a pencil and then use a utility knife to cut the foamboard BELOW this line, with a sloped towards the edges. Glue on the wooden dowels and allow to dry.


4. Once dry, cover the slope with a mixture of 50% spackle/25% glue/25% paint and sprinkle your rubble mixture on. Be sure to include bricks if you have them. Allow to dry thoroughly (at least overnight is best).

5. Once dry, simply paint the rubble itself. The wood can be stained with washes or diluted paint.


Bric-A-Brac or "Random Crap" Barricades
The most numerous example of urban barricades were those assembled from random items, including things such as streetcars and vehicles filled with rubble, paving stones, cable reels, rolls of newsprint, furniture, barrels, crates, sandbags....if it was large enough to provide some measure of cover and concealment, it's likely to have been thrown into a barricade at some point. Barricades like this pre-date the 20th century as well, being widely used during the French Revolution and (most famously) at the Battle of Rorke's Drift. By WW2 though, they needed to be able to withstand heavy caliber ammunition and tracked vehicles so, when lighter items were used, they were often filled with rubble, bricks, and stone and reinforced by placing heavy timbers or railroad ties into the ground behind them.

I could easily write instructions on how to precisely make a random barricade, but most of the fun is finding examples and assembling them yourself. Below are four of my completed barricades (as well as those listed above). As you can see, I used some old broken vehicles, some "pickle barrel" wooden shapes, 1/48 fuel drums, lasercut MDF squares (leftovers from some Sarissa buildings), bricks, etc.

Sandbags can be easily made by rolling out strips of epoxy putty, cutting them into equal pieces, and squashing them down in ordered rows. Cable reels can be made using a piece of circular wooden dowel as the center with two circular MDF bases sandwiched on either side. If you break, incorrectly assemble, or badly paint a vehicle, this is the perfect excuse to use it - just be sure to fill soft-skinned or civilian vehicles with rubble.

Whatever you do, just be sure your figures can see over the barricade in most places!