Showing posts with label tutorial. Show all posts

Monday, October 29, 2018

Tutorial: Early 20th century Urban Barricades

In the increasingly urbanized conflicts that the enveloped the world after World War 1, troops often found themselves with little to no cover or concealment in the broad thoroughfares, plazas, and parks that had come to dominate the civil planning of cities after the crowded conditions of medieval Europe. In response, many assembled and scrounged whatever they could to provide protection against enemy fire and prevent enemy troops from maneuvering quickly in the form of barricades. In this tutorial, I'll show you how to easily assemble three common barricade types. But first, let's take a look at some historical inspiration...


Materials

  • 2-3mm MDF
  • 1/2" to 2" thick Foamboard 
  • Balsa, Basswood or other scale lumber in planks, square, and round 
  • Pre-mixed vinyl spackle
  • Sand, gravel, and assorted rubble
  • 1/48 and/or 1/56 scale bricks (I prefer Pegasus Hobbies' small red brick)
  • Paints (black, greys, and browns are prevalent with reds, red-brown, tans, and yellow being less so)
  • Dry pigments (optional)
  • Glaze or pigment medium (optional)
  • Greenstuff (optional)
  • Craft wood shapes (small pickle barrels, circles, etc. - optional)
  • Old or broken 1/48 or 1/56 softskin vehicles, civilian vehicles, farm/construction implement (Lledo, DeAgostini, and Ertl "Vintage Vehicles" work well)
  • Bits and gubbinz (optional)

Rubble Pile Barricades

One form of barricade was a simple breastwork, formed by pushing or dumping large quantities of rubble into a slope, backed with lumber boards. In heavily-bombed cities, this barricade was fairly easy to assemble, but was non-existent in cities that had not suffered bombing or shelling.

1. Cut a rectangular piece of MDF measuring 6" x 1.5". Along ONE of the long edges, bevel with a dremel or piece of sandpaper (be sure to wear a dust mask or respirator).

2. Cut a piece of 1/2" or 3/4" insulation board measuring 6" x (a bit under) 1.5". Using a utility knife, carefully cut the board lengthwise at a 45 degree angle, so you're left with two sloping pieces.

3. Glue the sloped board on to the MDF with the slope facing the beveled edge (see below), weigh it down, and let dry thoroughly . You may need to clean the board up slightly so the transition between MDF and insulation isn't too apparent. It's OK if there's a slight difference, as this will be covered in rubble, but the pieces should be mostly flush.


4. Measure out and cut enough wood strips to cover the back and sides of the barricade (see below). The sides can stick out slightly towards the top.


5. Add some thicker strips of wood vertically at the corners and halfway along each edge to represent supports

6. To prevent vehicles and tanks from simply driving over the slope, workers would take railroad ties or thick wooden beams and jam them into the rubble, jutting out at angles and reinforced by the weight of the rubble on top of them. To represent this, cut or break off 1-2" long pieces of thick wood rod (either square or rectangular, I used 1/2" x 1/4" inch basswood), sharpen one end, put a small dab of glue on the point, and shove it into the foamboard at odd angles. Don't overdo it - the beams and ties were heavy and it would have been time-consuming to place many on each barricade. 


7. Cover the slope with a mixture of 50% spackle/25% glue/25% paint and sprinkle your rubble mixture on. Be sure to include bricks if you have them. Allow to dry thoroughly (at least overnight is best).

8. Once dry, simply paint the rubble itself. The wood can be stained with washes or diluted paint.


Rubble "Cribs"

Another form of barricade was the "crib" or box. This was used heavily by the Germans after mid-1944. It required a lot of manpower, time, and materials to construct, so - as far as I can tell - doesn't seemed to have been used outside of Germany itself.

1. Cut a rectangular piece of MDF measuring 6" x 1.5"


2. Cut a rectangular piece of 2" foamboard with enough space to accommodate the dowels, this is going to require some math. For my cribs, I used 1/4" square wooden dowels which seemed to be about the right size for 28mm. Since I needed to place pieces of dowels on either side, that would mean I had to subtract 1/2" from both sides (0.25 x 2 = 0.50), so my foamboard measured 5.5" x 1". Glue the foamboard to the base, weigh it down, and let dry thoroughly.


3. Measure out and cut enough pieces of wooden dowel to form the walls of the crib. As the pieces are stacking in alternating rows (remember building with Lincoln Logs as kid?), you will need some pieces measuring the full length and width of the base itself, and some measuring the length and width of the foamboard. Before gluing it down, be sure to dry fit the pieces to ensure they look right - it's okay if some pieces are slightly too long or too short, these barricades were assembled in haste! You can also make them any height you wish - there are some pictures showing cribs that were used as breastworks and many more showing cribs taller than the height of a grown man.

Once you have decided on the height of your cribs, make the top of the wood with a pencil and then use a utility knife to cut the foamboard BELOW this line, with a sloped towards the edges. Glue on the wooden dowels and allow to dry.
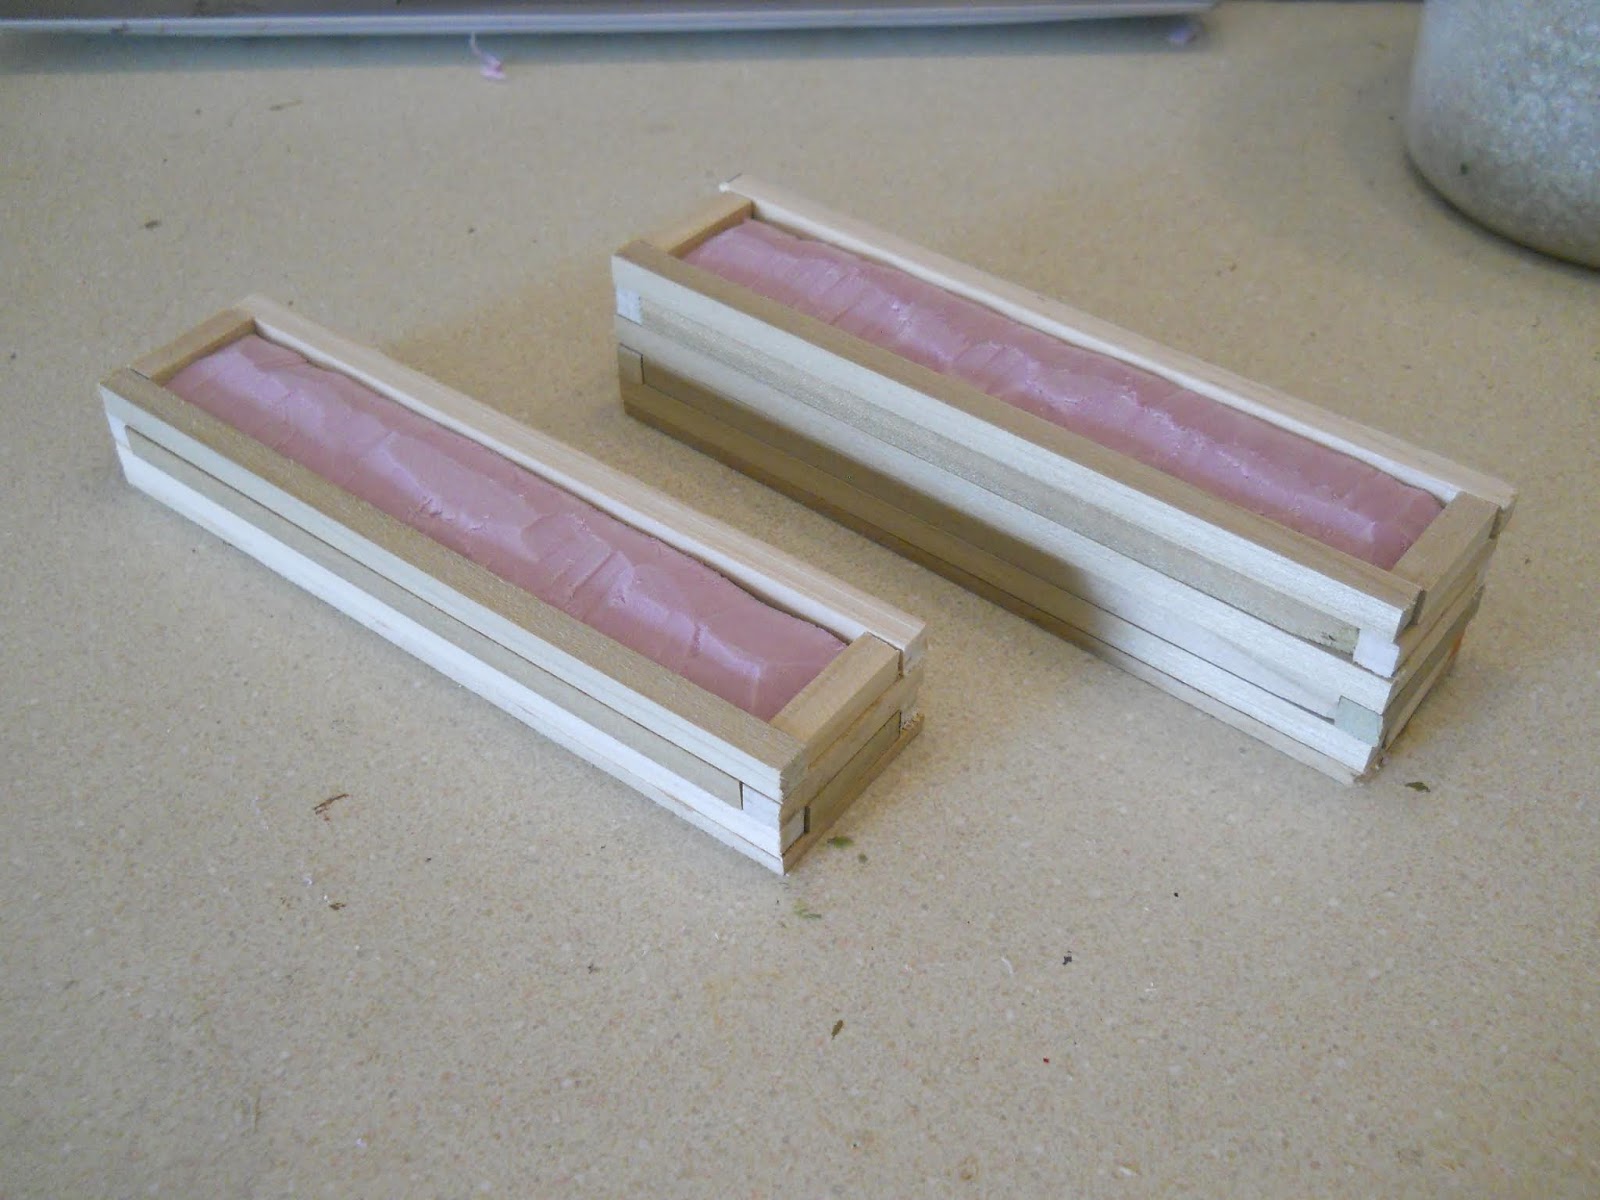

4. Once dry, cover the slope with a mixture of 50% spackle/25% glue/25% paint and sprinkle your rubble mixture on. Be sure to include bricks if you have them. Allow to dry thoroughly (at least overnight is best).

5. Once dry, simply paint the rubble itself. The wood can be stained with washes or diluted paint.


Bric-A-Brac or "Random Crap" Barricades
The most numerous example of urban barricades were those assembled from random items, including things such as streetcars and vehicles filled with rubble, paving stones, cable reels, rolls of newsprint, furniture, barrels, crates, sandbags....if it was large enough to provide some measure of cover and concealment, it's likely to have been thrown into a barricade at some point. Barricades like this pre-date the 20th century as well, being widely used during the French Revolution and (most famously) at the Battle of Rorke's Drift. By WW2 though, they needed to be able to withstand heavy caliber ammunition and tracked vehicles so, when lighter items were used, they were often filled with rubble, bricks, and stone and reinforced by placing heavy timbers or railroad ties into the ground behind them.

I could easily write instructions on how to precisely make a random barricade, but most of the fun is finding examples and assembling them yourself. Below are four of my completed barricades (as well as those listed above). As you can see, I used some old broken vehicles, some "pickle barrel" wooden shapes, 1/48 fuel drums, lasercut MDF squares (leftovers from some Sarissa buildings), bricks, etc.

Sandbags can be easily made by rolling out strips of epoxy putty, cutting them into equal pieces, and squashing them down in ordered rows. Cable reels can be made using a piece of circular wooden dowel as the center with two circular MDF bases sandwiched on either side. If you break, incorrectly assemble, or badly paint a vehicle, this is the perfect excuse to use it - just be sure to fill soft-skinned or civilian vehicles with rubble.

Whatever you do, just be sure your figures can see over the barricade in most places!


Thursday, October 4, 2018

Tutorial: Shattered Cityscape Basing


As much as I love cast resin bases, when purchased in a quantity of anything higher than a single squad, the cost becomes astronomical. This either forces modelers to spend exorbitant sums in order base their armies and/or keeps new modelers from spending much time or effort on their bases. Personally, base work is one of the aspects of modeling that can make or break a miniature, so I set out to make a cost-effective and reasonably approachable tutorial to make eye-catching bases with little experience.

Here's how you can make great Shattered Cityscape bases. The two most expensive items in this tutorial are the cork sheets and GW skulls - the latter being an optional addition that could easily be left off.

As always, practice responsible shop safety.


Materials Needed


  • A selection of bases
  • Thin cork sheeting (I used IKEA placemats)
  • Paperclips or copper wire
  • Sand/gravel/grit of appropriate size
  • 1/48 or 1/56 scale bricks (optional)
  • GW skulls (optional)
  • Other bitz (I-beams, plasticard, scale sandbags, etc.)
  • Propaganda posters/signs (optional)
  • Wire cutters
  • Needle-nose pliers
  • White and super glues
  • Gesso
  • Acrylic paints and washes (see below for appropriate colors)
  • Brushes
  • Flat clear spray sealant
  • Black spray primer

1. If you're using plastic bases, be sure to wash them in warm water with some dish detergent. Bases are produced in huge batches, which causes the producers to use a lot of mold release agent. If you don't wash it off, that agent prevents glue and paint adhering properly. Rinse and dry them thoroughly.

2. Rip off chunks of the cork sheeting. This will be used to mimic cracked concrete, so it's good to rip them into larger chunks first and then split those into smaller and smaller pieces that can be placed close together (leaving a gap of some sort) to resemble the irregular cracking of concrete under stress. Place portions onto bases and arrange them before gluing the pieces down with super glue.


It's a good idea to leave "open" spaces on some of the bases large enough to fit any sand/grit, bricks, skulls, or other bits. On every third base or so, I leave enough room to place one or two skulls. If you'd like, you can layer the cork to resemble thicker pieces of concrete or to provide a taller base for character figures.

3. Apply two coats of gesso over the top of the cork. Do not apply it to the ripped sides. This does two things - it seals the top of the cork making it more durable and provides a dried concrete texture to the undamaged top portions.


4. Glue any large bitz into the open spaces using super glue

5. Spread a 75/25 mix of white glue and water over the open portions of the base that remain and sprinkle some sand/grit over the mixture. Don't worry about covering these portions completely, you'll be doing a second coat. Let the glue dry for at least 2 hours (overnight is best).

6. Once dry, gently blow any excess sand away, then again using the 75/25 mix of white glue and water, cover the grit areas again, as well as some portions of the undamaged "concrete". It's a good idea to add in any bricks or smaller bits at this point as well. Let the glue dry for at least 2 hours (overnight is best).


7. Once dry, gently blow any excess sand away. Roughly bend your paperclips or copper wire using the needle-nose pliers and cut off small 3-6mm portions with a wire cutter. Realistically, even though the reinforcing metal rods called rebar are buried a bit deeper than what would be exposed on a 2mm high base, we add these for artistic effect (The Rule of Cool). Put a dab of super glue on the end of one of the pieces and stick it horizontally into the side of the cork, then mentally draw a straight line from one end of the base to the opposite and do the same there. It doesn't have to be exact. You should space the rows about 10mm apart.

Rebar is (generally) laid in perpendicular rows at right angles, so do another row or two on the other sides. If you miss a few, don't worry - not all the rebar will be exposed, On a 25mm base, I do about 1-3 rows total, so anywhere from 1 to 6 exposed ends. Larger bases get more rows and more exposed ends.


8. Prime with black spray primer. This may require several coats to get into the crevices between the concrete. I suggest doing a couple coats of spray primer and then finishing up with an airbrush loaded with black acrylic paint running at 15-20psi, if you have one. If you don't have an airbrush and can't get into the cracks, once the primer is dry, dilute black acrylic paint with water and flow improver and apply that as a wash into the deeper cracks.Let the primer dry for at least 2 hours (overnight is best).

9. Paint with acrylic paints, starting with the darkest color and working up to lighter colors. Here, I started with a Dark Gray color called (appropriately) Pavement and applied this to the entire base. I then added subsequent layers using a a mix of a custom "concrete" color (itself a mixture of light grey, beige and brown tones) in increasingly higher ratios (i.e. first 75/25 Pavement/Concrete, then 50/50 Pavement/Concrete, and so forth) until the last highlight, which was a pure Conrete color. I used semi-dry brush technique where I loaded the brush with paint and then wiped off the excess - not to the point where the brush was truly "dry", but to where the outside of the brush was slightly damp with paint.


10. Paint any details. Rebar has a dark brown to rust color and bricks come in a variety of reds, brown, yellows, and grey. I basecoat my skulls with a tan color called Golden Brown, then do successive semi-dry brush layers of Ivory. If you'd like, repaint the black ring around the lower base.

At this point, I also come through with a variety of washes; loading the brush up with a diluted mix of wash and water and just dabbing the brush randomly on each base. This adds a subtle variety of colors to mimic the effects of crumbling concrete, masonry, and other debris mixing together.

11. Once dry, seal with spray sealant. Allow to dry 6-12 hours.

12. If you'd like, find and print 28mm propaganda posters and cut out. Burnt posters can be replicated by using a lighter (after you've cut them out and before you glue them down!). Glue them down with white glue.


Obviously, you'll need to paint (or at least prime) your miniatures separately for this tutorial but it's easy enough to temporarily attach them to a figure holder, scrap wood, or spare base while doing so and then adding them later. 

Friday, March 16, 2018

Tutorial: Information/Propaganda Kiosks

A unique and visually-appealing piece of scatter terrain is an information or propaganda kiosk. These were common in European cities in the late 19th and early 20th century, being covered in advertisements, news, and propaganda posters, and sometimes housed telephones or informative guides. They ran the gamut in terms of shape and size from squares, hexagons, or cylinders; from the size of a single person to large structures that were buildings in their own right. 


Kiosks are quick and easy to make, provide a nice piece of LOS-blocking hard cover, and can be customized for use in games as diverse as historicals, moderns, post-apocalypse, or grimdark 40K/Necromunda. In trying to get terrain finished for Adepticon, for this tutorial I'll be making four for the latter.

Materials
  • Wood dowel/PVC piping (I'm using 1 3/4" wood dowel cut @ ~2" tall)
  • Metal washers (2 per kiosk, slightly larger than the dowel/pipe. I'm using 2" washers)
  • Plastic bases (2 per kiosk, one about the same size as the washers and another smaller diameter. I'm using 40mm rounded lip and small flying bases)
  • Cereal cardboard, cut into strips
  • Plasticard rod (for rivets. Not really necessary unless you want a gothic-industrial look)
  • Bitz 
  • Super glue
  • X-acto knife
  • Sandpaper
  • Paint
  • Advertising/Propaganda posters (sized appropriately for scale, do some internet searches and simply resize your printer output)

1. Cut the pipe or dowel to whatever size you want. I prefer somewhere between 1.5-2" tall to provide cover from elevated positions and for enough surface space to place lots of posters. You want to cut these pieces out at perfect 90 degree angles, so use a miter box or table saw. Rough up the metal washer with a piece of sandpaper for between adhesion and glue the dowel to the washer, looking at it from the top down to make sure it's centered correctly.


2. Repeat the process with the other washer at the top of the dowel, being sure to rough up both sides of the washer, since you'll be gluing bases to the top of it. Again, do you best to center the dowel properly.

3. Glue the larger base to the top of the washer to build up the "roof".


4. Glue the smaller base to the top of the large base (small flying bases fit almost perfectly inside a 40mm base, with just a little sanding around the outside of the flying base)


5. Glue the cereal cardboard strips around the top and bottom of the dowel. To get a proper fit, glue one end of the strip down, pull the strip around so it covers the glued end, then use a sharp X-acto to make a cut just before the glued end, and then proceed to glue the rest down.

For decoration, I used the winged skulls from the Cities of Death kits for the roof and plasticard rod in slices for rivets. You can you whatever bitz you'd like. Obviously, I'm going for a design suitable for the grimdark universe of 40K but you can easily change the design up to fit any period. Most historical examples before WW2 incorporate faux gothic or, more commonly, Art Deco features.

6. Prime and paint. Once dry, seal with flat clear varnish and then cut and apply the posters. It's up to you how you apply the posters, though I use white glue. If you'd like a more weathered look, you can "age" the posters by washing them with diluted black tea.


Wednesday, March 14, 2018

Tutorial: Quick and Easy Bronze Statues

It's Adepticon crunch time and that means repainting old terrain - one of which is this Deathwatch Marine I made years ago from an Inquisitor-scale Artemis and a plinth from an old Tamiya figure. I've done a lot of bronze statues over the years and people keep asking me about my methods so, along with the repaint comes a tutorial. I'll start out by saying that this statue is going to get the works, including heavy weathering. You can skip certain steps to make the statue look newer or less oxidized and I've denoted these steps by placing an asterisk before the number.

Materials needed:

  • A statue (if this is your first time, I recommend a scrap mini. If it turns out great, you've got a statue. If it doesn't, you didn't waste a great mini!)
  • A plinth (this is the stone or cement base the statue sits on. It can be anything from wood to plastic to old bitz. It should just look reasonably big enough to anchor your statue)
  • Black primer
  • 2 shades of Bronze paints (I use Tin Bitz for my dark base and Vallejo Bronze for my highlight)
  • Verdigris paint (I mix my own using mid-tones of green, blue and white but there are ready mixed colors on the market)
  • Vallejo Glaze Medium
  • Secret Weapon Cool Grey Wash
  • Off-White paint (for bird poop)
  • Black or VERY Dark Brown paint (for engraving text)
  • Colors for the plinth (I use Pewter Grey and Pure White)
  • Brushes (one for detail painting, one for washing, one for drybrushing)
  • Sponge


1. Prime your model black. Be sure to cover the model completely. All bronze statues have a black base color, so any bare metal or plastic will stick out if missed.


2. Heavily drybrush your dark Bronze color, covering all raised areas equally. It's OK to leave deep recesses a black color, for the reason I mentioned above.

3. Using your lighter Bronze color, lightly dryrush the higher areas and edges. It seems redundant but it will show through slightly, even with fairly heavy weathering.


4. Mix together your verdigris color and some of the glaze medium and cover the entire statue using the wash brush. You can vary the amount of weathering by varying the wetness of your brush - if the brush is fairly dry, weathering will be heavy; if it's wet, weathering will be lighter. Focus more weathering on the upper surfaces than lower, as rain causes more oxidation on upper surfaces.

5. Once the verdigris is thoroughly dry, wash the entire statue with SW Cool Grey Wash. 


6. While the wash dries, paint your plinth. Cover the entire plinth in your base color.

7. Using the sponge, stipple successively lighter shades unto the plinth. This is a quick and easy way to fool the viewer's eye into thinking its a stone effect. When finished, use a detail brush to highlight the edges with pure white.

*8. For a more heavy weathering effect, apply a second coat of verdigris glaze, applying it solely on upper surfaces. You can simulate drip stains by using the detail brush and applying the verdigris in vertical strokes, applying heavy pressure at the top of the "drip" and lightening the pressure towards the bottom "end".

*9. To simulate engraved text, apply horizontal squiggles of black paint for the text shadow. For the text highlight, apply horizontal squiggles of verdigris mixed with white immediately below the text shadow.


*10. To simulate bird (or other xenos avian) poop, dab off-white color in spots on the uppermost surfaces, applying drips in the same way as Step 8. You may add small lines of solid poop in some spots, but do so sparingly. Apply a glaze of off-white around each spot, especially in areas where spots are grouped together.

Friday, October 9, 2015

Tutorial: Bolt Action Order/Pin Dice Holder

Frustrated with remembering pins in Bolt Action? Want an easy way to keep track of pins and order dice? Build a simple dice holder to help!

Materials

  • Scrap paper
  • Milliput/Green Stuff/Epoxy Putty
  • Bolt Action Order Dice
  • 7mm Dice
  • Scotch Tape
  • X-acto Knife
  • Basing Material
  • Paint

I suggest wearing a pair of disposable nitrile gloves for this. I know some people are against wearing gloves when mixing putty (as the putty tends to stick to the gloves) but I recommend it.

1. Tape the piece of scrap paper down to your work surface. You'll use this to assemble the dice holders on so the putty doesn't stick to the work surface.


2. Place the scotch tape around the surface of each dice. This will keep the dice from getting putty stuck in the pips/words and will help keep the dice from sticking too much (they will still stick a little).


3. Mix the epoxy putty as directed on the package. Roughly 2oz. of putty (half a standard pack of Milliput) will yield about 10-11 dice holders. Break off pieces and roll into ~3/4" balls. Place the putty balls on the paper.


4. Using your index finger, push each ball down into a disc. Then, start pushing each dice into the putty, making a large indentation for the order dice and a small indentation for the "pin marker" dice.

Form the excess putty into a slope surrounding each die, trying to remove the "smashing hamburger" cracks in the edge.


5. If you want to use basing material, it's a good time to push any sand/gravel into the sloping edges.


6. To remove each die from the putty, wiggle the die back and forth, and then slowly lever it out. It's okay if you expand the the indentation a little (it makes putting the die in easier) just try not to mess up the slopes that actually hold the die in. Once you remove both dice, you may need to smooth out the interior of each indentation with your little finger.

Allow each holder to cure.


7. Once the putty has fully cured, remove each holder from the paper and shake off any loose basing material. Paint each holder as necessary.


Thursday, February 26, 2015

Tutorial: 15mm Telephone/Telegraph Lines

By the 1930s, much of Europe was criss-crossed with a wide array of telegraph and telephone overhead wires. Telegraph lines were common, usually accompanying the growth of railroads and their depot and maintenance buildings. As such, they could be found as far west as Portugal, as far south as southern Italy (there were even some lines in Egypt), as far north as northern Norway, and as far east as the Russian steppes.

Telephone lines were common in prosperous Western Europe, but grew increasingly rare the further south and east the fighting advanced. Whatever technology they used, communication lines were vital and important strategic assets to all armies. Usually located alongside roads and rails, often at the edges of cultivated fields, communication line poles quickly became rocky and overgrown. As such, they make great linear obstacles that provide useful concealment to infantry and AFVs alike.


Materials


  • Wide popsicle sticks ("tough depressors") - the thicker the better!
  • Bamboo sticks or wooden dowel rods
  • Thin basswood strips
  • Tiny round beads or plasticard rod
  • Wood glue
  • Construction adhesive (optional)
  • Sand, ballast, and small pebbles
  • Clump foliage
  • Static grass
  • Earth-tone acrylic paints
  • X-acto knife
  • Black nylon thread (optional)

1. The first step is to choose the basic shape and contruction of your poles. 99% of poles were simply tree trunks, denuded of bark with wooden line support crossbars nailed on (Some were treated with pitch or tar to make them relatively weatherproof, giving them a dark brown appearance). Some, especially at the end of lines (near a town or structure) had a wood support beam added to take the extra weight and pull of the lines (see the pics above for an example). The crossbars weren't always at the very top of the pole either - many lines were carried alongside the pole at various heights.

I should point out one exception to the above and these were the concrete poles and metal crossbars installed throughout northern France in the 1930s. These poles are very distinctive, having a ladder-like construction. From what I understand, these lines were installed because the high soil acidity rotted the wood bases, causing the pole to collapse (great soil for wine grapes, not so much for wood). There are some manufacturers of these poles on the market.


2. For this tutorial, I'm doing a very basic, common construction of one pole and one small crossbar at the peak.

Start by marking each popsicle stick at various intervals for where the main pole will be glued. Above I've divided each stick by thirds. You may divide each stick at whatever length you'd like. You may also want to sand down the edges of the popsicle stick so it blends in more evenly with the game mat.

3. Cut each bamboo stick into 2" lengths - these will be the main poles. Glue each pole on the popsicle sticks where marked and let thoroughly dry.

If you want shattered and broken poles, just snap the poles at various heights. Communication poles are thick and tough and will often not break completely. Often they will snap and hang to one side from several pieces of wood. If you do snap the pole completely, leave the top portion off the base until after the next step.

4. Once the poles are dry, spread a thick layer of construction adhesive on the popsicle stick and apply basing material. I place several small pebbles along each stick to represent large rocks and boulders farmers have pulled out of their fields and dumped along the edges. This also adds weight to the stick to help it stay upright.

If you have any damaged tops of poles, push them slightly into the basing material now.


5. If you find the bases warping too much (a little warping is OK, they will straighten out when dry), paint the underside of each base with acrylic paint. Allow the paint to dry. Keep applying more coats to even out the warping.


6. Once everything is dry, it's time to move unto the crossbar supports. I cut small (~10mm) lengths of basswood strips. I then cut small notches to flatten out one side of the top of the pole and then glued each strip at the top of each pole.


7. Paint the bases using whatever earthen-tone acrylic paints you'd like.

8. To accurately weather the poles, paint them using a combination of brown, grey, and black. I used artist's ink, but washes or watered-down acrylic paint is fine. Try to avoid areas where the pole has snapped or broken as much as possible - the inside wood  is often lighter in color.

9. Once the paint is dry, install the insulators. I cut very small lengths of plasticard rod and glued one on each side of the pole with CA glue. I did not bother painting them - many insulators were made of ceramic or glass, which was glossy in appearance. You can also use small craft beads. Common insulator colors included white (for ceramic or milk glass), clear green, clear red, brown, and black.

10. Add static grass and clump foliage to the base. The bases should like wild and overgrown, high enough to hide most infantry and conceal a good deal of most AFV hulls.

11. If you want, you can add wires using black nylon thread, glued around the insulators. You can also add road signs to the poles.