Showing posts with label Commission Work. Show all posts

Wednesday, October 21, 2020

Fast & Furious Gaslands Commission #2

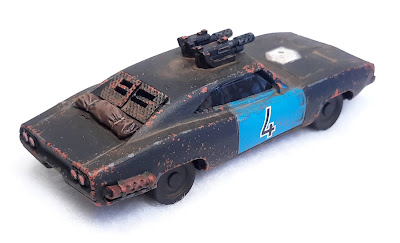
Two years ago I did a rather large commission for a client using the slightly larger 1/60 scale Fast & Furious cars as a base. The same client approached me again to do another team using similar cars i roughly the same style and I was happy to oblige. With the exception of the Halo buggy and Maisto rig, these are Mattel's larger F&F branded cars which make a nice basis for conversion.

As with last time, these cars were fully disassembled, stripped of paint, and converted using plasticard and bits. This time the client used Anvil Industry's fantastic set of Gaslands bitz which, after dealing with the poorly cast Ramshackle bitz from last time was a welcome relief. Painting and weathering are the same as the last project (a black base with rust and bare steel chipping effects) but the client asked for something to make these "pop", so they don't get mixed up with the older vehicles, so I decided to add turqouise blue to offset the orange rust (a very popular combination in marketing the last few years, especially movie posters).

And that's about all there is - a pretty straightforward project with the most time-consuming process being paint stripping.




Monday, September 14, 2020

Commission Project: Small Scale Islands


Hello again. After a long hiatus, I've finally been able to settle in and start some hobby work. This year has been filled with two house moves, changing states, a "pandemic", riots, lifestyle changes for my family, and just getting everything squared away with the new house. I will say, given everything that's happened, my family and I are in a good space and I hope yours is too. 


Thankfully, Fightin' Kentuckian was able to rouse me and refocus my skills with a commission, this time for two groups of islands - one representing tropical, and the other temperate (or subarctic) waters - for playing Warlord Games' Cruel Seas and Black Seas. The trick was to represent two very different climates without giving away scale differences between the two sets. For examples, I chose islands and features in the Caribbean and Baltic Seas. The Baltic is characterized by large weathered rocks, rocky "sandbars", and occasionally small clumps of woods where some tough seeds found a foothold. In contrast, the Caribbean is characterized by long low cays, mangroves, and high verdant hilly islands.


I started by cutting the bases using my scrollsaw set to 30 degrees - this bevels the edges toward the top (you just have to remember which side you're cutting!) making it easier to cut the insulation foam. Next, I mounted 1/2" thick foamboard on the cut pieces using Loctite General Purpose Adhesive (this comes in a tube and provides better grip and less warping than Liquid Nails) applied weight and let them cure for a full 48 hours. This helps prevent warping and gaps between the pieces. It's not foolproof, but it helps. Next I cut the terrain with a skinny utility knife, using the beveled edges as a guide. The hardest part was the sandy beaches, since they require a lower slope, that needed sanding with a dremel and more work to get the slope right. 


Once everything was cut, I sanded it down with 150 grit sandpaper and then applied spackling to remove any remaining gaps. After sanding once more, I began painting - the Baltic islands in cool colors (greys, etc.) and the Caribbean islands in warm colors (tans, browns, etc.). A lot of the key to getting terrain looking more "natural" is using a lot of different tones and colors and applying them via blending techniques (stippling, washes, etc.). I could do this with an airbrush, but I think the brush gives me more control and the finally look doesn't appear "airbrushed on" - a hard concept to convey, but you know that "look" when you see it. It also helps to add highlighting as elevation increases or terrain "dries out". You can see this in the Caribbean island sands especially - just like in nature, dry sand appears brighter than wet. 


Once painting was done, I applied multiple layers of flock, then static grass, then "flowers", then underbrush and sealed everything by spraying with scenery cement. As that dry, I cut the stands of woods. If you would like the technique,  I highly recommend checking out Grand Tactical Battle's scenery page - as I copied it from them. This was then inserted, glued, more underbrush was applied, and then sealed again with scenery cement. 


Since I don't have anything in this scale (especially not anything naval), I borrowed my son's Hot Wheels boat, which is nominally 5-6mm, to give you a better sense of scale.


That's it for now. What a way to get back into the swing of things. I should have more posts this month, as I have a bunch of half completed projects from last year to finish.

Friday, November 8, 2019

Shinto Temple Complex, Part Deux

Another month, another temple complex commission but this time for Fall-In. To be honest, I can't say there's much different here than the last one I did for Fighting Kentuckian, though there were some changes in color tone. Oddly, I also had issues with my vinyl filler material adhering to the wood - whether that had something to do with my filler or this batch of wood, I have no idea.

The walls this time are a flat off-white finish, while all the red lacquer is built up from multiple layers of Tamiya paints. I started by undercoating all the pieces in Flat Red, then added areas of shadow and highlight by adding in Purple and Orange respectively, and finally applied multiple coats of Red to really bring out a depth of color. Natural wood was done by using long strokes of various shades of tans, browns, and beiges running with the grain. Once given a light, slightly diluted coat of a mid-tone tan, this melds the colors and produces an effect that looks vaguely similar to wood. The pantile roofs were airbrushed with Tamiya Flat Black, then given multiple layers of a 50/50 mix of Tamiya OD Green and Dark Green, and finally highlighted with Olive Green. To give everything a more used look, I added Vallejo European Dirt Wash along the edges of roofs, along walls, and on upper horizontal surfaces.


The "stone" texture is achieved by applying multiple layers of gesso with a stabbing motion of the brush. Unfortunately, the base being MDF means that you have to apply a lot of gesso, but once that's dry it provides a nice rough texture without destroying any texture on the MDF itself. For example, on the gate and bell tower bases, there were lines showing the edges of the stone tiles. As the gesso shrinks, it does fill these lines, but taking a sharp Xacto blade and rescribing them was simple and didn't destroy the gesso either. Once dry, I applied multiple shades of medium through light grey paint, edge highlighting with almost pure white.

Tuesday, October 1, 2019

Shinto Temple Complex Commission

Recently I was contacted by the "Fightin' Kentuckian" to assemble and paint a small Shinto temple complex from Things From the Basement. He wanted a nice, clean look reminiscent of the product photos on their website and I dove right in with my usual gusto for terrain (several times he actually had to hold me back from going completely overboard adding little details and heavy weathering).

Having never assembled TftB MDF kits, I wasn't sure what to expect but I found them to be pleasant kits to work with. There are a lot of cleverly hidden joins, which meant less filling and sanding than I'm used to with other MDF kits. The "pantile roofs" are provided and cut from half sections of cardboard, sliced on the bias so that they bend to accommodate the curvature of the Asian-style rooflines. I particularly enjoyed making the small stone lanterns - these are kinds of tiny ornamental details I really like seeing in real life and on the tabletop - as they went together easily with a interlocking mortise-and-tenon assembly that required little to no glue.

Once all the sub assemblies were together, I went about painting everything. The walls are a pure satin finish white, while all the red lacquer is built up from multiple layers of Reaper Purple into Vallejo Flat Red. Black lacquer wood was done with a pre black basecoat, then successive highlights of Dark Pavement, then drybrushing (following the "grain" of the wood) with light grey and a little golden brown on the edges. Natural wood is done in a similar fashion but using beige and tan. The pantile roofs were airbrushed with Tamiya Flat Black, then given multiple layers of a 50/50 mix of Tamiya OD Green and Flat Black.

The "stone" texture is achieved by applying multiple layers of gesso with a stabbing motion of the brush. Unfortunately, the base being MDF means that you have to apply a lot of gesso, but once that's dry it provides a nice rough texture without destroying any texture on the MDF itself. For example, on the gate and bell tower bases, there were lines showing the edges of the stone tiles. As the gesso shrinks, it does fill these lines, but taking a sharp Xacto blade and rescribing them was simple and didn't destroy the gesso either. Once dry, I applied multiple shades of medium through light grey paint, edge highlighting with almost pure white. To tone down the transitions and give the stone a "dusty", ultra flat finish, I then washed it with Secret Weapon Concrete wash and applied some Vallejo Dirt wash around the base of each vertical piece.


Saturday, January 19, 2019

Commission Work: Soviet Tankovy Company (Part Two)

To go along with the Tankovy Company I completed in 2016, the client approached me and asked if I would add a platoon of Lend-Lease Lees and two platoons of KV-1s.

KV-1 base color is Testors Acryl Russian Armor Green (first time using this color and I love it!) with VMC Green Ochre stripes; detail washes with P3 Armor Wash and GW Green. Tracks are my usual Pavement Grey, washed with Testors Acryl Rust, then drybrushed with GW Boltgun Metal. Gunmetal parts are Pavement Grey, washed with P3 Armor wash, then highlighted Slate Grey. Tank crew wear my custom Telo Mimetico Blue, washed with GW Blue Ink; fleshtones in VMC Flat Flesh, washed with GW Ogryn Flesh.

Lees are basecoated in Tamiya Olive Drab, highlighted in a 50/50 mix of Tamiya Olive Drab & Olive Green, and edge highlighted with Tamiya Olive Green with a little White added, then the entire vehicle is washed with Vallejo Olive Green Wash. The Leess were kind of a bear to paint, simply because they had part rubber, part steel tracks. All rubber (including tires) is Pavement washed with P3 Armor Wash


Tuesday, November 20, 2018

Fast & Furious: Post-Apocalypse Edition Commission


This was a commission piece I just finished for use with the Gaslands rules. The client supplied me with a nice variety of Fast and Furious cars, two Matchbox buggies, and some Ramshackle motorcycles and asked me to do some conversion work, while finishing them off in a very simple Black, Steel, and Rust paint scheme for everything. The Fast and Furious vehicles are rather interesting in that they're a fair bit larger than Hot Wheels' and Matchbox nominally 1/64 scale, being about 1/60 scale, making the motorcycles look a little small (being are 20-18mm or 1/72 scale) but also making the buggies (both in 1/64) look correct. It's a trade-off that does work in this context. 


While the car exteriors were easy enough to paint, the crew and the motorcycles took the longest time, since the Ramshackle figures have a surprising amount of detail. Some are holding personal sidearms, some have utility pouches and backpacks, some have armor plating....the stylistic post-apocalyptic fashions are all here.

All in all, this was a quick little project that took about a week to complete and the results look good. Let's ride!


Monday, August 20, 2018

Commission Work: 6mm "Tau" Army #2

Following up on the heels of my last Epic-scale Tau commission, here's yet another one in the same scheme! The client wanted a very simple white-grey and red scheme. Like the last army, these are all Onslaught Miniatures "Okami Technocracy Combine" pieces taken from assembly through final painting.