Showing posts with label X-Wing. Show all posts

Friday, April 25, 2014

Tutorial: Painting a simple Planetary System Board/Mat

Materials Needed:

- Any playing surface suitable for painting (I used a 3x3' 4mm MDF board)
- Black spray paint (Flat)
- Matte spray varnish
- Acrylic paints
- Scrap paper (should be heavy and thick, able to take paint without disintegrating)
- X-acto Knife
- 00 or 000 brush
- Old toothbrush
- Airbrush (you can use a spray can but it will require more complex masking)
- Circular objects of various diameters (dishes, lids, etc.)


1. Using the black spray paint, spray the entire playing surface. Make sure you use a good quality paint brand that will withstand regular gaming abuse and storage.


2. Mount the playing surface and protect the surrounding area from paint spatter. Pour some white paint unto the scrap paper and dilute it VERY slightly with water. Get some white paint on your old toothbrush, paint should wick about 1/3 the way up the bristles. Do not overload the toothbrush with paint!

Note: Use an old toothbrush that still has stiffness on the bristles (see pic below) or the effect will be harder to achieve when you "flick" the paint in the next step.


3. Hold the toothbrush as pictured below. Apply very slight downward pressure on the bristles with your thumb.


4. Starting in one corner, hold the brush 4-8" from the surface and pull back on the bristles. This will "flick" the paint unto the surface as tiny specks. Hold the brush closer for larger specks and denser fields, further away for smaller specks and more diffuse fields. Do this to the entire board.


5. Pick out smaller stars with an 00 brush and by mixing different colors with the paint. Blue, yellow and orange are good choices.


6. You now have a simple starfield in 5-10 minutes.


7. Using your scrap paper, cut circular stencils of various sizes with common household objects (I'm using an overturned bowl below).

Note: If you are using spraypaint instead of an airbrush, you will have to use more scrap paper and smaller stencils. Be sure to mask any area you do not want paint on! Spray cans are under high pressure and will spray pigment far and wide.


8. Tape or hold the stencil tight to the surface and spray the first (darkest) coat of paint inside the planet stencil. Hold your airbrush further away in this step to guarantee a crisp, clean outline. Be aware of overspray.


9. Establish one corner of the surface as your planetary system's star direction. Still holding the stencil tight, apply progressively lighter shades of the base color in crescent-shaped patterns, with their middle towards the star's direction (see pic below).


10. If you want your planet to have gas or cloud streams, apply these in the same way, but in a generally perpendicular pattern to the surface. The clouds should be lighter on the planetside facing the system's star.

11. Continue these same techniques for other planets and their moons. Moons should have a slight to severe overlap of the "parent" planet but should not be completely centered on that planet.


12. Once all planets and moons are complete, using your 00 brush and white paint, outline the curve closest to the system's star to mimic zenithal lighting.


13. Seal your play surface with matte varnish.

Friday, January 3, 2014

Tutorial: How to REALLY Fix The X-Wing Lambda Shuttle....With Pictures!

CAUTION! This tutorial requires significant force and may result in breakage (of tools and/or miniature) or injury. Take good precautions, wear protective gear, and work slowly! I cannot be held liable for breakage or injury.

I was able to pick up a Lambda-class shuttle for FFG's X-Wing game over the holidays for about 1/3 the retail price. When I got the package, the mini itself looking amazing while in the box but, upon opening, I found out what so many of you already have - the wings don't fold down correctly. After reviewing the official FFG forums and hearing how FFG claims that the wings as provided are in the correct position, I'd first like to show how this is a load of bantha fodder. Observe:


Let's go to the videotape!

Shuttle Tydirium (RoJ film footage, 1983)

ILM Promo image (RoJ, 1983)

Lambda-class shuttle schematics (SW Technical Journal, 1994)

Lambda-class Shuttle card (Decipher Star Wars CCG "Endor", 1999)

Col. Jendon card art (FFG X-Wing, 2013)


The above images show that a near-90 degree orientation for the deployed wings is correct, and that (due to either poor design or bad manufacturing) the FFG miniature's stock wing orientation is incorrect. The pic below shows the correct angle after using the popular "pinch" method...which leaves a gaping 1mm wide gap in the fuselage sides.


In an effort to help others get it right, I volunteered my cheap Lambda miniature for experimentation. Had I paid full price, I probably wouldn't have gone in so blind (not to mention being rather angry at paying $30 for an incorrect miniature). So...let's fix it! You'll need the following:


  • An X-acto knife (preferably NOT the regular, light duty #11 model)
  • A thin, strong metal tool (preferably one you don't mind breaking)
  • Jeweler's files
  • Super glue
  • PATIENCE

I won't lie - this tutorial could potentially break the miniature. BUT, the plastic that molded the Lambda out of must have some sort of adamantium in it, because the only thing that broke during this entire tutorial was both my heavy duty X-acto blade and a metal file. Practice shop safety - wear eye protection and work in an area where broken X-acto blades won't be a safety issue.

Most importantly - Be Patient! This can be a time-consuming project that can get easily frustrating. Work slowly and take a break.

First, pull off the dorsal (top) fin by pulling it away from the body with steady, constant pressure. You should hear a sharp crack when the super glue holding it in breaks up.


Next, work your blade between the upper fuselage and the forward bulkhead, just over the bulkhead blaster cannons. Once about halfway inserted, start leveraging and wiggling the blade up and down. Do this to the other side as well.


Eventually, you should be able to work the pieces apart far enough that you can insert your larger metal tool. Continue leveraging the pieces apart with your tool. Be careful to avoid damaging the thin plastic of the upper fuselage overhang.


You may see the bulkhead tab that holds the cockpit tab secure inside the body. If you do, you've probably broken it away from the cockpit tab. Now you can remove the cockpit like you did with the dorsal fin - pull straight away from the body by applied steady, constant pressure. You may need to run your X-acto blade around the cockpit "neck" where it joins the forward bulkhead to break up the super glue there. The cockpit should come off, though you may break the internal cockpit tab. THIS IS OK (the internal tab is unnecessary when re-assembling the mini).


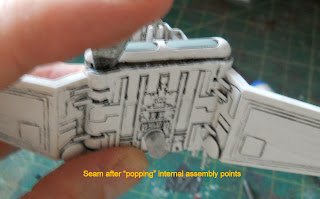
If you hear a hollow breaking pop when leveraging the forward bulkhead, congratulations - you just broke up one of the internal assembly points. Do this to the other side until you hear the same. The front half of the body should be noticeably easier to bend apart. STOP, turn the mini over....

And run your blade along the seam underneath the engines. Insert your blade into the seam and leverage under each engine separately (this is where the rear internal assembly points are).


After "popping" each rear assembly point, the body should now easily come apart. Cut down as much of the internal assembly points as you can.


The pic below shows the little tab that's caused all the problems. It's located just above the wing blaster cannons on the first strut. You'll notice that this tab is alinged parallel to the lower wing and prevents the wing from going to their correct orientation because it hits the internal tab inside the body. Remove this tab.


Clean up the paint, black wash, and mold lines inside the wing assembly and file down the inside of the wings closest to the body.


Clean up an excess super glue around the cockpit neck and dorsal wings. You may want to use this opportunity to remove any of the mold lines on the mini as well. When you're done, bend any pieces back into shape if they were deformed during deconstruction. Carefully seat the wings into their places and apply a THIN bead of super glue around the lower fuselage half. DON'T GET ANY ON THE WINGS!!! Join the fuselage halves together and hold until the glue is cured.


See? No gap anymore...


Apply super glue to the cockpit neck and re-attach. Apply super glue to the dorsal fin and re-attach. Congratulations on your corrected shuttle!