Showing posts with label Cheap but Fun. Show all posts

Tuesday, February 24, 2015

Snow-covered Woods

If I could give new gamers one tip for terrain making it would be this - always remember to check after-Christmas clearance sales for stores that sell hobby supplies and/or decorative Christmas collectible tchotchkes. The forest below cost me less than $20, was quick to assemble, and looks effective at multiple scales.

All the pine trees are "small" Lemax trees that came in packs of two. I got them at Menard's for less than $.070 each. As they are glued to large, heavy snow-covered bases, they required no effort to place. The forest bases themselves are made from beige felt (pine forests usually lack much undergrowth and are blanketed in dead pine needles, which are a beige-brown color), liberally spray-painted with black, brown, and rust red paint. I then cut irregular holes out of a piece of cotton fabric and glued the felt to it. When the glue dried, I added some static grass to the open sections.

The best part is all the trees and bases fit in a one gallon ziploc bag for easy storage.


Wednesday, February 18, 2015

15mm Cobblestone Roads

A quick post for today, nothing in-depth. I've been struggling with urban roads since I started the 15mm terrain project and ran across someone mentioning using faux patterned leather as stand-ins for cobblestone roads. Oddly, we had about 3 yards of good quality faux leather we'd ordered about 6 years ago for a home decorating project that never got done - bingo.

The hardest part was cutting everything to size and keeping the width consistent throughout. Lots of measuring, marking, and careful cutting. The base leather was plain black and I drybrushed a medium shade of the color I wanted, then did a highlight drybrush of a lighter color. I then flipped the leather over and painted the reverse side - this helps protect from the road warping (somewhat). I painted several sets - 1 2" wide set of beige cobbles (the set pictured below), 1 2" wide set of grey cobbles, and 1 3" wide set of grey cobbles.


Friday, August 15, 2014

Product Review: Tamiya 1/100 Me262 & Me163 kit

Since I'm looking to do a small expansion of my FOW German forces into the Ardennes offensive, I needed to find a nice model for the Me262 "Sturmvogel". I personally dislike Battlefront's underscale planes - they're noticeably smaller and run contrary to the "forced perspective" argument many of their supporters claim. The awesome Armaments in Miniature doesn't produce a 15mm version, so with some searching I found Tamiya's Me262A & Me163B combo kit. I paid less than $13 for the kit shipped from Evilbay.


Unboxed, the set is very simple and straightforward. Contents include 1 sprue for the Me163B, 2 sprues for the Me262A, a clear canopy sprue, 3 ball bearing "weights", a nicely sealed decal set, and instructions/painting guide.


Assembly is quick and easy - I assembled both planes in one sitting, while watching a movie with my wife. There are a couple sticking points though that do require careful attention. The Me163 wings (and the Me262 rear stabilizers) utilize a mortise and tenon joint - after cementing, you MUST look at each plane from the front elevation to be sure the wings dry at the correct angles (90° from the fuselage). For the Me262, be sure to dry fit the cockpit before gluing - it sits higher than what the instructions lead you to believe. Also, there will be gaps between the Me262 wing assembly and the lower fuselage and raised edges between the wing assembly and fuselage sides that will require filling and sanding (see pic below). Not terribly hard but annoying on a kit that's otherwise easy to assemble.


Take care when sanding certain gaps so as not to destroy raised panel lines or detailing. The Me262 model in this kit represents the the A-1 Schwalbe ("Swallow") version, which served as both a fighter and fighter-bomber, and retains its nose-mounted dorsal 20 & 30mm cannons. If you're a real stickler for historical accuracy, converting the model to the A-2 Sturmvogel version is as simple as filling in the dorsal nose cannons, as these were eliminated to save weight for the dedicated ventral bomb racks.


Here you'll see a size comparison with some BF German Grenadiers and an AIM 15mm Stuka. As you see, dimensions are nearly spot-on. For example, the Me262 had a wingspan of 41.5ft, just a hair under 5" in 1:100 scale and this kit has a 5" wingspan. In the pic above, I've mounted the Me262 pilot on the end of a sprue for painting and it's the same size as the BF Germans.

To mount planes for flight, I use the older 50mm GW clear flying bases. I use 2 of the longest pegs joined end-to-end with clear plasticard tubing and just drill a hole in the bottom of the fuselage of the aircraft for mounting. The Me163 is perfectly sized to be an awesome objective (the wingspan is only 5mm longer than a large FOW base) for either Axis or Allied forces.


Pros:

-Super-easy, quick build
-Two great plane models for less than the price of one resin plane
-Perfectly sized 15mm pilots
-Nicely detailed exterior
-Me262 can be used as either Schwalbe or Sturmvogel models


Cons:

-Lack of cockpit detail
-Prominent gap/raised edge between wing assembly and fuselage requires filling
-Raised panel lines on engines requires careful sanding

Wednesday, August 6, 2014

15mm French Country Chateau

Here's another cheap "Christmas Village" building repainted and converted for use in 15mm. This was initially a Victorian-style House from the 1995 Santa's Best Collection. Like the others, this is a solid resin cast building, so there's no interior and much of the foliage is cast on.....but you can't beat the price - $6 at the local Goodwill store. 


Thursday, May 8, 2014

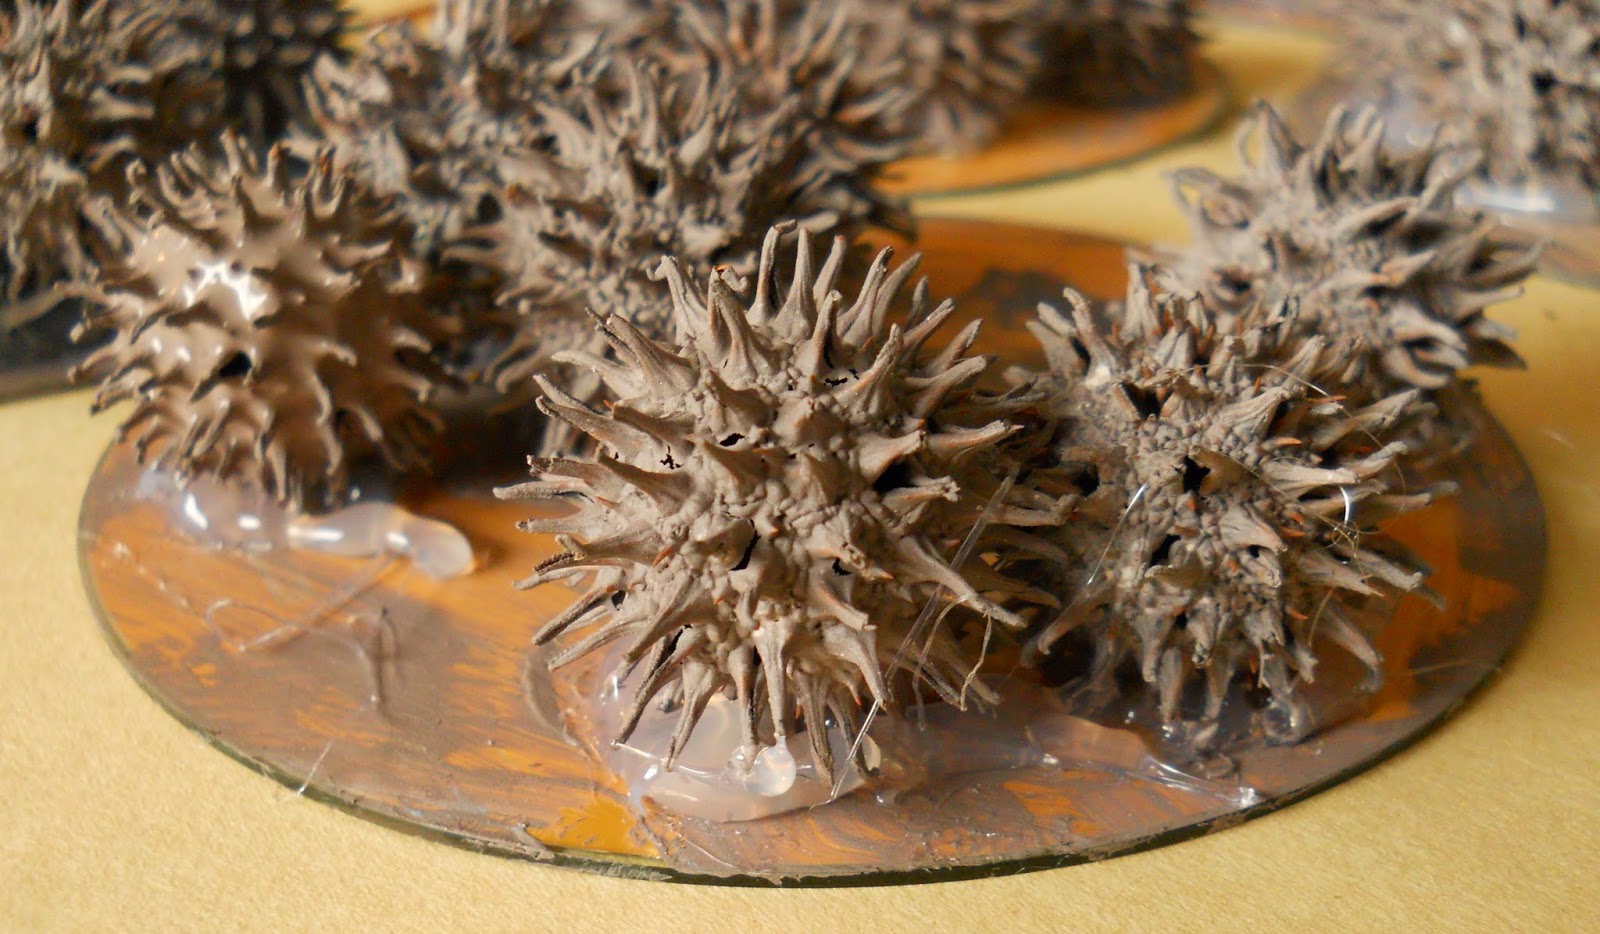
Tutorial: Alien Cacti/Bushes From Sweet Gum Seedpods

Now that the weather is warming up and the days are getting drier, 'tis the season for collecting the fallen seedpods of the Sweet Gum tree. While it's very common in the Southeastern US, I've found several in my local Northern Illinois neighborhood, so keep a sharp eye out even if you're outside its common range.

Materials needed:

-Sweet Gum tree seedpods (they must be DRY and hard, do not take pods that are soaking wet or soft)
-Suitable bases (I used old CDs)
-Acrylic Gesso
-Acrylic paints
-Hot glue & hot glue gun
-Basing material (I used natural sand & "burnt" static grass)
-Flat spray sealant
-Clippers or X-acto Knife

1. Collect fallen sweet gum seedpods. Ideally, you should collect them during a period of dry sunny weather when the pods have had a few days to dry out and harden. If this is not possible, let the pods dry indoors for several days. Do not collect fallen pods that are soaked or have been sitting in water.

2. After the pods have had time to dry, shake them thoroughly over a garbage can. A sawdust-looking material should fall out - these are the actual seeds. Try to be sure to shake them completely out.


3. Clip the long stems at the base of each seedpod with clippers, scissors, or an X-acto knife.


4. Mix gesso, acrylic paint(s) in the color you want your finished cacti/bushes, and a small amount of water. Don't over-do it with the water - you want the pods to be coated with the paint/gesso mix, not soaked in water.

5. Dip each pod in the paint/gesso mix until it is completely covered. Allow the pods to dry thoroughly for several hours before handling again. During this time, you should ready your basing material. Make sure your bases are large enough to accommodate several small "clumps" of seedpods, without any of the pods or spines sticking out over the edge. This will protect your pods from damage and extend their usability.


6. Once the pods are dry, ready your glue gun. Be sure the gun is HOT - if the gun is warm, the glue won't melt well and this process will be much harder. I recommend using a high-temperature glue gun for this but, if you don't have one, a low temp gun will work (but will take longer and require more glue for adhesion). Once hot, attach each pod to the bases.

Be sure to use enough glue to get each pod to adhere, while also making small "root ball" bumps around the base of each cacti/bush.


7. Basing as necessary. Here I covered the bases with a thick layer of tan acrylic paint, then shook some natural sand over the wet paint and let dry for several hours. This forms a nearly rock hard surface, as the sand bonds with the paint while it cures.


8. Seal with flat spray sealant and add any foliage. I just used some "burnt" static grass, since these are intended for a desert/ash wastes planet.


Wednesday, June 12, 2013

Tutorial: Making a 15mm Graveyard

Tools
-X-acto Knife

Materials
-Basing Material (MDF, etc.)
-1/2" Foamboard
-Sheet styrene and plasticard shapes
-Fencing material (see below)
-Sand
-Static grass, clump foliage


Step 1: Cut your basing material to shape and size. Glue down the foamboard and cut to size. Shape and slope the edges as desired.


Step 2: Using the ballpoint pen, mark the perimeter where the fence will be placed.


Step 3: Next, mark where each row of gravestones & markers will be placed. In the pic below, I'm using a medium FOW base as a rough guide to how large I want each aisle to be.


Step 4: Mark where you want the entrance and path up to the graveyard to be. In the pic below I've roughly laid out stone steps but feel free to use a simple rutted path, wide paved road entrance, or other suitable pathway, depending on the terrain you want to reproduce.


Step 5: If necessary, cut out your pathway. To make stairs, simply make one vertical cut (not too deep) and one horizontal cut (not too deep) on each line and pluck out the excess.


Step 6: Lay down your perimeter fence. In the pic below, I'm using various small stones and gravel to build up an un-mortared fieldstone wall. I start by laying down strong white glue on the perimeter lines and then placing one wide layer of single stones over that. After letting it dry, I lay down further subsequent single layers until the fence is at least waist high on a 15mm figure.

If you want a brick wall, simply cut a long rectangle of foamboard and using your ballpoint pen, mark out out brick on both sides. When done, glue this down.

If you want a simple wooden fence, you can use matchsticks for fence posts and either basswood strips or very thin wood coffee stirrers for fencing. Cut each post to size, leaving a little bit of extra to sharpen and push into the foamboard. Glue the posts in. When dry, cut the strips or stirrers to length and glue to the posts.


Step 6: Using plasticard and plasticard shapes, cut out different headstones and grave markers. Use Google Images to search for different kinds of grave markers that work fr your terrain. In the pics below, you'll see that I used simple cuts and various shapes to build all kinds of markers. Experiment and don't worry about making too much - you can use the excess in other projects or on bases!

Be sure to cut your headstones longer than necessary so you can sharpen one end. Push the sharpened end into the foamboard and glue.

If you want to make an open grave or two (don't over-do it!), simple make a rectangular incision into the foamboard next to a grave marker and pluck out the excess material. It actually looks more realistic if the bottom isn't perfectly flat.


Step 7: Texture, seal, and paint your graveyard. I didn't texture mine, sealed it with colored gesso, and then covered it with static grass and clump foliage.


Friday, November 30, 2012

CD-based Rock Outcroppings

In an attempt to use up the excess foamboard I had before another house move, I decided to try my hand at some more CD-based terrain with all the small off-cuts I had left. Initially, I'd only intended to make some desert-style outcroppings - almost like mesas - but had enough left over for some larger slate-type outcroppings.


The mesas are primarily intended for smaller scale games like Heavy Gear and FOW but could work for 25mm games like Legends of the Old West.


The slate outcroppings are primarily intended for larger scale games, since I worked natural-looking steps into each for figures to climb up and down on. These will work really well for the Necromunda tournament at Adepticon this year.


They can also work with smaller scale figures in a pinch.


Tuesday, November 13, 2012

Tutorial: CD-based Desert Oasis

 With the intent of creating a desert board for FOW, Heavy Gear, and Necromunda; I realized I needed more desert terrain. In another stunning moment of inspiration handling the best material available to scratchbuilders, it struck me - use CDs to make Oases! Here's how I did it.

Materials
- Old CDs
- Blue plastic or plastic painted blue (for pools)
- Gloss medium or "Water Effects"
- Sand
- Paint
- White glue or CA glue
- Static grass, long grass, & clump foliage
- Cheap plastic palm trees (look on Ebay or in cake decorations)
- Pennies

Tools
- Hot glue gun & glue sticks
- Sandpaper
- X-acto Knife

1. Using the sandpaper, rough up the playing surface of the CD. Don't use the labeled side (unless you first remove the label by scrapping with a knife). Remove any excess dust with a cloth (this helps ensure adhesion).


2. Cut out the rough shapes of the pools from the blue plastic with your X-acto knife. They don't have to be precise. Be sure to leave enough room around the edges to place some figures and penny-based trees (described later).

3. Heat up your glue gun and use it to attach the blue plastic "pools" over the center hole of the CD. When cooled, place a bead of glue around the perimeter of the pool (this builds up the "banks"). Don't worry about being precise.

Use the hot glue to build up small dunes and humps around the outer area (this helps the oasis look more natural when finished). Don't make too many or figures/trees won't be able to sit properly on the oasis.


4. When the hot glue has cooled, cover the entire CD - excluding the pool - with white glue or CA and pour a good helping of sand over that. Let it thoroughly dry for a few hours.

5. Once the glue is thoroughly dry, blow off any excess sand. Paint the sandy surface of the oasis with a heavy coating of paint in a "desert-like" color and before the paint dries, sprinkle another good helping of sand over it. Let thoroughly dry overnight.

This is a good trick to learn for other terrain projects. As the paint cures, it will bind together and the sand will bind with it. This makes for a wonderfully durable playing surface without having to use a ton of CA glue or sealant.

6. The next day, blow off any excess sand. Glue static grass throughout the sandy portion of the oasis. For a natural look, cluster more foliage around the pool itself and get sparser towards the edges. Place some long grass tufts at the edge of the pool and glue a couple clump foliage bushes around the perimeter of the pool.


7. Here's the trickiest part of the process (and the one I managed to screw up, if you look closely).

Once all the foliage has dried, begin building up the pool itself with gloss medium. Pour the gloss medium in the center of the pool slowly. Using a wet brush, carefully spread the medium around and let dry away from direct light or heat. The gloss medium will spread out in a thin layer and create depth to your pool. You can do as many thin layers as you like, but even one layer can be effective.

Lots of specialty mini painting companies sell a product called "Water Effects". All this is Gloss Medium in a smaller package with a 200% markup in cost. Any good art store sells gloss medium in small, medium, and huge bottles. I have a (IIRC) 200ml bottle of Winsor & Newton Gloss Medium that cost me $8 and this project used about 1/20 of the total bottle. So gloss medium goes a long way for the money.

Be aware that gloss medium CAN be tinted with inks and washes....and this is where I messed up. Don't add too much ink to the medium. My first layer was heavily tinted with blue ink and the long grass tufts sucked it right up....so now my long grass has blue creeping up it!

Also, don't try to pour a deep, thick layer of gloss medium (my second mistake) or it won't cure correctly, forming large cracks in the middle that will need to be filled in. Take your time!


8. The oasis itself is done (unless you want to seal it). To make the individual tree stands, heat your hot glue gun. Cut the palm trees trunks at different lengths for a more natural look (trees don't all grow the same height!) and attach to pennies with hot glue. To cover the bases, dip each into the same paint you used for the oasis, up to where the hot glue ends, and then immediately dip into fine sand and set aside to dry.