Showing posts with label Historical. Show all posts

Thursday, December 20, 2018

Tamiya 1/25 General Patton figure

In a flurry of last minute activity, I was able to complete this General Patton figure as a Christmas gift for my Grandfather. This is an ancient 1/25 Tamiya plastic figure from my late Great Step-Uncle's collection. As such, it's not the most dynamic or finely-detailed miniature but it was fun to put together and try to come up with a suitable pose. I'm not entirely sure how historically accurate this uniform (or the colors I chose are) for Patton's time in the European Theatre. While I tried to find out as much as I could via online sources in the limited amount of time I had available, there isn't that much information about his uniform out there. As such, this is mostly a "best guess" and I'm sure the button counters out there may have a different interpretation. 


As this is a gift, I mounted the figure on a larger base than I normally would so that it would fit securely in the tiny "display case" I chose - this being a small Amac box from the Container Store. This allows the figure to be able to be displayed without having to be put in a dedicated display case or dusted regularly, as well as making it easier to handle.


Friday, May 18, 2018

Eastern Woodland Indians


I finally finished a group of Warlord/Conquest Eastern Woodland Indians that had been sitting in my paint queue for (no exaggeration) over a year now. I bought this set after flipping through a copy of Sharpe's Practice with the intention of making a French and Indian War army. Of course, my attention span being what it is, I moved on to other things and left this group sitting in the back of the painting tray. Additionally, My apologies once again for the almost 2 month hiatus in posts here. Between post-Adepticon burnout, my birthday, and the usual work/family craziness; there hasn't been much time for hobbying or gaming. I should have some more projects coming later this month.

In any case, this was really just an exercise in doing some Native American skintones, which I've never been much good at. In my opinion, it's much more difficult to get a really eye-catching skintone in darker shades, which really speaks to the skill of those who can do so and is likely the reason many amateur figure painters shy away from the subject. With this tone I started with a Vallejo Red Leather base, highlighting that with successive mixtures of Vallejo Orange Brown and Vallejo Skin Shadow, with a GW Fleshshade wash over it. The "stubble" effect on their shaved scalps was achieved using a midtone Grey mixed with Vallejo Glaze Medium. The "warpaint" was achieved using thin diluted coats on paint in various colors, with only one or two coats for coverage.

Their clothing is a hodge-podge of various colors, with browns and reds featuring prominently. Normally, I would add some wood-grain effect to their weapons, but I really wanted a worn, darkened wood so I left out the wood-grain and stuck to highlights in dark browns and umbers, with a wash of P3 Armor Wash. As I wanted to make this group look like it was crossing a fen or grassy marsh, the bases are in browns, tans, and greens with tall grasses and low patches of flowering shrubbery.

I'm not sure if I'll ever get around to the rest of the force, but these guys were fun to paint and a nice departure from my normal projects. 


Friday, March 16, 2018

Tutorial: Information/Propaganda Kiosks

A unique and visually-appealing piece of scatter terrain is an information or propaganda kiosk. These were common in European cities in the late 19th and early 20th century, being covered in advertisements, news, and propaganda posters, and sometimes housed telephones or informative guides. They ran the gamut in terms of shape and size from squares, hexagons, or cylinders; from the size of a single person to large structures that were buildings in their own right. 


Kiosks are quick and easy to make, provide a nice piece of LOS-blocking hard cover, and can be customized for use in games as diverse as historicals, moderns, post-apocalypse, or grimdark 40K/Necromunda. In trying to get terrain finished for Adepticon, for this tutorial I'll be making four for the latter.

Materials
  • Wood dowel/PVC piping (I'm using 1 3/4" wood dowel cut @ ~2" tall)
  • Metal washers (2 per kiosk, slightly larger than the dowel/pipe. I'm using 2" washers)
  • Plastic bases (2 per kiosk, one about the same size as the washers and another smaller diameter. I'm using 40mm rounded lip and small flying bases)
  • Cereal cardboard, cut into strips
  • Plasticard rod (for rivets. Not really necessary unless you want a gothic-industrial look)
  • Bitz 
  • Super glue
  • X-acto knife
  • Sandpaper
  • Paint
  • Advertising/Propaganda posters (sized appropriately for scale, do some internet searches and simply resize your printer output)

1. Cut the pipe or dowel to whatever size you want. I prefer somewhere between 1.5-2" tall to provide cover from elevated positions and for enough surface space to place lots of posters. You want to cut these pieces out at perfect 90 degree angles, so use a miter box or table saw. Rough up the metal washer with a piece of sandpaper for between adhesion and glue the dowel to the washer, looking at it from the top down to make sure it's centered correctly.


2. Repeat the process with the other washer at the top of the dowel, being sure to rough up both sides of the washer, since you'll be gluing bases to the top of it. Again, do you best to center the dowel properly.

3. Glue the larger base to the top of the washer to build up the "roof".


4. Glue the smaller base to the top of the large base (small flying bases fit almost perfectly inside a 40mm base, with just a little sanding around the outside of the flying base)


5. Glue the cereal cardboard strips around the top and bottom of the dowel. To get a proper fit, glue one end of the strip down, pull the strip around so it covers the glued end, then use a sharp X-acto to make a cut just before the glued end, and then proceed to glue the rest down.

For decoration, I used the winged skulls from the Cities of Death kits for the roof and plasticard rod in slices for rivets. You can you whatever bitz you'd like. Obviously, I'm going for a design suitable for the grimdark universe of 40K but you can easily change the design up to fit any period. Most historical examples before WW2 incorporate faux gothic or, more commonly, Art Deco features.

6. Prime and paint. Once dry, seal with flat clear varnish and then cut and apply the posters. It's up to you how you apply the posters, though I use white glue. If you'd like a more weathered look, you can "age" the posters by washing them with diluted black tea.


Wednesday, March 14, 2018

Tutorial: Quick and Easy Bronze Statues

It's Adepticon crunch time and that means repainting old terrain - one of which is this Deathwatch Marine I made years ago from an Inquisitor-scale Artemis and a plinth from an old Tamiya figure. I've done a lot of bronze statues over the years and people keep asking me about my methods so, along with the repaint comes a tutorial. I'll start out by saying that this statue is going to get the works, including heavy weathering. You can skip certain steps to make the statue look newer or less oxidized and I've denoted these steps by placing an asterisk before the number.

Materials needed:

  • A statue (if this is your first time, I recommend a scrap mini. If it turns out great, you've got a statue. If it doesn't, you didn't waste a great mini!)
  • A plinth (this is the stone or cement base the statue sits on. It can be anything from wood to plastic to old bitz. It should just look reasonably big enough to anchor your statue)
  • Black primer
  • 2 shades of Bronze paints (I use Tin Bitz for my dark base and Vallejo Bronze for my highlight)
  • Verdigris paint (I mix my own using mid-tones of green, blue and white but there are ready mixed colors on the market)
  • Vallejo Glaze Medium
  • Secret Weapon Cool Grey Wash
  • Off-White paint (for bird poop)
  • Black or VERY Dark Brown paint (for engraving text)
  • Colors for the plinth (I use Pewter Grey and Pure White)
  • Brushes (one for detail painting, one for washing, one for drybrushing)
  • Sponge


1. Prime your model black. Be sure to cover the model completely. All bronze statues have a black base color, so any bare metal or plastic will stick out if missed.


2. Heavily drybrush your dark Bronze color, covering all raised areas equally. It's OK to leave deep recesses a black color, for the reason I mentioned above.

3. Using your lighter Bronze color, lightly dryrush the higher areas and edges. It seems redundant but it will show through slightly, even with fairly heavy weathering.


4. Mix together your verdigris color and some of the glaze medium and cover the entire statue using the wash brush. You can vary the amount of weathering by varying the wetness of your brush - if the brush is fairly dry, weathering will be heavy; if it's wet, weathering will be lighter. Focus more weathering on the upper surfaces than lower, as rain causes more oxidation on upper surfaces.

5. Once the verdigris is thoroughly dry, wash the entire statue with SW Cool Grey Wash. 


6. While the wash dries, paint your plinth. Cover the entire plinth in your base color.

7. Using the sponge, stipple successively lighter shades unto the plinth. This is a quick and easy way to fool the viewer's eye into thinking its a stone effect. When finished, use a detail brush to highlight the edges with pure white.

*8. For a more heavy weathering effect, apply a second coat of verdigris glaze, applying it solely on upper surfaces. You can simulate drip stains by using the detail brush and applying the verdigris in vertical strokes, applying heavy pressure at the top of the "drip" and lightening the pressure towards the bottom "end".

*9. To simulate engraved text, apply horizontal squiggles of black paint for the text shadow. For the text highlight, apply horizontal squiggles of verdigris mixed with white immediately below the text shadow.


*10. To simulate bird (or other xenos avian) poop, dab off-white color in spots on the uppermost surfaces, applying drips in the same way as Step 8. You may add small lines of solid poop in some spots, but do so sparingly. Apply a glaze of off-white around each spot, especially in areas where spots are grouped together.

Sunday, December 17, 2017

15mm Beutepanzer T-34(r)

I'm currently in the middle of doing another commission, so I decided to finished painting a single tank in a day while I waited for the primer to dry on the commission project - a PSC T-34(r) beutepanzer. This is actually a mini I had originally modeled and painted about 4 years ago that I was never really happy with, so last year I stripped it down and added the rear deck bins and a german cupola to the 76 turret. It then sat in on my painting table since last month. The biggest problem was finding the large, thin balkankreuz that were liberally applied to T-34(r) turrets to reduce the chances of friendly fire. The solution came in the Rubicon 1/56 scale Opel Blitz decal sheet, which has large numbers of them.

The mini itself is based in Tamiya Dunkelgelb, with vertical drybrushing done in 50/50 DG and pure white to mimic rainstreaks and worn edges. I then used a sponge with Testors Russian Armor Green to represent chipping of the DG down to its original color. I then used Vallejo Dark Yellow wash as a filter over the entire model, finishing out the tracks in Pavement drybrushed with steel and washed with Vallejo Dark Rust Wash. As I wanted to paint this in a day, I declined to do my usual oil washes and opted instead for some Vallejo Environmental washes around the engine deck and some dry pigment to mimic road dust.


The panzer officer on this mini is probably the best I've done in 15mm. He is basecoated in Pavement, highlighted with a 50/50 mix of Pavement/Pewter Grey, and then washed in P3 Armor Wash. Shoulderboards and piping are picked out in Tentacle Pink, and headphones in Territorial Biege. Flesh is Vallejo Basic Skin, washed with GW Flesh Wash, then highlighted again with Basic Skin.


Saturday, November 11, 2017

Eastern Front Terrain: Signs and Telegraph Poles

A quick post for today, this time some scatter terrain for the Kursk Village I completed last year. I wanted to add a little more character to that board, as well as take a small diversion from the large commission I'm working on. The telephone poles have been laying around my terrain stash since post-Christmas clearance last year and they're actually fairly nice with weighted "snow" bases; it's just that they didn't really fit in anywhere. So I mounted them on 25mm washers, built up the base with vinyl spackle and sand, and painted and flocked them. I added the roadsigns by gluing basswood on the poles, which are just drybrushed and washed - not fully repainted. 


The roadsigns are just some extra MDF bases I had laying around with basswood signs added. They are based, painted, and flocked in the same manner as the poles. All the signs are handpainted and, likely, incomprehensible gibberish as I copied them from 1/35 roadsigns.


Thursday, November 2, 2017

VBCW/Seelowe Terrain: Destroyed Terrace Houses & Statue

Finishing out the collection of buildings for the VBCW/Seelowe board, I went with a more damaged look, using Sarissa's Destroyed Corner Pub, Terrace Shop, and two Terrace Houses. As with the other Sarissa buildings, to make them look a bit more realistic, I added cereal box shingle roofs and chimney stacks from metal tubing. I then mounted each on 2mm MDF with about 1.5" in the front for a sidewalk and about 4-6" in the back for a small yard. The pub had the most improvements though as I built out the sign and facade using MDF and basswood.

I painted them (before assembly - which, pro-tip, is MUCH easier) using a Walmart branch chalk paint to give them some "tooth". Each house has it's own molding and door color, again using cheap craft paint (I rarely use hobby paints for terrain). I also picked out the nice base brickwall detail in red-browns and used a dark gray color to pick out the small cracks in each house's facade. I also airbrushed the base and used a midtone green to even out the bright tones in the scrubber hedges and provide more uniformity.

The statue is one I did here, just re-based to blend in better with the rest of the board and with a low decorative hedge added.

That's it for now! Tomorrow I'm off to Operation Sting where this board gets its first outing....


Tuesday, October 31, 2017

VBCW/Seelowe Terrain: Sarissa Terrace Houses

Continuing on from yesterday's post on the industrial terrain, we move onto to the intact houses. As I mentioned previously, each of these houses was initially purchased for a commission piece that fell through and I decided to re-use them for the VBCW board. Each of these are the terrace houses (with the exception of the single story portion I scratchbuilt) from Sarissa Precision's Europe at War line and are really nice base models. They are super cheap (about $10-20), assemble well, have cardboard shutters/doors/moldings, and provide just the right amount of modularity to be able to mix and match separate sections if you wish. If I had ne complaint about them, it's that the "pins" the hold each level together fit very snugly - even when unpainted - so they have to be shaved down a bit to provide easy access to the interiors during play.


To make them look a bit more realistic, I added cereal box shingle roofs and chimney stacks from metal tubing. I then mounted each on 2mm MDF with about 1.5" in the front for a sidewalk and about 4-6" in the back for a small yard. Some yards have small victory garden plots (barren; to reinforce that besieged feeling) made from basswood and filled with vinyl spackling. Others have small Anderson shelters (premade home bomb shelters made from corrugated metal, half buried in a yard and then covered in earth) made from cardboard tubes and cardboard corrugation.


I also wanted the yards to be functional on the tabletop, so each is surrounded by a linear obstacle of manicured hedges. Like those on my Normandie board, they are made from green kitchen scrubbers, cut to size, with imperfections added and edges rounded off. I then hot glued them to the board and added texture with sand. For the paths, I used Happy Seppuku's Cobblestone pattern maker and HO scale talus for the gravel paths.

I painted them (before assembly - which, pro-tip, is MUCH easier) using a Walmart branch chalk paint to give them some "tooth". Each house has it's own molding and door color, again using cheap craft paint (I rarely use hobby paints for terrain). I also picked out the nice base brickwall detail in red-browns and used a dark gray color to pick out the small cracks in each house's facade. I also airbrushed the base and used a midtone green to even out the bright tones in the scrubber hedges and provide more uniformity.

I also finally found the perfect technique for painting rustic weathering shingling. First, basecoat with the very darkest color (here, it's Pavement). Second, drybrush a midtone color using downward vertical strokes, then once dry, repeat with the midtone using upward vertical strokes. Lastly, keep adding successively lighter tones by drybrushing upward (you also want to hit the roof peak with a subtle line of lighter tone). It seems really counter-intuitive but, trust me, it works.


Friday, August 18, 2017

Statue Scatter Terrain

Even with the current hysteria surrounding statues here in the US at the moment, it was actually by complete coincidence that I finished these pieces this week. I recently came into possession of a lot of modeling stuff since a distant relative passed away who was also a long-time historical modeler. Among all the different models, were a small collection of 54mm figures that were rather old and not very well cast, so I decided to give them a new lease on life. I cleaned each of them up, cut up some wood for plinths, and put them all together.

To paint them, I tried a very different technique than the one I normally use, most recently on my Hungarian statue. This time I primed the plinths with gesso and used a tan-colored chalk paint for the color and texture, highlighting with white mixes, washing with Vallejo European Earth, and finally adding some light earth color with a dry pigment wash of Yellow Earth. The statues themselves were primed grey, basecoated in Pavement grey, with successive drybrushing of a blue-green paint mix. Unlike most earlier statues, I tried to to leave the dark grey base showing through in areas of shadow and focused the verdigris more on the blue side of the color wheel. What really helped was a good wash of Secret Weapon Cool Grey which helped to mellow the colors (which I also carried into parts of the plinth to imitate weathering). I also added some whitish discoloration on horizontal surfaces to simulate the effects of bird poop. All in all, I really like the final effect and will use it going forward.

Included in the set are two Napoleonic statues, an American Revolution statue, a Confederate soldier statue, and a Spanish-American War soldier statue.


The two statues below (one Spanish-American War, one Napoleonic) are for sale for $25 each. Drop me an email if you're interested in buying one or both.


Friday, July 7, 2017

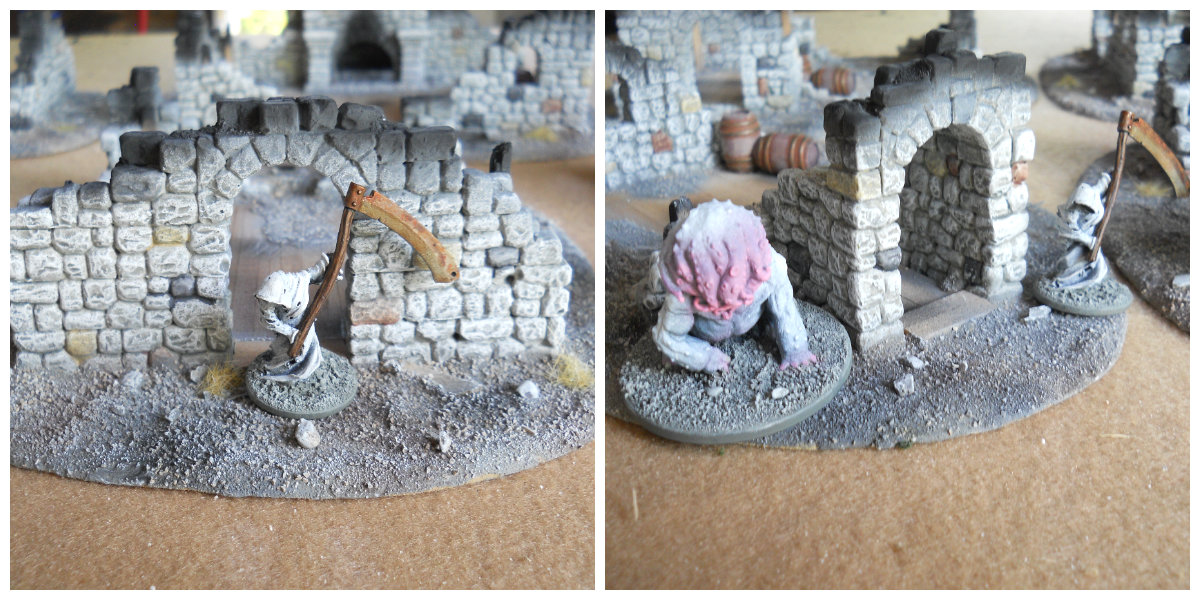
Frostwallon Terrain - Burnt Out Ruins

I've wanted to try my hand at doing some terrain using Hirst Arts molds for years, probably as far back as when I first started gaming, but I always balked at the pricing. Luckily, I have a friend with a nice collection of them who let me borrow a couple to try out. Using Fieldstone Molds #70 & 75 (and Tile mold #200, which I eventually plan to use for a sewer board), I cast up about 4lbs. of a 50/50 mix of Plaster and Rock Putty and put together a bunch of ruined buildings. After casting, I assembled all the pieces using construction adhesive, cut out some MDF bases, and added basswood floors and rubble piles. Once dry, I undercoated everything with flat Grey latex paint, as recommended on the Hirst site. I then used various shades of greys, browns, and tans to add some variation in color. Though I like the end product, the casting process was really labor intensive and (coupled with drying times) was quite time consuming. If you are interested in using Hirst molds, here are a few pointers I learned:
  • Use a plastic or disposable container to mix the plaster that can be bent to pop out any dried plaster before the next mix
  • Rock putty is a good cheap alternative to dental plaster but is too brittle alone. Mix with equal parts of regular plaster.
  • Mixing the plaster too fast causes excess air bubbles to develop
  • While lightly tapping the molds helps, I found having a toothpick on hand (to stir the plaster inside each mold and to pop any bubbles) was better
  • Even after allowing the plaster to dry before demolding, let it dry it for 24-48 hours before trying to build with it
  • Construction adhesive is awesome for locking bricks together
  • Latex paint can be bought in small "sample" jars and tinted any color you want. Check your local hardware store.

The intent was to use them for Frostgrave, but I left out any snow or elaborate fantasy bitz, so they could also be used historical or even science fiction gaming.