Showing posts with label Historical - Modern. Show all posts

Sunday, December 18, 2022

Paint Queuemas Day 6: US Army in MOPP Gear

"On the sixth day of Paint Queuemas..."


Today's entry is another group of Eureka Miniatures - some 28mm US Army in MOPP Gear. This is a great range of figures with a lot of variety beyond even those I have here. If I had one criticism, it's that the mold lines are kind of tricky to see and remove because they often run along seams, pockets, etc.


This is another bunch of miniatures I've done using zenithal priming and glazing. The fatigues are done by painting one coat of Dark Green ink, then a coat of GW Camoshade, and then I applied blotches Vallejo Medium Brown and Medium Olive, then did a final wash of Camoshade to tone the transitions down and blend it all together. Yes, I know this isn't true US Army woodland camo as it lacks black but I decided against including it since it didn't look nice and took away from the shading. All the webbing is Reaper Worn Olive, washed with a coat of GW Camoshade.


Doing the flesh was surprisingly easy, as I opted to simply paint the brows and cheeks with Vallejo Flat Flesh, and then washing it with a heavy application of Fleshshade and Sepia. Once I filled the lenses with Testors Canopy Glue after sealing, it gives the effect of deeply sunk eyes inside a hood. Gunmetal was done with basecoat of Dark Grey and a coat of Black ink.


As I wanted to go with a post apocalyptic "Twilight 2000" vibe, I kept the bases very sparse of vegetation, opting solely for rocky soil using a variety of craft paint. I did not include much dirtying of their fatigues, as I wanted to give the impression that they'd just been deployed or airdropped somewhere.


Stay tuned for tomorrow's post!


Friday, December 16, 2022

Paint Queuemas Day 4: "The Beast", Soviet Tankers


"On the fourth day of Paint Queuemas...."

And now for something completely different. It's been years since I've painted a unit of true 28mm miniatures, so I decided to add to my burgeoning Cold War collection with this Soviet tank crew from Eureka Miniatures that are definitely NOT based on a certain action movie from 1988 😉.

To speed up painting, these are zenithal highlight primed and then painted using glazing. For the khaki uniforms, I applied one coat of thinned Vallejo German Camo Beige, and then two diluted coats of GW Earthshade. The helmets, gloves, and boots are thinned Vallejo Leather Brown, covered with two diluted coats of Secret Weapon Soft Body Black. Because there's so much brown, I wanted something to offset that, so I chose to paint the gasmasks in Vallejo Golden Olive, which was then given one coat of Dark Green ink wash and then two coats of GW Camo shade.

The gunmetal is Dark Grey craft paint, with two coats of Soft Body Black over that and the bakelite AK parts are Vallejo Orange Brown, washed with GW Sepia. Lenses are Vallejo Light Turquoise with a Blue ink wash and buckles are AK Gunmetal.

I painted the bases uses multiple light coats of earth toned craft paint. To get the dusty boot effect, I dampened the figures boot with a clean brush and let the craft paints "bleed" unto it via capillary action. Then, when I did the final highlight, I did a light dry brush over the soles and front of each boot. A very easy and convincing effect!

Finally, I sealed them all and added some Testors Canopy Glue to the mask lenses. Cool little squad, now I just need to pick up the Rubicon Models T-55 tank for their ride!

Thursday, August 30, 2018

Soviet Motorized Infantry in Afghanistan


I recently finished up more miniatures that had been sitting half complete in the paint queue for months now, this time some of Eureka Miniatures' Soviet Motorized Infantry. I had started in on the flesh and blocking in colors when these were delivered and set them aside, only to collect dust. I'm glad I picked them up again to finish because, like most of Eureka's works, the detail is super crisp and a joy to paint.

The most iconic part of the Soviet uniform in Afghanistan was the KZS jumpsuit, which was simply a light camouflage overall worn over the soldier's BDU. To go along with my Soviets in NBC suits (see below), I wanted the squad to have a bold colored KZS of olive green and desert sand. I used Vallejo Medium Olive and progressively highlighted it with Vallejo Light Olive, then I washed it with diluted GW Earthshade, then highlighted the high points of folds with a 50/50 mix of Light Olive and white, then did one more washed of diluted GW Earthshade. The "splotches" are done by blocking out each one with Reaper Faded Khaki and then painting the inside of each with Reaper Amber Gold, leaving a tiny rim of Khaki visible. This helps to blend camouflage patterns into the garment. I finished with yet another wash of GW Earthshade, but only in the recesses of folds to help blend in the splotches.

Flak vests, bags, and chest rigs are all Vallejo Russian Uniform, highlighted with white to help them appear faded from constant use, all once again washed with GW Earthshade (I'm really starting to love this wash...). Flesh here is my normal process - a base of Vallejo Medium Flesh, progressively highlighted with Vallejo Flat Flesh, and finally Basic Skintone, then washed with GW Fleshshade. Gunmetal is done in Vallejo Dark Grey, highlighted with a 50/50 mix of Dark Grey and Vallejo Grey Blue, and washed with P3 Armour Wash. As I shoot more in my personal life, I'm getting a better sense of what truly weathered, "blued" gunmetal looks like and I think this recipe is fairly close to reality. The wood furniture is Vallejo Brown Leather with some Brick Red mixed in and the iconic bakelite magazines are Vallejo Red Leather; both are washed with GW Fleshshade.

The bases are Territorial Biege, highlighted in Khaki, drybrushed in Vallejo Desert Sand, then washed with diluted layers of Secret Weapon Sewer Water. The bricks are simply washed in diluted Brick Red and a mix of arid-style grass is applied.


Special Weapons Section


Rifle Section


Additionally, I repainted some of my old Soviets in NBC gear from a few years ago to more closely match this squad. Repaints included some work on shading and washing the suits and masks in order to make them look dirtier, some minor repaints of the weapons (particularly the RPGs), and repainted the bases.


And here's a glamour shot of both squads together. Now all they need is a stateless, stealth operative to track down or a giant mecha to defend...


Friday, August 18, 2017

Statue Scatter Terrain

Even with the current hysteria surrounding statues here in the US at the moment, it was actually by complete coincidence that I finished these pieces this week. I recently came into possession of a lot of modeling stuff since a distant relative passed away who was also a long-time historical modeler. Among all the different models, were a small collection of 54mm figures that were rather old and not very well cast, so I decided to give them a new lease on life. I cleaned each of them up, cut up some wood for plinths, and put them all together.

To paint them, I tried a very different technique than the one I normally use, most recently on my Hungarian statue. This time I primed the plinths with gesso and used a tan-colored chalk paint for the color and texture, highlighting with white mixes, washing with Vallejo European Earth, and finally adding some light earth color with a dry pigment wash of Yellow Earth. The statues themselves were primed grey, basecoated in Pavement grey, with successive drybrushing of a blue-green paint mix. Unlike most earlier statues, I tried to to leave the dark grey base showing through in areas of shadow and focused the verdigris more on the blue side of the color wheel. What really helped was a good wash of Secret Weapon Cool Grey which helped to mellow the colors (which I also carried into parts of the plinth to imitate weathering). I also added some whitish discoloration on horizontal surfaces to simulate the effects of bird poop. All in all, I really like the final effect and will use it going forward.

Included in the set are two Napoleonic statues, an American Revolution statue, a Confederate soldier statue, and a Spanish-American War soldier statue.


The two statues below (one Spanish-American War, one Napoleonic) are for sale for $25 each. Drop me an email if you're interested in buying one or both.


Friday, December 30, 2016

Team Yankee Commission: US Armored Company

Despite a lot of setbacks, I was finally able to get around to completing my current commission. I really appreciate the patience and understanding of my client for this one, which ran almost a month over schedule.

All miniatures are BF Team Yankee. As I mentioned in my previous AH-1 post, I wasn't overly impressed with the build quality of these models. Many have gaps between parts that are easy to overlook until the miniature itself is complete and I felt like the quality of the plastic itself was very "cheap", closer to the softer plastics of companies like Zvezda. Overall though, for models primarily meant for gaming, they're pretty good and I'm sure many gamers would be perfectly fine with them.

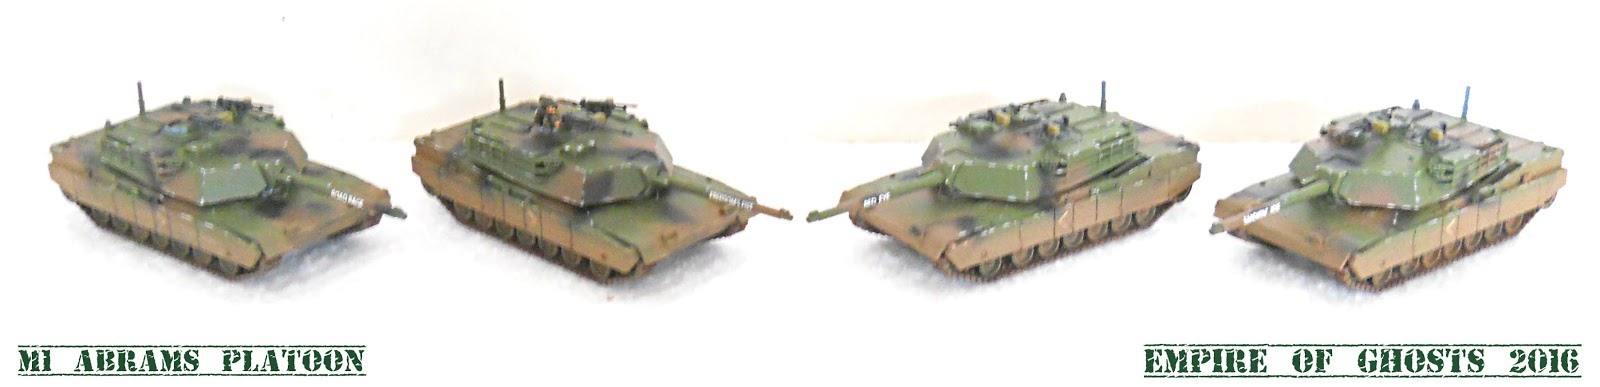
The client asked for two schemes - the majority of the AFVs in NATO three-tone camouflage with one Abrams platoon in a two-tone REFORGER (REturn of FOrces to GERmany) camouflage scheme, both done in the style of Tacobat's excellent Bannon's Boys build. This was a big change from my usual style, especially the heavily contrasted edge chipping, but I did my best and like the end result. The REFORGER camo is interesting, as I couldn't come across any material online showing whether or not the lighter tan color was applied to the upper surfaces or not.

NATO camouflage is done in a base of Tamiya NATO Green, with airbrushed blobs of Tamiya NATO Brown and plain Black. REFORGER camouflage is done in a base of Tamiya NATO Green with larger bands of Reaper Tanned Leather (in hindsight, I should have done that in reverse - lighter color as base, darker color as blobs - to make painting easier). MGs are Pavement, drybrushed with Pewter Grey, then washed with P3 Armor Wash. Ammo boxes are done in Reaper Worn Olive with a wash of Secret Weapon Green. Rear lights are Flamenco Red and glass is Army Painter Blue.

AFV crew fatigues are a base of Reaper Olive Drab, highlighted with Reaper Worn Olive, then washed with Secret Weapon Green, with helmets done in VMC German Dark Camo Green. Mortar crew camouflage fatigues are a base of Reaper Olive Drab, highlighted with Reaper Worn Olive, with blotches of Black and VMC German Camo Dark Brown, then washed with Secret Weapon Green. Skin is VMC Light Flesh washed with Secret Weapon Flesh Wash.

Decals are BF and I-94.


Tuesday, December 20, 2016

Team Yankee Commission: AH-1 Cobra Squadron

First off the assembly line for my large Team Yankee commission are four Battlefront AH-1 Cobras. These are really rough kits that were difficult to assemble and make them look "right". The client chose the 1st Cav Division for unit insignia.

Helicopters are basecoated in Testors Acryl Green Drab, with very subtle panel highlighting in 75% Green Drab/25% White, panel lining in GW Green Ink washes. Gunmetal/bare metal parts are Pavement, highlighted with 75% Pavement/25% Pewter Gray, washed with P3 Armor Wash. Bare steel and chipping is Testors Acryl Steel.

Decals are Battlefront. These were a MAJOR pain to put on, many would not release from the decal sheet after repeated soakings and the remainder would not properly adhere to the piece itself. I have decals that are 15+ years old that aren't that bad and BF really needs to have more QC over their decals processing.