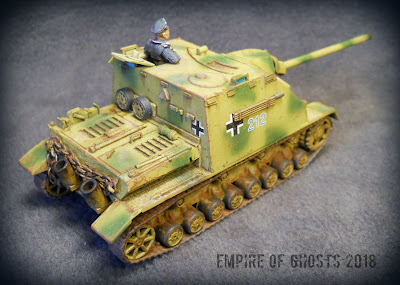
Like the real counterpart, this is based on a Warlord Panzer IV chassis. I cut the turret ring and low casemate off and added plasticard sheets to for the casemate. This was the most difficult part - reference material is scarce, so I had to cut the pieces multiple times to get the right height and angles. Even now, it's ever so slightly too tall but I'm OK with it. Then I added the netting hooks, armored visors, hatches, barrel clamp, and aiming periscope using plasticard shapes. The gun mantlet and barrel shroud was taken from spares of the Rubicon Hetzer kit and the barrel itself is brass rod. The tank commander is from JTFM.
I had actually primed and painted this several months ago and never liked the scheme, so I went back, stripped it down, & re-primed it. I decided to use a hairspray chipping method that was very well demonstrated by a vlogger called Panzermeister36 on Youtube. I primed everything in Red Oxide primer, hit it with hairspray, and then airbrushed it in a 50/50 mix of Tamiya Dark Yellow and Yellow Green with soft-edge camo done in Tamiya Flat Green. I then went back and (using a toothbrush and bamboo stick) chipped, flaked, and scratched to reveal the primer underneath. Rubber roadwheels were done in Pavement, tools are in Vallejo Medium Brown. Any steel items are done in Vallejo German Grey highlighted with Vallejo Oily Steel. The commander is basecoated in Vallejo Dark Grey, highlighted in German Grey, with a final highlight in 50/50 German Grey and Light Grey; with waffenfaube in Vallejo Pink.
Decals are by Rubicon. Weathering was done with oils (again special thanks to Panzermeister36, who pointed out that my cheap oils need to sit on cardboard for several hours before painting to eliminate all the excess linseed oil in the paint).


No comments:
Post a Comment