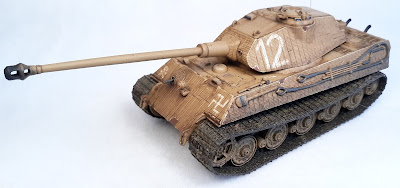
So, I acquired this Italeri King Tiger as a tournament prize ages ago, promptly built it.....and then it sat in my paint queue for over a year. To be honest, I wasn't really sure what direction to go with this, as I already had a resin "Henschel" King Tiger in my inventory, which is big and terrifying, and two seemed like overkill. This is also slightly undersized for the scale (the Panther I posted yesterday is actually slightly taller and beefier in general), the details aren't really correct in some places, and the molded-on zimmerit is.......lacking, or entirely absent in certain areas where it should be (the mantlet and turret rear stand out). I scribed some quick (and not very good) zimmerit lines and then sanded and cut into many areas of the zimmerit to make it appear that the paste was flaking off.
Finally, I decided to hell with it and threw together this "last stand" King Tiger. Since the model itself is a little anachronistic, I made the backstory that this was pulled from a depot somewhere in the final days of the Third Reich and given a quick painting of insignia. As usual, I primed in red oxide, put down a coat of hairspray for chipping, and then airbrushing Tamiya 50/50 Yellow-Green and Dark Yellow. I then did the chipping in the non-coated areas and, to simulate wear on the zimmerit, lined the edges and areas of heavy use by using the basecoat color with some white mixed in. As I mentioned, I wanted this to look like someone had handpainted on the insignia with a brush, so that's what I did - no decals here! I added streaks and rings on the upper hull to simulate where a paintcan was laid.
After finishing detail and track painting, I sealed the model and then gave it an overall dark brown oil filter. Normally, I use a yellow/light umber filter on dunkelgelb vehicles, but I really want this to look dirty, so it is noticeably darker than most of my German AFVs. Once dry, I then added successive darker washes to the zimmerit towards the bottom to simulate dirt and mud buildup in the crevices, as well as dry blending light umber and brown oils in the deck surfaces. I washed the tracks with AK Track Wash, hit the lower hull and track areas with Vallejo European Mud, and then loaded an old toothbrush with Vallejo European Splash Mud, Vallejo Medium Olive, and Secret Weapon Caked Dirt and flicked it to create the splatter effect. Rusty mufflers were done using Vallejo Rust Texture, overpainted with successive oil filters of red, orange, and finally yellow - this creates an oxidized texture without the use of dry pigments. Finally, I painted all the viewports and the headlight and gave them a gloss coat.
In closing, is this entirely historically accurate! Definitely not! But it was something fun and a good base to test out some new techniques.


1 comment:
Post a Comment