Showing posts with label painting. Show all posts

Thursday, November 8, 2018

El Alamein Table

Full disclosure - I had no real interest in starting a North Africa table and had actually just sold my 15mm NA table a couple of months ago. I don't even own any desert armies, in either 28 or 15mm! But, things just came together and here I am with a North Africa table for local Bolt Action events. This is a strong departure from my normally dense tables, as I really wanted to emphasize the almost featureless expanse of the desert surrounding the Alamein train station itself.


I had actually started work on the dunes earlier this summer with the intent of using them for Gaslands, in sort of a post-apocalyptic Wastelands table. They're spare off-cuts of pink foamboard from previous projects that were cut to shape, sanded, and then textured. I wanted to get a "flowing" feel to each dune, with a gently sloped windward side and and steeply sloped leeward side to provide a more "natural" feel to the table itself. While it's hard to tell from the pictures, the dunes do provide some measure of cover and the higher dunes block LOS for most infantry and troops on the "ground".

The first piece of terrain that helped push me towards a 28mm desert table was Warlord's Desert Table scenery box I won at a tournament early this year. Overall, the set itself is useful, if rather uninspired for the advanced modeler. The star of that set are these excellent resin ruined wall pieces. I really enjoy the look of them and, being separate pieces, they enjoy a good amount of flexibility in arrangement. Here I've made them into a small walled enclosure or heavily ruined building site.


Years ago, I had made two very large rocky hills for Flames of War. I was never really satisfied with how they turned out (or how big they were), so they never saw much use. One was eventually damaged in a move but the other living on in a dusty box. I hate to see terrain sit unused - I would rather sell old terrain and let someone else enjoy it, than have it be neglected in my own extensive terrain collection. So I repurposed this piece to serve as a representation of the high ground to the south of the station, giving it a thorough repaint, and some new flocking. I used a lot of different spray paints and drybrushing to build up a depth of color.


Last, but really the entire reason this became the El Alamein battlefield was finding an amazing deal on Sarissa's El Alamein Station kit. I love Sarissa's kits (the majority of my Seelowe/Channel Islands table are Sarissa's "Europe At War" building line) and this was no exception. The rail line is about 5' long but VERY delicate (so be sure to take extra care when painting the trestles before gluing on the rails, one of my pieces snapped off about 2" from the end). The train cars are great and, when I have a little more in the hobby budget, I'd like to add one of their steam engines as well.

I'd be remiss to not mention the station itself. I'll be honest - on the dry fit build, I was a little disappointed by how plain it all was. However, I assembled the entire station and used some of the spare cardboard sheets to "bulk out" the bottom portion of the exterior walls. This added a nice transition and sense of depth that the kit lacks. I then filled in the joints with spackle and gave the entire structure three coats (!) of gesso, giving it a textured and durable finish. I again used a lot of different spray paints and drybrushing to give it a depth of color quickly. To finish it off, I painted on the English and Arabic signs, added a few of the always helpful pickle barrels, and glued on some British propaganda posters in the vestibule. From pictures, the station at the time appears almost brand new, likely due to the dry climate, so I avoided a lot of weathering besides some drybrush streaking on the roof.


To finish off, I added some leftover crate stacks from my Necromunda Freight Hub table and bought a cheap Twin flat sheet at Walmart for $6 that I spraypainted....to give it a depth of color.

A lot of players will probably disregard this table as being plain but, that was always the intention. The El Alamein battlefield itself is, for the most part, scrubby featureless desert so there is a toss-up decision for the gamer to either go completely historically accurate (and likely end up a death trap for gamers) or anachronistic (and likely end up not resembling the area at all). I feel like this table sits somewhere in the middle - it combines features that are largely miles apart in actual groundscale to ensure a balanced play, while also staying true to the "spirit" of the battle itself.

Wednesday, February 21, 2018

Crashed Aquila Lander

Battle of Macragge was a pretty awesome starter set for 40K, even it was a little underwhelming. Though I don't have the rest of the set anymore, I did keep the excellent crashed Aquila Lander terrain pieces, which tend to get a lot of use in skirmish level games. My initial paintjob wasn't fantastic and, after several years making the Adepticon rounds, it was looking a little worse for wear, so I decided to give it a repaint.

I went with a Reaper Dark Elf skin purple for the exterior and Vallejo Olive Green for the interior. I also used various decals for both the old Imperial Guard and Cadian transfer sheets. I then did some little wear around the damaged pieces and airbrushed some Territorial Beige and Khaki for the churned-up ground.


Saturday, February 6, 2016

Winter Camo Tigers

The last of my repainted Tigers that sat around 90% complete, this time I did an experiment in winter whitewash camouflage using pastel chalk. The miniatures are painted as normal, sealed and decaled. Once dry, I took a piece of white pastel chalk, ground it up into a dust, and added water with a small amount of flow improver and matte medium. I then roughly painted this over the entire mini, leaving the tracks, running gear, and areas around insignia bare and allowed it to thoroughly dry. Once dry, the chalk forms a semi-translucent coating - almost similar to pigment, but not quite as strong - that can be wiped off with your finger to simulate areas of heavy wear (around hatches, near running gear, and around the exhausts). To fix the chalk, I gave the minis a light coating of flat spray sealant. I then painted and weathered any crew, stowage, cables, running gear, and exhausts and gave it a final flat seal.

I like the result and will be using this again in the future....


Wednesday, March 11, 2015

Italians @ Malta, 1942: PIP Gruppo Da Sbarco

Just wanted t share my almost complete MVSN Gruppo Da Sbarco squad. 

The Battaglione Gruppo Da Sbarco were a specially-trained amphibious assault Blackshirt regiment raised for the Invasion of Malta. After the cancellation of Operation Herkules, Da Sbarco was split in two groups - one taking part in the bloodless seizure of Corsica and the other being stationed on the southern French coast. The Corsican Group eventually joined the Allies, while the French Group battled partisans alongside the German Brandenburgers.

I used a color plate from Osprey's Italian Army & Elite Special Units 1940-43 as inspiration for painting these figures. I started with a base coat of Vallejo 50% Green Grey and 50% Brown Violet, working up successive highlights with more Green Grey. I then gave the uniform a black wash. Webbing and boots are Reaper Muddy Soil. The khaki rifle slings and satchel charges are a mixture of Territorial Beige and Amber Gold. 

I tried painting on the small Gruppo patch on each left arm. I'm debating whether or not to paint the MVSN logo on the helmets - it's very intricate and very small. Otherwise, these guys are ready for sealant and groundwork.


Wednesday, April 2, 2014

Road to Adepticon 2014: Saga Normans/Necromunda by Night

12 hours left until Adepticon and here's where I'm at with my Saga Normans. Major paintwork is done, and now its unto the groundwork, after which is clean-up painting. 


And here's what 12-13 tables of Necromunda terrain looks like all boxed up and ready to go...


Tuesday, April 1, 2014

Road to Adepticon 2014: Saga Normans


Sorry for the lack of posts over the last few weeks. Here's some proff of life - I'm slowly and painfully slogging though 6 full points of Saga Normans. I had a huge amount of trouble assembling and cleaning the Perry Bros. Knights I bought, so I'm trying to rush through painting the entire army as quickly as possible.

Wish me luck!

Wednesday, July 31, 2013

It's All Or Nothing...

This always happens - I'm either blowing things off completely or I've just got too much to do at once. My painting queue....Panzerspahkompanie in the first 2 rows (ready to be weathered), (3rd row) Looted T-34 (with 76 and 85mm turrets), Girls Und Panzer StuG, three "dot-camo" Late War StuGs, (fourth row) Pioneer Supply Opel Blitz, three Mid-War Hungarian Panzer IVs, and an Early-/Mid-War StuG platoon!


I think I have a problem...

Thursday, June 27, 2013

RIP Powermate Compressor 2011-2013

Well, my air compressor finally bit the bullet. It kept overheating even on the coolest of days. It wasn't really bad during the winter when it was practically outside whilst running but it's gotten worse as the summer went on. I recently started work on a Panzerspahkompanie for FOW Late War and this is the result.


The 250s on the right were the first and they turned out really well. The 8-rads were next and were just so-so (partly this is due to my indecision on the actual camo scheme). The Luchs (front left) were last and are a huge fail - CFM pressure kept dropping and I kept having to stop and wait for the motor to cool, which resulted in an overdone soft-edge scheme.

I actually came back after taking this picture and started doing some dot camouflage on the StuGs by masking and, while, they look great, they're now half done, since this is when the compressor decided to commit hari-kari. Oh well, as Ron Swanson says:


Sunday, March 24, 2013

Saga Viking Warlord: Ragnar Lodbrook

Things have been so crazy since the move. I actually don't have a dedicated workspace right now and am painting out of halfcut cardboards boxes from the move. I've also been dealing with an e-tailer who sent my order for Adepticon to the wrong address and now will not offer me a refund because he claims it was all my misake - so now I'm forced to run different army lists than I had planned. Craziness.

Anyway, I did finish my Viking warlord for Saga for WWPD's painting contest. Please vote for my entry here (listed under "ancientsociety") if you are a forum member! 

This figure is my version of Ragnar Lodbrook (the GB fig is very over-sized). It's a converted Artizan figure. The Celtic Cross is from the Armorcast gravestones set.


Friday, November 16, 2012

Golden Gear Duelist Entry

Finished! Here's my entry for Dream Pod 9's 2012 Golden Gear contest - a Dingo Arena Duelist Gear.


Friday, October 26, 2012

Heavy Gear Duelist PIP


A quick little post to show everyone my painted Dingo Duelist miniature for Heavy Gear Arena. It still needs decals, washes, and a finished base.

Monday, October 8, 2012

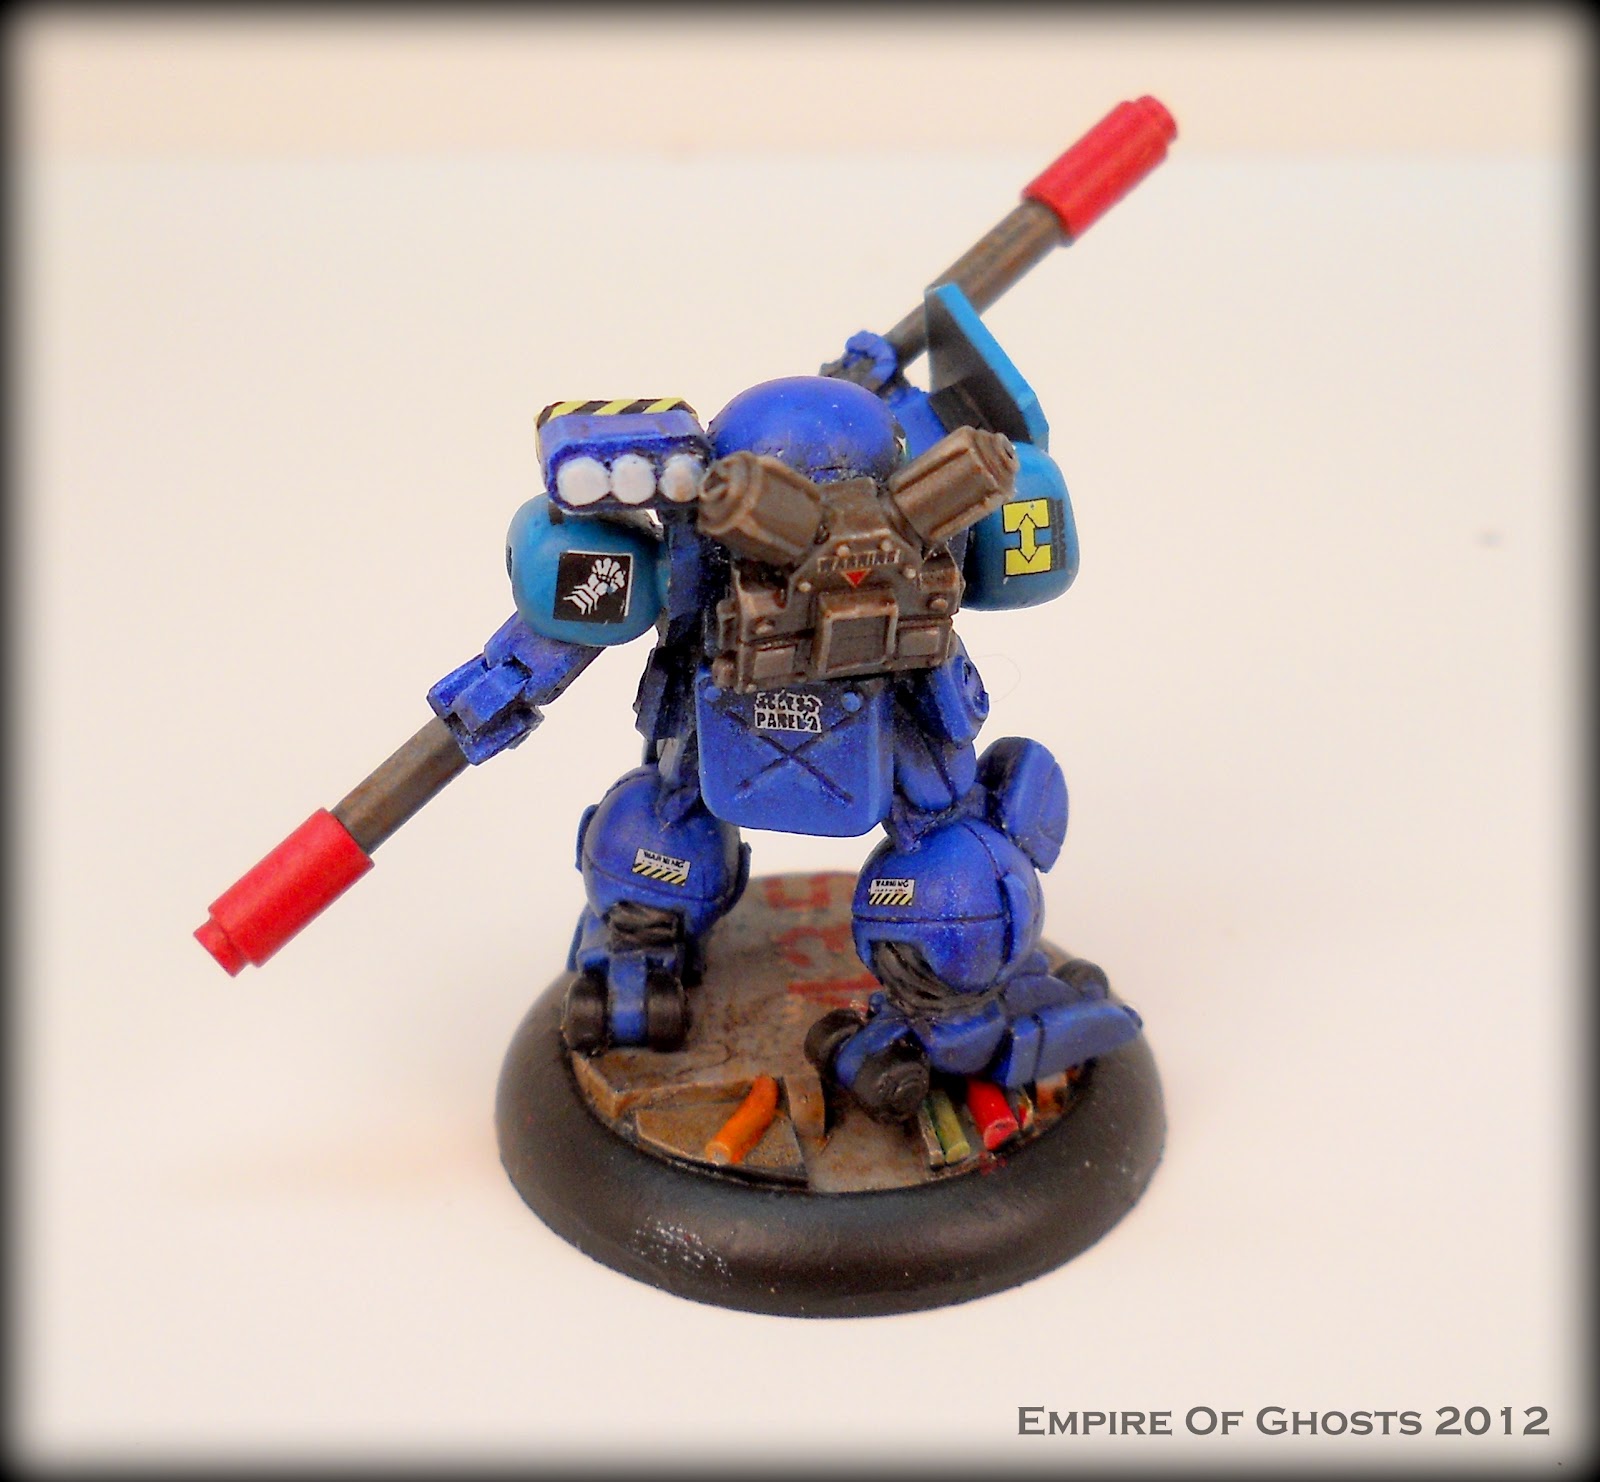
Heavy Gear Basilisk Duelist

This mini was an experiment in using zenithal priming and VERY thin paint to achieve a nice subtle shading effect. I think, for my first time using this technique it came out fairly well however, in the future, this may be much more useful for bright, bold color hues. The royal blue here is a little on the dark side to really make the effect "pop".


This is a DP9 Southern Basilisk Gear used by an independent Arena dueling team, the only conversions here are a plasticard buckler and scratchbuilt staff. 

Primed in Armory Black with zenithal effects in Armory White. The base blue is straight Badger Royal Blue, accents in (old, old, OLD) GW Hawk Turquoise and VMC Ghost Gray, with lights in GW Blood Red and VMC Bright Yellow. Steel parts are painted in (IIRC) Reaper Steel Grey.


The base, buckler, and staff are weathered using oils. Decals are from the DP9 Arena sheet, old GW Imperial Guard sheet, and misc. model kit sheets.


Sunday, July 29, 2012

Tutorial: Airbrushing Basics

I'm going to follow the path of an air molecule moving through an airbrush system,  starting with the compressor, through the regulator(s), moisture trap, hose, and finally to the brush itself.

Canned Air

NO. Just no.

It's expensive in the long run, a source of inconsistently pressurized and unregulated airflow, and bad for the environment. Invest in a compressor.


Compressors - How I Tank?

A compressor is simply an engine that pumps the surrounding air into itself and expresses that air into a tank, regulator, hose, and finally airbrush. Compressors come in two major varieties - those made exclusively for airbrushing and the more widespread general purpose units (the picture above is a general purpose compressor). Either will do but there are some differences:
  • Noise: Purpose-made airbrush compressors are generally smaller and less noisy than GP compressors.
  • Size: Airbrush compressors are generally smaller and more compact than GP compressors. However, GP compressors will generally have a larger storage capacity (if tanked) and a stronger, more consistent engine.
  • Heat: Because of their size, airbrush compressors may not be able to handle long continuous spraying due to the buildup of heat within the engine. GP compressors generally do not suffer from this since they have some type of passive or active heat sink. This can be somewhat mitigated if the compressor has a tank (since the engine does not continually have to run to provide airflow).
  • Connections: GP compressors, being made to handle pneumatic tools and sprayguns, generally have larger pneumatic connections that may not fit an airbrush hose. This is easily solved with the installation of the correct fittings (available at any good hardware store) unto the compressor or regulator itself but the correct sizing may be difficult for novices.


I don't mention pressure above since that's really a function of the regulator(s) and, if you have it, the air tank. I personally own both types - a tankless airbrush compressor and a tanked GP compressor - but end up using the GP compressor more often simply due to its consistency and reliability.

On the subject of tanked vs. tank-less compressors, having used both, I always say spend the extra money for a tanked compressor. Tank-less compressors have one big disadvantage - inconsistency of air flow. With a regulated tank, I am always assured of having the same (or similar) pressure at all times, whereas even the best tank-less compressor will have fits and starts and have a higher or lower pressure behind the regulator.

Whatever you choose, it's important to purchase a new compressor from a trusted store or website. The compressor should be oil-less, have a grounded electrical cord, and be free of rust, chips, or dents. Remember shop safety - DO NOT PURCHASE A TANKED COMPRESSOR WITH ANY TYPE OF DAMAGE!


The Regulator(s) - "Mister, we deal in lead air."

Over the years I've become convinced that the regulator is probably the most important part in any airbrush system because it has the crucial job of maintaining the correct PSI in the airbrush system. A regulator is a valve that the user can adjust to "regulate" the pressure in the airbrush system. It operates using a unit of measurement called PSI, which is short for "pounds per square inch". PSI measures the pressure (or stress) of gases or liquids in a given system (The most widely known example being blood pressure, which ranges from 2.5 to 1.3psi in humans).

Without getting too in-detail, a regulator consists of three basic parts - an adjustment valve (sometimes a handle, knob, or nut) which either expands or contracts a diaphragm inside the regulator to force more or less pressurized air through the regulator. The pressure within the regulator is displayed on the pressure gauge. Tanked compressors should have two regulators - one to measure and control the pressure within the air tank and another to measure and control the airflow to the airbrush itself.

Good regulators should be made of all-metal parts, have an easily controllable adjustment valve, and a large, clear pressure gauge.


The Moisture Trap  - Keeping it dry

A moisture trap (AKA moisture separator, condensation trap) consists of a filter which separates dirt and water particles from the compressed air after it leaves the regulator. There are two types of moisture traps - post-regulator and in-line.

A post-regulator moisture trap is screwed directly into the outlet port in the regulator. An in-line moisture trap is mounted "in-line" of the air hose, at least 6" from where the hose connects to the regulator. Due to the properties of compressed air (which I won't go into here), most professionals prefer in-line traps. Since these are usually more expensive (taking into account the hose cost) than post-regulator mounted models and most of you reading won't be using an airbrush on every single project, a post-regulator model should work quite well. [12/2016 - Since writing this, I've actually switched to a different compressor and started to use an in-line filter and I must say I personally much prefer the in-line filter. I have almost no issue with moisture any longer.]

Whichever model you choose, be sure to clean and empty the trap of water periodically to ensure long-term use.


Hoses

Air hoses generally come in two types - coiled or straight - and two materials - PVC or braided nylon. I prefer a straight, braided nylon hose. Straight are generally lighter than coiled hoses and braided nylon is more durable and flexible than PVC.


The Airbrush

There are two categories (or systems) of airbrushes - double-action or single-action.
The diagram above shows the cross-section of a double-action airbrush. In both systems, compressed air enters from the air hose at the bottom center of the airbrush - this is the air valve. When the main lever is pressed down, the valve opens and air enters the airbrush. Here's where the difference in the two systems occurs.

In a single-action system, the air and paint are mixed inside the brush by pressing down on the lever. The spraying of paint and air is thus a single action, hence the name. When the main lever is depressed and pulled back, the needle slides back from the air nozzle and more paint/air are released.

In a double-action system, when the main level is depressed, only air enters the brush (and is consequently sprayed out). Paint is mixed into the air flow only after the level is pulled back - a double action (press for air, pull back for paint). This allows the user to keep air flowing through the brush, without having to spray any paint.

The next set of differences is how the paint "flows" into the brush itself. The diagram above is called a gravity-feed system. The paint cup is mounted atop the brush and paint flows into the brush via gravity. The other system is called siphon-feed. The paint cup is mounted below (or sometimes, to the side of) the airbrush and the compressed airflow "sucks" the paint inside the brush.

I personally recommend a double-action, gravity-feed airbrush for most modelers. The specific make and model is a personal choice (Paasche, Iwata, and Badger are generally the traditional, "go-to" airbrush companies) but you should look for the following features:
  1. All-metal construction, especially with moving parts
  2. Lightweight 
  3. Well-balanced
  4. Good access to replacement parts
[12/2016 EDIT - Since writing this, I actually realized I hadn't been using any sort of lubricant for the moving parts in my first airbrush. This is bad. So, do yourself a favor and be sure to pick up a small tube of airbrush lube and lubricate the trigger assembly and needle during each session.]

Basic Setup & Painting

Be sure to spray in a well-ventilated area, away from small children and pets. Your painting area should also be out of direct sunlight and between 60-80F for optimal spraying. Unless you are airbrushing outside, you should be wearing, at least, an N95 Particulate Mask. Spraying completely indoors, even with a spray booth, means you should be wearing a full respirator.

To start, make sure all your fittings are properly connected - threaded couplings should be wrapped in teflon tape, firmly attached, and wrench tight. Make sure your airbrush is properly attached before turning on the compressor.

When the compressor comes on, let it run for a few minutes. If you have an air tank, let the tank come up to at least half pressure. After that - with no paint in the airbrush - push down on the main lever. You should see the gauge on your regulator come up - this is the current PSI you're spraying at. You can adjust the current PSI higher by turning left and loosening the valve knob (more air flow) and lower by turning right and tightening the valve knob (less air flow). For model work, you should be spraying somewhere between 15-30psi.

Add the paint to your paint pot and thin to the consistency of skim milk (see the section on Proper Thinning below). Keep a sheet of paper handy and spray out some paint unto the paper. If the paint doesn't spray well, thin a little bit more or adjust the PSI slightly higher. If the paint is thinned too much, it will run and drip. If this happens, add more paint and stir well.

With a double-action airbrush, practice letting your finger apply the right amount of pressure to the main lever. More pressure will increase airflow, and vice versa. When you feel confident, pull pack slowly on the lever to begin spraying the paint. As with the airflow; pulling back a little will spray a little paint, pulling back further will spray more.

You may also want to try some basic airbrush exercises to get your control correct.


Properly Thinning Paint

Let's make this simple - STOP THINNING ACRYLIC PAINT WITH FOREIGN CHEMICALS!!!

Windex, Ammonia, Flow Improver, that unmarked bottle of clear liquid from the medicine cabinet...whatever you've heard on such and such a forum on teh interwebs, these all cause more issues than what they solve and are generally more expensive per volume than dedicated acrylic medium.

I'd like to quote ScoutII over at TMP for the breakdown of why, chemically, thinning with foreign chemicals is a bad idea:

"Anywho, when you thin a paint like an acrylic paint with something like water (or Windex…alcohol…Flow Aid…) you are diluting the paint. When you use a formulated compound like an Acrylic Medium you are actually adding a different type of acrylic resin into the mix that has better physical characteristics for the task at hand.

This is important because when a monomer like the acrylic resin actually cures it forms a bunch of long chain polymers that are sort of ball shaped. They have all kinds of hooks and what not that let them snag other long chain polymers that are next to them and when you have a few million of these chunky long chain polymer spheres all hooked together they form a very strong…very durable film. It can bend and move without cracking and does it's job wonderfully.

When you dilute the compound with something like water, you put fewer of the monomer molecules together. When they start to polymerize into the long chains, there will be fewer of those long chains close to each other and it will reduce the strength of the resulting film. You can see this yourself if you dilute the paint significantly and paint it on a surface. The resulting film is almost dusty like and you can rub it off quite easily.

Now the actual Acrylic Mediums are basically just a different formulation of resin (with other chemicals added to adjust drying times and the like). The resin used though generally will flow like water (though it isn't water). This provides additional long chain polymers for everything to bind to when it is curing. You can use something like the Airbrush Mediums I linked to above to thin the paint to the point where you can barely see the pigment at all, and they will still produce a durable film.

I know, you will definitely hear from people who will swear up and down that they thin their acrylic paints with only water (or only Windex…or some other substance they find in their medicine cabinet) but it will result in a less durable finish."

There are numerous reliable options for Acrylic Medium (sometimes marketed as "Airbrush Medium") on the market from companies like Golden, Liquitex, Vallejo, and Testors; to name a few. [12/2016 EDIT - I will admit that I have experimented with using both Ammonia (Windex) and Isopropyl Alcohol as thinning mediums since writing this. Ammonia has been strictly a no-go. However, I have found that adding a drop or two of Isopropyl to the paint mixture does improve paint flow without adversely affecting the finish. I still rely heavily on using Golden Acrylic Airbrush Medium as my primary source of dilution (like 99% medium to 1% iso).]


Cleaning

After each painting session you should thoroughly clean your airbrush, at the very least. Optimally, you should be doing a basic cleaning of the brush between paints.


To clean your airbrush:
  1. Empty any leftover paint from the paint pot
  2. Fill the paint pot with clean water and/or airbrush cleaner
  3. Run all the water/cleaner through the airbrush
  4. When the spray is clear, remove any leftover water/cleaner from the pot and blow air through the brush
  5. When no water comes out of the brush, turn off the compressor and remove the needle, according to your model's instruction manual
  6. Being careful not to bend the needle, wipe it clean and replace
  7. Clean any dirt or paint off the brush and thoroughly dry

Saturday, November 12, 2011

Golden Gear 2011 Duelist Entry

Following up my conversion of the Dark Cobra into an Engineering Cobra, I finally had the entire piece painted last weekend. Here are two shots of the finished piece:


Considering it's in-universe background as a heavy construction vehicle, this Gear was much too shiny and new, so I decided to try out a new weathering technique using oil paints. And, I think we can all agree, the finished Gear seems much more appropriate....

So, Ladies and Gentlemen, making it's first appearance in the Arena Dueling Circuit........The Wrecker!


Friday, July 8, 2011

Tutorial: "Polishing" Metal Models for Painting

It took me several years to pick this little trick up and, since then, I haven't finished one miniature without using either one or both of these methods.

The issue I always had was that my paint would never really "flow" well over the miniature. It was very prevalent whenever I'd use a wash and the wash would seem to "settle" throughout the area, instead of seeping into recesses and leaving high areas without shading. This was always a side effect of the metal miniature underneath.

The cause is partially a factor of the metal itself but also an aftereffect of the casting process. Both of these things together cause the miniature's surface to develop very tiny ridges and valleys, giving the surface a "Flat" or "Matte" appearance or finish. I discussed finishes in more detail in the Paint 101 Tutorial for those interested but it's enough to say here that whatever else is put over this finish - primer, paint, washes, etc - takes on the same or similar properties.

While a nice, low profile Matte finish provides a good foundation (or "ground") for paint adhesion; a severe Matte finish can cause paint to flow incorrectly, to take on a Matte finish when one is not wanted (as in the case of Gloss finishes), and/or for the bumps in the metal to become evident in the final piece. "Polishing" attempts to solve this somewhat. The methods below are an attempt to grind or sand the metal surface into a Semi-Gloss finish - just enough to provide a good ground for paint adhesion, but not severe enough to affect paint flow and properties.

FYI, re: Greenstuff and "Polishing": Always be sure to polish your mini before attempting any greenstuff work or sculpting. The instructions below only work on white metal/lead surfaces and will damage any delicate greenstuff work.


Method 1: Steel Wool + Time = Polished Mini!

This is a good method for highly detailed minis where a Dremel could easily destroy detail or for those of you who don't own a Dremel (note: WTH is wrong with you!? Go buy a Dremel, it saves tons of time!).

What you'll need:

  • A white metal (pewter, lead, tin, etc.) miniature
  • Fine Steel Wool
  • (Optional - for sanding out "micro-pitting") Jeweler's files and/or sandpaper
Step 1

Once the miniature is ready for polishing, rinse it well under cool water to remove any excess dirt, dust, or metal shavings. Any of these can scour or scratch the surface of the mini where you don't want it.

For this tutorial, I'm using Reaper Chronoscope's Natalya. This is a slim, well-detailed mini that could easily be damaged by using a rotary tool to polish. It's pictured above, totally unpolished...

Step 2

Some minis have been incorrectly cooled following casting and suffer from "micro-pitting". These are tiny pits in the metal surface and must be sanded or filed away before polishing. This can be done with either jeweler's files or sandpaper. If the pitting is too deep or filing would destroy detail, you can skip this step for now and fill the pits with Green-stuff after polishing.

Remember, if you use sandpaper to remove "micro-pitting", to rinse the mini before continuing on.

Step 3

Using the steel wool, begin "sanding" the surface of the miniature all-round. I find it helpful to start from the top and work down the miniature. Try to focus on large flat areas for now. If you're worried about destroying raised details, use soft indirect pressure and "polish" in a circle motion.

Compared to the last picture, I've begun polishing from Natalya's head downward to her waist. It's a little hard to tell from the pic but you may notice the mini's surface is smoother and shinier.


Once you've given it a good once-over....

Step 4

You should notice the mini is noticeably more shiny, especially in large flat areas and raised parts. The mini still may have some areas you were unable to reach into, like between collars and shirts, under slung weapons, and inside coats or other outerwear. Now, focus on those areas.

Break off small bits of steel wool and try to fit them into the gaps and crevices, sanding with medium pressure, in any direction possible.

Below the mini has been fully polished. Compare this to the 1st pic, especially in the thigh area in the foreground, and you'll easily spot the difference. This largely smooth surface is much easier to paint than the rough, matte surface the mini originally had.


A super-polished, glossy surface isn't necessary and, in the case of small miniatures devoted to gaming, is not advised. A super-polished surface provides little to no paint adhesion and is really only good for large display miniatures.

Step 5

When you're comfortable with the finish, stop and fully wash the mini with warm water and dish soap. Rinse well under warm water and let it fully dry before priming (or adding Greenstuff details).


Method 2: Dremel + a Delicate Tough = Polished Mini...in less time

A quicker method that takes a little practice but can save time.

What you'll need:
  • A white metal (pewter, lead, tin, etc.) miniature
  • Water
  • Dremel or other Multitool (I use a Dremel Stylus)
  • Brass Wire Brush (Dremel #530)
  • Carbon Steel Wire Brush (Dremel #428) or Stainless Steel Wire Brush (Dremel #535)
  • (Optional - for small spots) Cylindrical Wire Brush (Dremel #443)
  • (Optional - for "super polishing") Nylon Bristle Brush (Dremel #404)
  • (Optional - for grinding out "micro-pitting"/cracks) High Speed Cutters (Dremel #125, etc.)
A note on safety: Whenever using ANY of the above brushes or tools, ALWAYS wear some form of eye protection, no matter how low your RPMs are set! It's common for wire brushes to "shed" a bristle now and then and it's easier to scoop them into the trash or pluck them out of your skin, than out of your eye.

Bristle Brush Stiffness

From my experience, here's a list of the the bristle brushes from above, graded from most to least stiff:

  • Carbon-Steel: VERY stiff, recommended for low to no lead content miniatures only
  • Stainless Steel: Stiff, a good all-round bristle for all but the softest metals
  • Brass: Somewhat stiff, good for detailing
  • Nylon: Hardly stiff at all, ideal for super polishing (if you're so inclined)
In reality, the only two brushes you truly need for this process of Stainless Steel and Brass. I've included the others here for those who are so inclined to use them.


Step 1

Once the miniature is ready for polishing, rinse it well under cool water to remove any excess dirt, dust, or metal shavings. Any of these can scour or scratch the surface of the mini where you don't want it.

Step 2

Some minis have been incorrectly cooled following casting and suffer from "micro-pitting". These are tiny pits in the metal surface and must be sanded or filed away before polishing. This can be done with either jeweler's files or sandpaper. If the pitting is too deep or filing would destroy detail, you can skip this step for now and fill the pits with Green-stuff after polishing.

Alternatively, you can attempt to grind the surface of the miniature down around the pitted around by using a High-Speed Cutter. This should ONLY be attempted on areas that lack highly-detailed surrounding surfaces. It is ideally suited for pitted areas that lack detail, such as billowing capes, rumpled clothing, etc.

For this I recommend either a Dremel #192, 117, or 125:


Begin by setting your multitool ~10K RPM (Speed 3-4 on the Dremel) and carving around the pitted area, attempting to blend it into the surrounding area. You may have to set your speed higher or lower depending upon the depth and width of the pitted area.

Don't try to get it entirely perfect with the high-speed cutter. It's impossible really, as the cutter isn't designed for really smooth, delicate work. Instead, switch to either a Carbon-Steel or Stainless-Steel bristle brush, working from the outer edges of the affected area inwards. This provides a smooth transition between the non-affected areas surrounding the cuts.


Note: Some of you may be asking "why not just use the bristle brush to dig out the pitting?"...Well, I've tried this and it will ruin a perfectly good bristle brush in no time. A bristle brush tool isn't designed to handle the pressure and intense heat that digging out the pitting requires. This is why you start with a heavy-duty tool bit and work downwards to more delicate bits, both in this step and throughout the entire process.

Remember, if you use sandpaper or a Multitool to remove "micro-pitting", to rinse the mini before continuing on.

Step 3

Using the your Carbon-Steel or Stainless-Steel bristle brush, begin lightly polishing the surface of the miniature all-round. I find it helpful to start from the top and work down the miniature. Try to focus on large flat areas for now.

Start around 7,500 RPM (Speed 2 on the Dremel) and use light pressure, just ever so slightly hitting the surface of the miniature. Don't attempt to apply heavy pressure. Instead, if you find the surface difficult to polish, increase the speed to ~10K RPM (Speed 3-4), use a moderate pressure, and try to make multiple passes around the miniature.

Increasing the pressure significantly will have two negative effects. First, you can easily ruin raised details in a matter of seconds. Second, and most importantly, you will begin building up heat within the metal. The problem with heating the metal like this is, as it is focused in one area, the metal will heat (and cool) unevenly, weakening delicate parts. Additionally, heat will begin to build with the bristle brush, shortening its life and making it easier for individual bristles to "shed" while the tool is going at speed, which can lead to injury.

The main purpose of this step is to polish out bad areas (see Step 2) and to give the miniature, as a whole, a good even polish, NOT to make it super-shiny or to focus on individual parts. For this, we go to....

Step 4

You should notice the mini is noticeably more shiny, especially in large flat areas and raised parts. The mini still may have some areas you were unable to reach into, like between collars and shirts, under slung weapons, and inside coats or other outerwear. Now, focus on those areas.

Using the Brass wire brush on a higher speed, attempt to get into recessed areas being sure not to apply too much pressure and always checking the area after a few passes. This is the step where I try to move the miniature into different positions to get a smooth, even polish.

Step 5

If you're really, super inclined to get a great finish, put your multitool aside for now and use the steel wool process above. At most gaming scales (6-32mm), this step isn't needed and will generally be more work then its worth.

Step 6

If you're satisfied with the finish at this point, wash your miniature with soapy water to remove any excess metal dust or bits, dry for a couple of hours, and either continue unto the next step for super-polishing or prime and paint...

Step 7

Super-polishing really isn't necessary and can sometimes provide a surface too-smooth for good paint adhesion. I honestly don't recommend this for any miniature you plan on handling and/or throwing in a storage case for any amount of time. On 54mm or larger scale miniatures meant for display, this step may come in handy. As always, YMMV...

Using a Nylon bristle brush on ~12-15K RPMs (Speeds 5-7), begin by working over the surface of the miniature applying light pressure and making passing in a circular motion. You're attempting to get a highly polished surface and it may take some time and a lot of patience to achieve. As above, try to avoid building up excessive heat and/or pressure.


Thursday, January 20, 2011

Tutorial: Paint Additives & Mediums

After reading the Paint tutorial, I'm sure a few of you have take a trip or two over to your local art store and have inevitably come across the paint additives section. The array of paint additives (everything from making your paint look like water to making it look like sand) can be a little bewildering.

Hopefully, this can answer some of your questions. Before I start I should mention that this isn't meant to be a complete, exhaustive list of every single additive, but a general overview of the most commonly available types.


Should I Add to a Paint or Palette?

As a general rule, most mediums are almost always added to paint to change its properties. As with most things, follow the directions as indicated on the additive's container.

If an additive directs you to add to the paint, it's almost always better to pour the additive out unto a palette and then pour the paint into it. Start by adding a smaller amount than you think you'll need. It's always better to simply mix more needed paint, then to have extra left-over and be unusable. Mix to the correct consistency and you're ready to roll.

When finished, unless stated otherwise, it's not a good idea to add the mixture back into its paint pot.


A Word On Flow Improver

I've already covered the basic on the use of flow improvers/aids in the Brush Care 101 tutorial but thought I'd add the following...

Flow Aids/Improvers should NEVER be added directly to anything other than regular water! In a shining example of dumb-assery, when I first started painting, I added Flow Aid directly to several pots of Citadel paint. After a few days, they didn't cover well. After a few weeks, some form of chemical mutation occured in the depths of my paint drawer and the paints had to be thrown out. Let us never speak of what horrors I witnessed upon opening those jars...

Make sure to add Flow Improver in the recommended ratio. Too much Flow Improver can cause paint to run, cure slowly, and can 'gum-up' brushes. Additionally, flow improvers/aids should only be used with water-soluble paints.

Also, be aware that a few companies label flow improver/aid as "Extender", which can be confusing as some companies label their Retarder as "Extender" as well. A quick look at the directions will clear things up as:

Flow Aid/Improver = "...add to water"
("True") Retarder/Extender = "...add to paint (or palette)"


Gesso & Priming

Gesso is traditionally used as a surface primer for fine arts applications, usually for adding 'tooth' to the surface of canvas panels. Gesso isn't a paint additive per se, but I've included it here since it's generally in the same area as other paint additives.

Modern gesso is generally an acrylic-based medium that contains large particulates. When applied to a smooth surface and cured, the gesso performs the same type of function that spray primer does, without the harmful chemicals. Additionally, unlike spray primers, gesso retains some absorbency (making it perfect as a ground for wall paintings) however, it lacks the resilience of an enamel spray primer.

Hearing all this you may think "sounds like a great way to primer miniatures indoors!" and you may be right, especially considering there are a number of colored gessos on the market currently.

The problem with using gesso as a primer is two-fold. First, gesso is both absorbent and gritty, causing your final paintjob to be both dull and to have a rough texture. Secondly, due to its acrylic nature, gesso doesn't form the same shell-like coating that spray primer does, so that model won't stand up to the abuses of gaming.


Acrylic Matte/Gloss Medium/Gel

As the name suggests, these mediums either add a matte or glossy finish to the fully-cured paint.

These additives have a gel consistency and should be mixed to paint according to the manufacturer's suggested ratio. Be aware that adding matte/gloss medium tends to decrease the opacity of the paint and also works as a Retarder/Extender.

These mediums are airbrush-friendly (in fluid form) and clean up with water.


Gloss, Satin, or Matte Acrylic Varnish & Remover

NOT to be confused with Matte/Gloss Medium, these varnishes are not technically 'additives', as they are never mixed into paint or water. Instead, these work by being painted, brushed, or sprayed over the finished paint to add a particular finish.

Varnishes are useful as they protect the underlying paint from damage, dust, and oily fingers. Be aware though, that adding too much can make the underlying paintjob look less realistic. For example, if you are attempting to paint some spit-shined black boots, gloss medium added to the paint will provide just enough shine, without overwhelming the effects underneath. Varnish will not.

Acrylic varnishes are airbrush-friendly (in fluid form) and clean up with water. make sure all underlying paint is fully dry and cured before applying varnish

Varnish Remover will remove varnishes without harming underlying paint.


Retarder/Extender

Paint Retarder is added to paint to extend its working time before drying/curing. This is useful if you plan to make extensive use of a "dry" palette, as the paint will not dry directly unto the palette.

These additives have either a fluid or gel consistency and should be mixed to paint according to the manufacturer's suggested ratio. Be aware that adding retarder/extender tends to decrease the opacity of the paint.

Acrylic retarders are generally of a fluid consistency, are airbrush-friendly, and clean up with water. This is one of the few additives you can pour back into the pot without adverse effects.

Oil retarders are can be either fluid or gel consistency (though gel is prefered), are NOT airbrush-friendly, and clean up with turpenoid/mineral spirits.


Drying (or Drier) Medium

Drying medium has the reverse effect of retarder, quickening the drying time of paint. As far as I know, it is only found as an oil paint medium, as oil takes so long to dry without it. The primary ingredient of this medium is either a quick-drying resin or chemical (such as cobalt or zinc).

These additives have either a cream or gel consistency and should be mixed to paint according to the manufacturer's suggested ratio. Be aware that adding drier medium tends to decrease the opacity of the paint.

This medium is NOT airbrush-friendly and cleans up with turpenoid/mineral spirits.


Effects Medium - Crackle

This medium allows you to get "crackling" effects within the paint itself, which can be very useful when painting old buildings or vehicles. Be aware that there is both a medium and a varnish with this effect, so be sure to read the product directions!

This medium has either a fluid, gel, or paste consistency and can be mixed to paint according to the manufacturer's suggested ratio. Make sure all underlying paint is dry and cured before applying!

Crackle medium is (generally) NOT airbrush-friendly and cleans up with water. Crackle medium should, under no circumstances, be added back to the original paint pot!


Effects Medium - Glazing


As the name implies, glazing medium is useful for glazing techniques.

This medium has a fluid consistency and should be mixed to paint according to the manufacturer's suggested ratio. Make sure all underlying paint is dry and cured before applying!

Glazing medium is airbrush-friendly and cleans up with water.


Effects Mediums - Pearlescent/Iridescent/Glitter


Admit it. You've seen all those tricked-out paintjobs on cars and wondered "how do they do all those effects...and how can I paint that?" These mediums are how. You're welcome.

The Iridescent/Pearlescent mediums have a fluid consistency and should be mixed to paint according to the manufacturer's suggested ratio. Make sure all underlying paint is dry and cured before applying!

The Glitter Medium is generally a varnish or glaze applying over all other paint.

All these mediums are airbrush-friendly and clean up with water. They are more often than not found in the airbrush section of most art stores, where they get the most use.


Effects Mediums - Water

Depending on the industry the manufacturer caters to, these mediums are known as either "Water effects" (miniatures/models) or "Pouring/Self-Leveling medium" (arts). Effectively, they have the same application - to provide small puddles, spots, or pools of standing water. It's important to do as much research as you can before purchasing any of these mediums, as all are good or bad at some things.

This medium has a fluid or gel consistency and can be mixed to paint according to the manufacturer's suggested ratio. Make sure all underlying paint is dry and cured before applying!

Water medium is (generally) NOT airbrush-friendly and cleans up with water.


Texture Mediums - Modeling Pastes

Modeling pastes are a quick way to add texture or build-up a surface and can be tinted with acrylic paints prior to application. Modeling pastes come in three
consistencies - light, regular, or heavy - and are generally applied with a paint knife or other tool. Modeling paste is somewhat similar to wall spackle in texture, consistency, and application.

This medium can be mixed to paint according to the manufacturer's suggested ratio. Make sure all underlying paint is dry and cured before applying!

Paste medium is NOT airbrush-friendly and cleans up with water (before curing).


Texture Mediums - Lava (Rock)

Yes, you did read that right - an acrylic medium that closely resembled tiny black lava rock, especially in miniature. Fairly straight-forward. As far as I know, Liquitex is the only manufacturer who makes this where it's widely available.

This medium can be mixed to paint according to the manufacturer's suggested ratio. Make sure all underlying paint is dry and cured before applying!

Lava medium is NOT airbrush-friendly and cleans up with water (before curing).


Texture Mediums - Stucco

As the name implies, this medium gives the effect of a stucco'd surface by suspended sand in an acrylic binder, great for desert buildings and sandy terrain.

This medium can be mixed to paint according to the manufacturer's suggested ratio. Make sure all underlying paint is dry and cured before applying!

Stucco medium is NOT airbrush-friendly and cleans up with water (before curing).


Texture Mediums - Sand (Natural & Resin)

This medium is almost identical in composition to Stucco but has a much higher sand to binder ratio. The Coarse or Resin Sand medium has bigger granules added and a resin binder, maikng it thicker, but perhaps unsuited for miniature work. The Light or Natural medium is probably best but I still prefer the ratio in Stucco for modeling work.

This medium can be mixed to paint according to the manufacturer's suggested ratio. Make sure all underlying paint is dry and cured before applying!

Sand medium is NOT airbrush-friendly and cleans up with water (before curing).