These problems are exacerbated by many gaming companies, as almost none of the major producers covers the proper care and maintenance of their paint and brushes. From a sales standpoint, this makes sense. The quicker an item is used up, the more of it you'll sell - unless, of course, your customer becomes so frustrated with it, that they go buy a competitor's product.
A mutually beneficial approach is for gamers and companies to discuss and understand proper maintenance of their brushes and paints. If these simple steps are followed, anyone can tell whether a product is good on its own merit, rather than the care it was given (or lack thereof).
Brush Anatomy
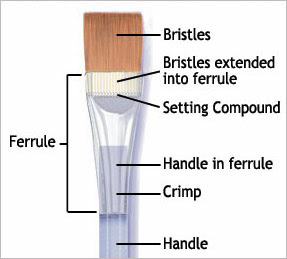
First, let's talk understand the parts of a brush. Going from top to bottom, we have the following:

1) Bristles. This is THE most important part of any brush and accounts for 90% of its overall price. Bristles come in 2 categories: Synthetic and Natural Hair.
Synthetics are just that - man-made materials, generally Taklon or Nylon. Synthetics are cheaper than natural hair brushes because they are easier to produce and/or procure. However, synthetic bristles have a tendency to lose their shape over time. This is caused by water and paint particulates building up within the fiber of the bristle. Proper cleaning can avoid this for a time but ALL synthetic bristles will eventually succumb to this problem because they lack the natural oils which protect natural hair brushes.
The one advantage synthetic bristles do have is their stiffness, which makes them good for heavy uses like dry-brushing.
Natural Hair is (you guessed it) hair taken from various animals - horse, camel, and rodents being the most common types. Most natural hair bristles are difficult to procure (usually the hair must be cut or plucked from the animal) and are more expensive because of this. The advantage of natural hair is two-fold. First, as its from an animal's coat, most natural hairs resist the intrusion of paint and other particulates into its fiber, making it both longer-lasting and allowing paint to flow better. Additionally, natural hair has "snap", which means it tends to retain its shape over time (so long as its properly cared for).
1A) Reservoir (not listed). This is the area just above the tip of the bristles and extends to within 1/4-1/8" of the ferrule. Generally noticeable on some brushes because they are more 'plump' in this area. This is where paint is drawn unto the bristles through capillary action and retained until painting.
It's a good idea to never let paint run past the end of the reservoir or it will be drawn into the ferrule.
2) Ferrule. This is where the bristles are attached to the handle. Ferrules should always be metal - avoid plastic, as it doesn't hold well over time and may crack. When produced, the bristles are set inside the ferrule with a glue and then the metal is crimped around the bristles to retain the brushes' shape.
2) Ferrule. This is where the bristles are attached to the handle. Ferrules should always be metal - avoid plastic, as it doesn't hold well over time and may crack. When produced, the bristles are set inside the ferrule with a glue and then the metal is crimped around the bristles to retain the brushes' shape.
Because the bristle area inside is hidden from view, and due to capillary action, this is generally where paint accumulates and ruins brush shape and stability.
3) Handle. Pretty self-explanatory but it's a good idea to only buy short handles for miniature painting because of all the detail work one does.
3) Handle. Pretty self-explanatory but it's a good idea to only buy short handles for miniature painting because of all the detail work one does.
Brush Type
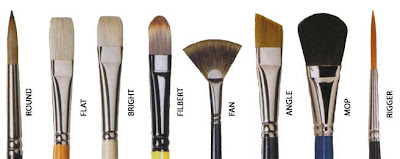
Now on to brush types:

1) Round: This is the most common brush type and generally the best "all-round" brush for miniature painting. Look for a brush that has a good, even tip and a plump reservoir for best results.
2) Flat: A vertically rectangular-bristled brush useful for painting large areas and laying down even coats. Flats are useful when painting vehicles, larger minis, and for applying washes evenly.
3) Bright: A square-bristled brush which finds more use in the fine arts but can cover for a Flat, if you're in a pinch.
4)Filbert: Flat brushes with a slightly tapered edge. Good for laying down weathering powders.
5)Fan: A fan-shaped brush used to blend areas of paint in a fine arts application. Not much use for mini painting, unfortunately.
6)Angle: Flat brushes with an angled tip. Could be useful when painting vehicles or getting into tight corners but a filbert could do this as well (in addition to being a bit more versatile).
7)Mop: The stereotypical "makeup" brush. Good for applying weathering powders and may have applications for paint chipping (though the technique escapes me).
8)Rigger: So named because they were used to paint rigging on boat models, these are fine detail brushes. Useful for some detail work but care must be taken so no paint accumulates in the ferrule, as these brushes lack reservoirs.
Brush Size
Brushes come in all shapes and sizes. Manufacturers use a (normally) single-digit numbering system to designate the size of the bristles. From smallest to largest, these sizes are: 5/0, 4/0, 3/0 (or 000), 2/0 (or 00), 0, 1, 2, 3, 4, etc. The sizes I find the most use out of these are 00, 0, 1, and (sometimes) 2.
A common myth is that smaller brushes (i.e. 3/0 and below) will paint tiny details better. This isn't always true, as brushes (like most things) reach a point of diminishing returns. By Size 3/0, the brush has little or no reservoir, which means it doesn't pick up and lay down paint as well as a larger brush with a good point would. However, YMMV...
My Tools Of The Trade
Personally, I use Winsor & Newton's Series 7 Kolinsky Sable brushes in sizes 00, 0, 1 for most of my painting work, two (sizes 2 & 4) synthetic Flat brushes for vehicle painting and washes, a size 1 Filbert for weathering, and a few old beaten-up synthetic brushes for dry-brushing (as dry-brushing will quickly ruin any new brush).
Natural Hair Brushes & Thinners
It's generally not a good idea to use pliable natural hair brushes (i.e. Red or Kolinsky Sable, etc.) with any form of chemical thinner, such as that used with enamels, turpenoid, or mineral spirits. The chemical thinner will almost always strip away the hair's natural oil over time. If you clean your brush properly, the brush should be ok but it will lose some of its inherent properties over time.
It's usually better to use synthetic of stiff-bristled natural hair brushes if you plan on painting with any type of paint that requires thinner in abundance, mostly because its cheaper to do so.
Acrylic Painting & Flow Improver
Before using any brush, it's a good idea to dampen it in water which has a little Flow Aid in it.
Flow Aid (AKA Flow Improver) is available in almost any art store and is added to water usually in a 1:20 ratio. Flow Aid makes water more "wet", in that it breaks down the surface tension between the paint and the surface being painted, allowing the paint to flow better.
Be careful to mix correctly, as too much Flow Aid will cause paint to dry too slowly and will break down the paints opacity. Additionally, be sure to use a non-porous cup (i.e. glass, metal, plastic, etc.) for "wet" water. I've made the mistake of using a paper cup and having the water literally start leaking out of the cup within 2 hours!
Always be sure to use cool or luke-warm water when painting. NEVER use warm or hot water as this will destroy the glue inside the ferrule and loosen the bristles.
Always be sure to use cool or luke-warm water when painting. NEVER use warm or hot water as this will destroy the glue inside the ferrule and loosen the bristles.
Used & Put Away Wet
When painting, the brush should be damp, not wet. Damp bristles aid capillary action and allow paint to be sucked into and out of the reservoir more easily. As mentioned earlier, be sure not to allow the paint to flow into the ferrule. If this happens - STOP, clean your brush, and start again.
Never keep you brushes immersed in any type of fluid (paint, water, thinner, etc.), bristles down, for long periods of time. This will cause the glue to loosen (as above) and can ruin the shape of the brush.
A Clean Brush Is A Happy Brush...
After each painting session, be sure to clean your brushes thoroughly with brush cleaner. Brush cleaner is available in any art store and comes in two forms - liquid and solid. NEVER use regular hand soap to clean brushes.
First, dampen your brush with cold running water and either immerse in liquid cleaner or rub unto bar soap. Work the cleaner into the bristles thoroughly and then reshape the bristles into their proper form. Rinse and set to dry either on its side (if you don't have the hollow protective "tube" to place over the bristles) or point down (if you do).
Do not set the brush into a cup with its handle down to dry, as any leftover paint or debris will accumulate and dry in the ferrule. In some cheaper brushes, water settling inside the ferrule may also loosen the glue holding the bristles together.
Once dry, brushes can be stored on their sides or in a container, bristles up. Store the container in a cool, semi-dry place with good air circulation.
Well, I hope that helps some of you. If you have any questions, feel free to post them in the comments or drop me an email and I'll do my best to answer them.


1 comment:
The travel size mini brush cleaner that Master's makes is perfect for miniature painting brushes. I've had mine for two years and I've barely made a dent in it. Michaels sells a nice little set which also includes some 'kiss off' for clothing and Master's hand soap. It was about $5 if I remember correctly.
Post a Comment