Showing posts with label inspiration. Show all posts

Thursday, November 8, 2018

El Alamein Table

Full disclosure - I had no real interest in starting a North Africa table and had actually just sold my 15mm NA table a couple of months ago. I don't even own any desert armies, in either 28 or 15mm! But, things just came together and here I am with a North Africa table for local Bolt Action events. This is a strong departure from my normally dense tables, as I really wanted to emphasize the almost featureless expanse of the desert surrounding the Alamein train station itself.


I had actually started work on the dunes earlier this summer with the intent of using them for Gaslands, in sort of a post-apocalyptic Wastelands table. They're spare off-cuts of pink foamboard from previous projects that were cut to shape, sanded, and then textured. I wanted to get a "flowing" feel to each dune, with a gently sloped windward side and and steeply sloped leeward side to provide a more "natural" feel to the table itself. While it's hard to tell from the pictures, the dunes do provide some measure of cover and the higher dunes block LOS for most infantry and troops on the "ground".

The first piece of terrain that helped push me towards a 28mm desert table was Warlord's Desert Table scenery box I won at a tournament early this year. Overall, the set itself is useful, if rather uninspired for the advanced modeler. The star of that set are these excellent resin ruined wall pieces. I really enjoy the look of them and, being separate pieces, they enjoy a good amount of flexibility in arrangement. Here I've made them into a small walled enclosure or heavily ruined building site.


Years ago, I had made two very large rocky hills for Flames of War. I was never really satisfied with how they turned out (or how big they were), so they never saw much use. One was eventually damaged in a move but the other living on in a dusty box. I hate to see terrain sit unused - I would rather sell old terrain and let someone else enjoy it, than have it be neglected in my own extensive terrain collection. So I repurposed this piece to serve as a representation of the high ground to the south of the station, giving it a thorough repaint, and some new flocking. I used a lot of different spray paints and drybrushing to build up a depth of color.


Last, but really the entire reason this became the El Alamein battlefield was finding an amazing deal on Sarissa's El Alamein Station kit. I love Sarissa's kits (the majority of my Seelowe/Channel Islands table are Sarissa's "Europe At War" building line) and this was no exception. The rail line is about 5' long but VERY delicate (so be sure to take extra care when painting the trestles before gluing on the rails, one of my pieces snapped off about 2" from the end). The train cars are great and, when I have a little more in the hobby budget, I'd like to add one of their steam engines as well.

I'd be remiss to not mention the station itself. I'll be honest - on the dry fit build, I was a little disappointed by how plain it all was. However, I assembled the entire station and used some of the spare cardboard sheets to "bulk out" the bottom portion of the exterior walls. This added a nice transition and sense of depth that the kit lacks. I then filled in the joints with spackle and gave the entire structure three coats (!) of gesso, giving it a textured and durable finish. I again used a lot of different spray paints and drybrushing to give it a depth of color quickly. To finish it off, I painted on the English and Arabic signs, added a few of the always helpful pickle barrels, and glued on some British propaganda posters in the vestibule. From pictures, the station at the time appears almost brand new, likely due to the dry climate, so I avoided a lot of weathering besides some drybrush streaking on the roof.


To finish off, I added some leftover crate stacks from my Necromunda Freight Hub table and bought a cheap Twin flat sheet at Walmart for $6 that I spraypainted....to give it a depth of color.

A lot of players will probably disregard this table as being plain but, that was always the intention. The El Alamein battlefield itself is, for the most part, scrubby featureless desert so there is a toss-up decision for the gamer to either go completely historically accurate (and likely end up a death trap for gamers) or anachronistic (and likely end up not resembling the area at all). I feel like this table sits somewhere in the middle - it combines features that are largely miles apart in actual groundscale to ensure a balanced play, while also staying true to the "spirit" of the battle itself.

Monday, October 29, 2018

Tutorial: Early 20th century Urban Barricades

In the increasingly urbanized conflicts that the enveloped the world after World War 1, troops often found themselves with little to no cover or concealment in the broad thoroughfares, plazas, and parks that had come to dominate the civil planning of cities after the crowded conditions of medieval Europe. In response, many assembled and scrounged whatever they could to provide protection against enemy fire and prevent enemy troops from maneuvering quickly in the form of barricades. In this tutorial, I'll show you how to easily assemble three common barricade types. But first, let's take a look at some historical inspiration...


Materials

  • 2-3mm MDF
  • 1/2" to 2" thick Foamboard 
  • Balsa, Basswood or other scale lumber in planks, square, and round 
  • Pre-mixed vinyl spackle
  • Sand, gravel, and assorted rubble
  • 1/48 and/or 1/56 scale bricks (I prefer Pegasus Hobbies' small red brick)
  • Paints (black, greys, and browns are prevalent with reds, red-brown, tans, and yellow being less so)
  • Dry pigments (optional)
  • Glaze or pigment medium (optional)
  • Greenstuff (optional)
  • Craft wood shapes (small pickle barrels, circles, etc. - optional)
  • Old or broken 1/48 or 1/56 softskin vehicles, civilian vehicles, farm/construction implement (Lledo, DeAgostini, and Ertl "Vintage Vehicles" work well)
  • Bits and gubbinz (optional)

Rubble Pile Barricades

One form of barricade was a simple breastwork, formed by pushing or dumping large quantities of rubble into a slope, backed with lumber boards. In heavily-bombed cities, this barricade was fairly easy to assemble, but was non-existent in cities that had not suffered bombing or shelling.

1. Cut a rectangular piece of MDF measuring 6" x 1.5". Along ONE of the long edges, bevel with a dremel or piece of sandpaper (be sure to wear a dust mask or respirator).

2. Cut a piece of 1/2" or 3/4" insulation board measuring 6" x (a bit under) 1.5". Using a utility knife, carefully cut the board lengthwise at a 45 degree angle, so you're left with two sloping pieces.

3. Glue the sloped board on to the MDF with the slope facing the beveled edge (see below), weigh it down, and let dry thoroughly . You may need to clean the board up slightly so the transition between MDF and insulation isn't too apparent. It's OK if there's a slight difference, as this will be covered in rubble, but the pieces should be mostly flush.


4. Measure out and cut enough wood strips to cover the back and sides of the barricade (see below). The sides can stick out slightly towards the top.


5. Add some thicker strips of wood vertically at the corners and halfway along each edge to represent supports

6. To prevent vehicles and tanks from simply driving over the slope, workers would take railroad ties or thick wooden beams and jam them into the rubble, jutting out at angles and reinforced by the weight of the rubble on top of them. To represent this, cut or break off 1-2" long pieces of thick wood rod (either square or rectangular, I used 1/2" x 1/4" inch basswood), sharpen one end, put a small dab of glue on the point, and shove it into the foamboard at odd angles. Don't overdo it - the beams and ties were heavy and it would have been time-consuming to place many on each barricade. 


7. Cover the slope with a mixture of 50% spackle/25% glue/25% paint and sprinkle your rubble mixture on. Be sure to include bricks if you have them. Allow to dry thoroughly (at least overnight is best).

8. Once dry, simply paint the rubble itself. The wood can be stained with washes or diluted paint.


Rubble "Cribs"

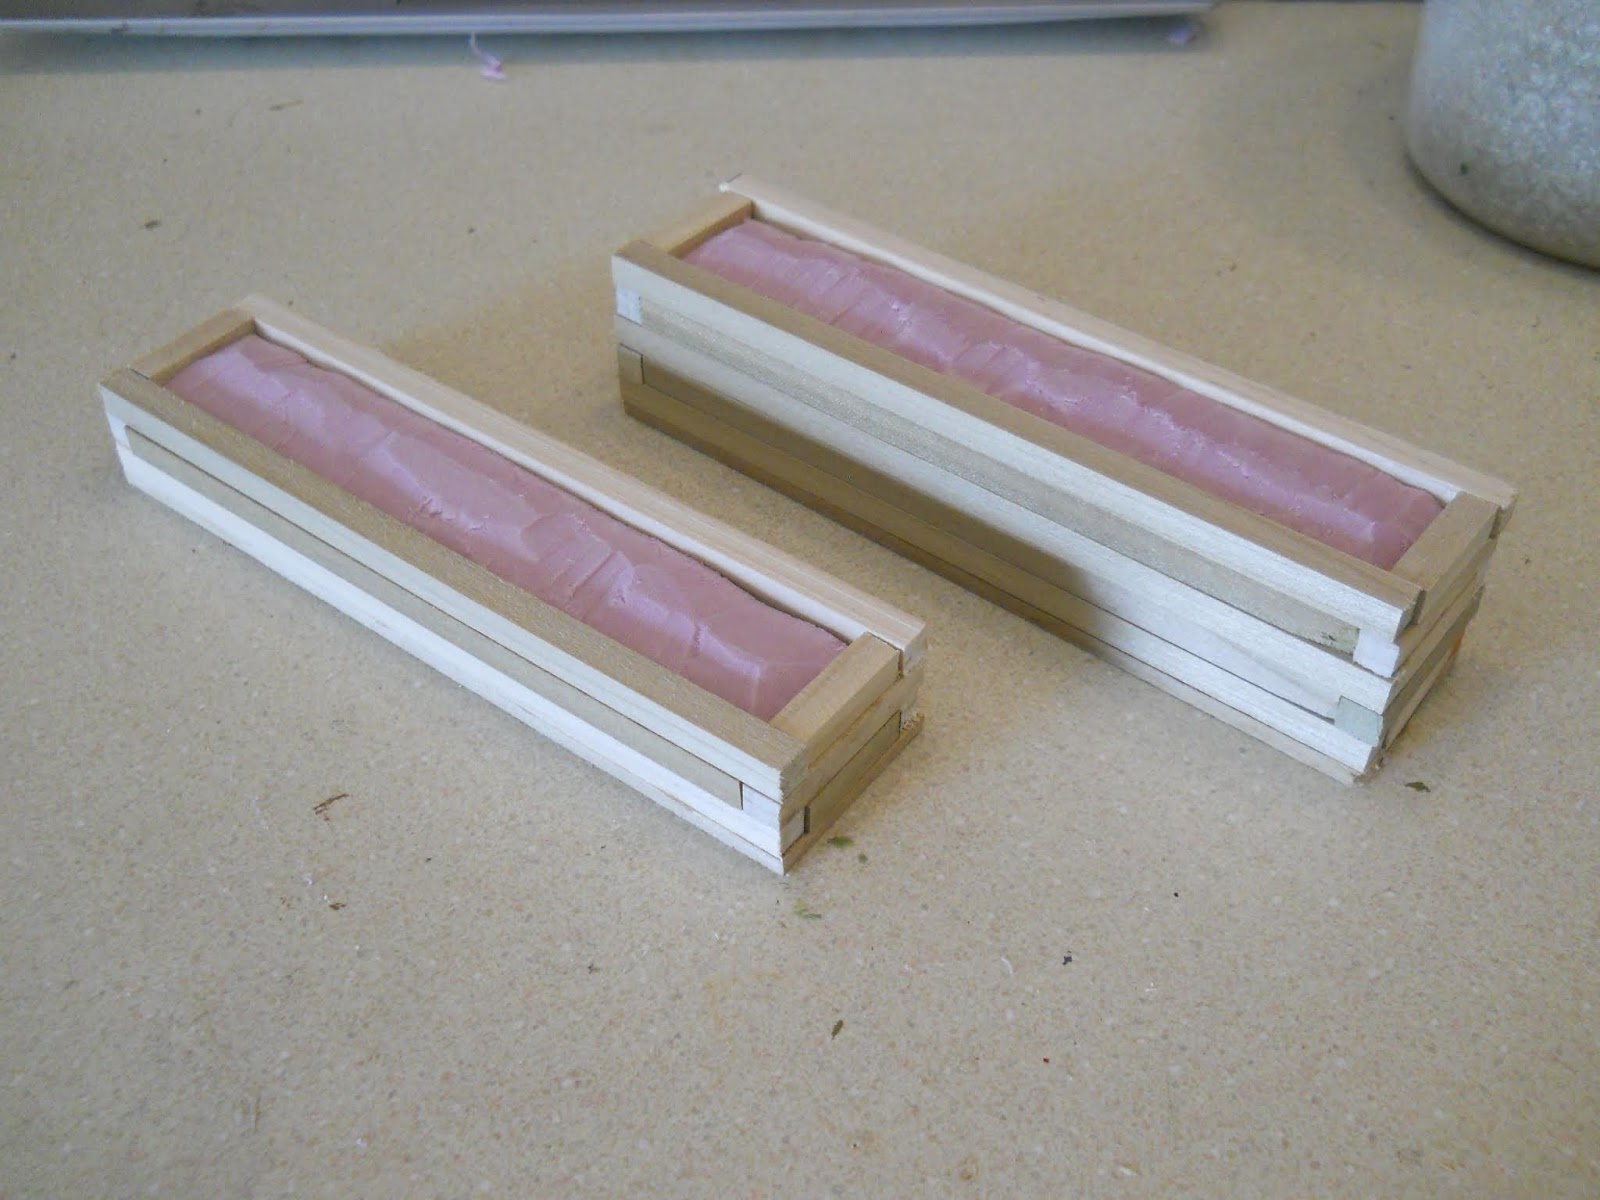
Another form of barricade was the "crib" or box. This was used heavily by the Germans after mid-1944. It required a lot of manpower, time, and materials to construct, so - as far as I can tell - doesn't seemed to have been used outside of Germany itself.

1. Cut a rectangular piece of MDF measuring 6" x 1.5"


2. Cut a rectangular piece of 2" foamboard with enough space to accommodate the dowels, this is going to require some math. For my cribs, I used 1/4" square wooden dowels which seemed to be about the right size for 28mm. Since I needed to place pieces of dowels on either side, that would mean I had to subtract 1/2" from both sides (0.25 x 2 = 0.50), so my foamboard measured 5.5" x 1". Glue the foamboard to the base, weigh it down, and let dry thoroughly.


3. Measure out and cut enough pieces of wooden dowel to form the walls of the crib. As the pieces are stacking in alternating rows (remember building with Lincoln Logs as kid?), you will need some pieces measuring the full length and width of the base itself, and some measuring the length and width of the foamboard. Before gluing it down, be sure to dry fit the pieces to ensure they look right - it's okay if some pieces are slightly too long or too short, these barricades were assembled in haste! You can also make them any height you wish - there are some pictures showing cribs that were used as breastworks and many more showing cribs taller than the height of a grown man.

Once you have decided on the height of your cribs, make the top of the wood with a pencil and then use a utility knife to cut the foamboard BELOW this line, with a sloped towards the edges. Glue on the wooden dowels and allow to dry.


4. Once dry, cover the slope with a mixture of 50% spackle/25% glue/25% paint and sprinkle your rubble mixture on. Be sure to include bricks if you have them. Allow to dry thoroughly (at least overnight is best).

5. Once dry, simply paint the rubble itself. The wood can be stained with washes or diluted paint.


Bric-A-Brac or "Random Crap" Barricades
The most numerous example of urban barricades were those assembled from random items, including things such as streetcars and vehicles filled with rubble, paving stones, cable reels, rolls of newsprint, furniture, barrels, crates, sandbags....if it was large enough to provide some measure of cover and concealment, it's likely to have been thrown into a barricade at some point. Barricades like this pre-date the 20th century as well, being widely used during the French Revolution and (most famously) at the Battle of Rorke's Drift. By WW2 though, they needed to be able to withstand heavy caliber ammunition and tracked vehicles so, when lighter items were used, they were often filled with rubble, bricks, and stone and reinforced by placing heavy timbers or railroad ties into the ground behind them.

I could easily write instructions on how to precisely make a random barricade, but most of the fun is finding examples and assembling them yourself. Below are four of my completed barricades (as well as those listed above). As you can see, I used some old broken vehicles, some "pickle barrel" wooden shapes, 1/48 fuel drums, lasercut MDF squares (leftovers from some Sarissa buildings), bricks, etc.

Sandbags can be easily made by rolling out strips of epoxy putty, cutting them into equal pieces, and squashing them down in ordered rows. Cable reels can be made using a piece of circular wooden dowel as the center with two circular MDF bases sandwiched on either side. If you break, incorrectly assemble, or badly paint a vehicle, this is the perfect excuse to use it - just be sure to fill soft-skinned or civilian vehicles with rubble.

Whatever you do, just be sure your figures can see over the barricade in most places!


Thursday, October 4, 2018

Tutorial: Shattered Cityscape Basing


As much as I love cast resin bases, when purchased in a quantity of anything higher than a single squad, the cost becomes astronomical. This either forces modelers to spend exorbitant sums in order base their armies and/or keeps new modelers from spending much time or effort on their bases. Personally, base work is one of the aspects of modeling that can make or break a miniature, so I set out to make a cost-effective and reasonably approachable tutorial to make eye-catching bases with little experience.

Here's how you can make great Shattered Cityscape bases. The two most expensive items in this tutorial are the cork sheets and GW skulls - the latter being an optional addition that could easily be left off.

As always, practice responsible shop safety.


Materials Needed


  • A selection of bases
  • Thin cork sheeting (I used IKEA placemats)
  • Paperclips or copper wire
  • Sand/gravel/grit of appropriate size
  • 1/48 or 1/56 scale bricks (optional)
  • GW skulls (optional)
  • Other bitz (I-beams, plasticard, scale sandbags, etc.)
  • Propaganda posters/signs (optional)
  • Wire cutters
  • Needle-nose pliers
  • White and super glues
  • Gesso
  • Acrylic paints and washes (see below for appropriate colors)
  • Brushes
  • Flat clear spray sealant
  • Black spray primer

1. If you're using plastic bases, be sure to wash them in warm water with some dish detergent. Bases are produced in huge batches, which causes the producers to use a lot of mold release agent. If you don't wash it off, that agent prevents glue and paint adhering properly. Rinse and dry them thoroughly.

2. Rip off chunks of the cork sheeting. This will be used to mimic cracked concrete, so it's good to rip them into larger chunks first and then split those into smaller and smaller pieces that can be placed close together (leaving a gap of some sort) to resemble the irregular cracking of concrete under stress. Place portions onto bases and arrange them before gluing the pieces down with super glue.


It's a good idea to leave "open" spaces on some of the bases large enough to fit any sand/grit, bricks, skulls, or other bits. On every third base or so, I leave enough room to place one or two skulls. If you'd like, you can layer the cork to resemble thicker pieces of concrete or to provide a taller base for character figures.

3. Apply two coats of gesso over the top of the cork. Do not apply it to the ripped sides. This does two things - it seals the top of the cork making it more durable and provides a dried concrete texture to the undamaged top portions.


4. Glue any large bitz into the open spaces using super glue

5. Spread a 75/25 mix of white glue and water over the open portions of the base that remain and sprinkle some sand/grit over the mixture. Don't worry about covering these portions completely, you'll be doing a second coat. Let the glue dry for at least 2 hours (overnight is best).

6. Once dry, gently blow any excess sand away, then again using the 75/25 mix of white glue and water, cover the grit areas again, as well as some portions of the undamaged "concrete". It's a good idea to add in any bricks or smaller bits at this point as well. Let the glue dry for at least 2 hours (overnight is best).


7. Once dry, gently blow any excess sand away. Roughly bend your paperclips or copper wire using the needle-nose pliers and cut off small 3-6mm portions with a wire cutter. Realistically, even though the reinforcing metal rods called rebar are buried a bit deeper than what would be exposed on a 2mm high base, we add these for artistic effect (The Rule of Cool). Put a dab of super glue on the end of one of the pieces and stick it horizontally into the side of the cork, then mentally draw a straight line from one end of the base to the opposite and do the same there. It doesn't have to be exact. You should space the rows about 10mm apart.

Rebar is (generally) laid in perpendicular rows at right angles, so do another row or two on the other sides. If you miss a few, don't worry - not all the rebar will be exposed, On a 25mm base, I do about 1-3 rows total, so anywhere from 1 to 6 exposed ends. Larger bases get more rows and more exposed ends.


8. Prime with black spray primer. This may require several coats to get into the crevices between the concrete. I suggest doing a couple coats of spray primer and then finishing up with an airbrush loaded with black acrylic paint running at 15-20psi, if you have one. If you don't have an airbrush and can't get into the cracks, once the primer is dry, dilute black acrylic paint with water and flow improver and apply that as a wash into the deeper cracks.Let the primer dry for at least 2 hours (overnight is best).

9. Paint with acrylic paints, starting with the darkest color and working up to lighter colors. Here, I started with a Dark Gray color called (appropriately) Pavement and applied this to the entire base. I then added subsequent layers using a a mix of a custom "concrete" color (itself a mixture of light grey, beige and brown tones) in increasingly higher ratios (i.e. first 75/25 Pavement/Concrete, then 50/50 Pavement/Concrete, and so forth) until the last highlight, which was a pure Conrete color. I used semi-dry brush technique where I loaded the brush with paint and then wiped off the excess - not to the point where the brush was truly "dry", but to where the outside of the brush was slightly damp with paint.


10. Paint any details. Rebar has a dark brown to rust color and bricks come in a variety of reds, brown, yellows, and grey. I basecoat my skulls with a tan color called Golden Brown, then do successive semi-dry brush layers of Ivory. If you'd like, repaint the black ring around the lower base.

At this point, I also come through with a variety of washes; loading the brush up with a diluted mix of wash and water and just dabbing the brush randomly on each base. This adds a subtle variety of colors to mimic the effects of crumbling concrete, masonry, and other debris mixing together.

11. Once dry, seal with spray sealant. Allow to dry 6-12 hours.

12. If you'd like, find and print 28mm propaganda posters and cut out. Burnt posters can be replicated by using a lighter (after you've cut them out and before you glue them down!). Glue them down with white glue.


Obviously, you'll need to paint (or at least prime) your miniatures separately for this tutorial but it's easy enough to temporarily attach them to a figure holder, scrap wood, or spare base while doing so and then adding them later. 

Friday, January 19, 2018

Redemptionist Encampment Necromunda Board

We're about 60 days out from Adepticon 2018 and I was finally able to fully complete one entire board. Most of what I've been working on has been used and re-used for the tournaments and events over the past 8-9 years and was pretty beat up and a lot of it was just a mish-mash of random pieces that I'd completed at different times, so they didn't exactly meld together properly when put on the table. As such, I wanted to go back and fix what I could, re-purpose what I couldn't, and combine them all into one coherent table. For this table, I chose a Redemptionist encampment theme. As the crusades pass through various domes and settlements, they'll often stop for a bit, cleanse the area of heresy, and exact some tithing from the locals. I really wanted this to look like a settlement where the Redemption has just recently settled in for what would likely be a few cycles. As such, there's a lot of religious graffiti and iconography but it hasn't become too out of control....yet. I also wanted a strong color theme throughout that evoked the furor of the Redemption, so I went with an orange-red rust color throughout, as well as picking out many pieces for some bright red paint schemes. As many of these pieces are re-purposed, I'll try to link to the older posts so you can see the changes below. 

"Alright, Arch Zealot - show us around the place!"

First are the entrance gate, settlement fence, tithing kiosk, and pilgrimage pulpit. Most of this was simply repainted for the table with some very minor additions. Unfortunately, during a loan to another person, they had lost several of the original pieces.


My (and apparently everyone else's) favorite piece is the Redemptionist Chapel and its "gospel" board. Initially, this had a small side shed and gibbet. The gibbet was re-used on another piece below and I removed the shed in favor of a large Promethium tank. After all, all those flamers require a lot of refills! Other than that, I just did some repainting on this piece.


The "Sin Tank" and weapons store. These were two pieces that had parts swapped between them, initially the store had the water tank but both proved to be very fragile and broke almost completely after last year's events. As such, I lowered the height of the water tower in an attempt to make it more durable and focused the theme of the other structure on weapons sales. The Sin Tank is sort of like a sensory deprivation cell that sinners and heretics can be imprisoned and, if unrepentant, lowered into the sewers below.


The pipe shelters. Really just something I threw together at the VERY last minute in 2013, these pieces did grow on me more as years went on - they're cheap, easy to make, and present a host of opportunities during play. Most of the work on these were expanding the platforms on top and repainting the pipes themselves to give them a more concrete look.


The Yellow Pulpit and ruined Chapel. Really not much new on these besides repainting - the chapel received more highlights to make it pop, whereas the Pulpit got a wash of Tamiya Dark Yellow wash to tone down the brightness, as well as some suitable graffiti. I held off on graffiti for the Chapel because even the most hardcore Redemptionist would defile holy ground!


The classic Necromunda towers. Probably the least changed of all the pieces here, since they were the first custom pieces I had ever made. Not bad for being 10 years old, right? Mostly just some washes, chipping, and jewel effects for buttons and screens.


Lastly, the "Blue" Tower - with the color scheme, this structure does stand out and I really wanted it to. It being tall, blue, and yellow; I wanted to give the impression that maybe...just maybe, the Redemption had taken in the wrong town. After all, who dwells at the top? And in what ways will he change it? Really the only thing new here was the addition of the crane and ladder to make it more accessible during play.


And, here's the finished settlement of Royston Vasey. You'll never leave!


Monday, November 20, 2017

Ork Shanty Town: Cactus Groves

Made some Borderlands-inspired alien cacti patches for my Ork Shantytown last month and just this past weekend got around to putting the last coats of paint on them. The tall cacti are made from wooden dowels of various diameters and lengths glued into insulation foam which is mounted on old CDs. Once dry, I took a high-temp glue gun and covered them with glue, letting it flow vertically down each "trunk". The smaller "bush" cacti are made from seedpods of the Sweet Gum tree and my tutorial on how to make them is here.