Showing posts with label Science Fiction. Show all posts

Tuesday, February 28, 2023

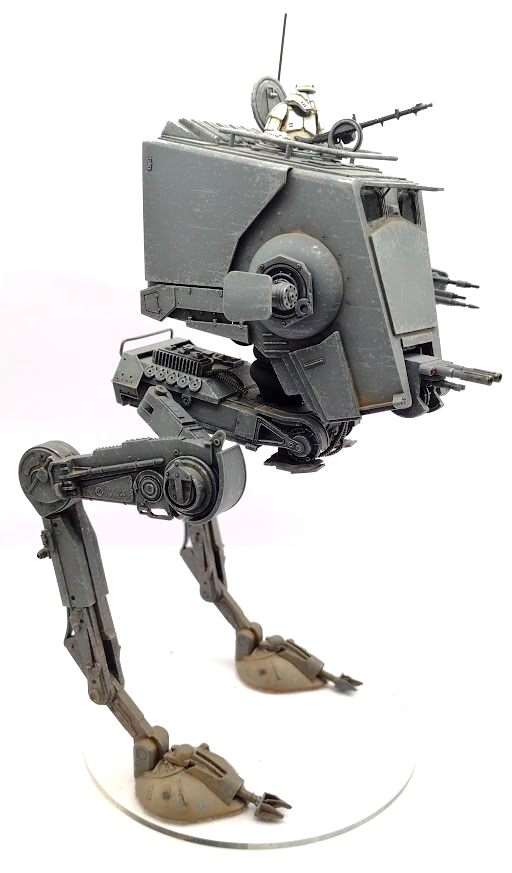
1/48 Bandai AT-ST Mk2

 This is my converted Bandai AT-ST in 1/48 (for modelers) or Star Wars Legion scale (for gamers). Started this build around December 2021 and finally finished it up.


I based this on artwork by Ukitakumuki on DeviantArt done for the Star Wars Galaxies card game. My headcanon is that this is an upgraded version of the base AT-ST incorporating features learned after the battle of Endor, allowing the walker to work more independently for longer periods of time, in a seek-and-destroy role.

I reinforced the inner thighs with plasticard and greeblies, added grabirons to the rear to allow easier crew access with wire, up-armored the sides of the chin with plasticard sheet, added additional detailing to the rear of the head with greeblies, a long-range antenna from a 1/100 M113, pintle mounted blaster from plasticard and a 1/35 MG34, and a combat commander using the head and arms from a Legion Occupier tank figure, torso and lower legs from a Legion LAAT pilot, and legs from a Tamiya Luftwaffe pilot. The rear of the head is removable to install a watch battery that powers the interior LED (difficult to see using my light box).

It was painted using Tamiya and Vallejo acrylics and the chipping effects are done by hand. I then applied an overall oil filter of Payne's Grey to blend the colors and tone down the metal chips. Once that was fully cured, I weathered it using oils and AK Interactive enamels.

I really enjoyed this build and highly recommend picking this model up, even for use in gaming. Once mounted on a clear base, it's very stable.


Thursday, November 21, 2019

Bandai 1/12 scale K2-S0


Sorry for the delay in updates everyone. If you haven't already heard EoG is moving soon, so that isn't very conducive to keeping my hobby going regularly. This wonderful 1/12 scale K2-S0 droid was the last major project I finished last month and just haven't gotten around to taking some nice glamour shots.

This is my first "large-scale" Japanese figure kit and it was both a pleasant, and frustrating, change of pace from the kind of stuff I normally do. The neck, arm, wrist, hip, and leg joints are all fully poseable; except for the feet, which I glued to the base to keep the figure stable since its quite top-heavy. I assembled this in smaller sub-assemblies at first to make it easier to prime and paint.

The thing I like about Star Wars is the grittiness of it, so I really wanted to make this model look worn without getting too far from the source material. As such, I primed the model in Krylon grey spray primer, hit it with a few coats of hairspray, and then airbrushed a 50/50 mix of Tamiya Black and Sea Blue. Once that dried, I used water to add a chipped paint effect along edges and points of articulation.

I picked out bare metal parts in Vallejo Oily Steel with a light wash of Secret Weapon Soft Body Black. The lighter and darker grey areas are Pewter and Pavement Grey, respectively, with the "warning" areas being Tamiya Lemon Yellow, with a slight coat of hairspray added between each layer to give it a mottled, worn effect. Weathering was done almost entirely with oil washes. To replicate the buildup of dust and dirt in crevices, I added dry pigment to the oil wash. The base itself was from an old Dust model - I ripped out the plastic bottom, glued in a metal washer for weight, primed in Krylon Rust Red, hit it with some hairspray, and then airbrushed it Tamiya Flat Black. I added the caution markings and script decal from an ancient Robotech model (the Star Wars universe has a funky alphabet and that came close enough).


Tuesday, October 9, 2018

6mm Sci-Fi Buildings

With the hype for a new Battletech game reaching fever pitch in August, I impulsively bought Gamecraft's 6mm Middle Eastern village. Now that the release date has been pushed back severely, I'm left with a village but no games to play it with. Ah well, this was a fun side project in a scale I don't normally tackle. 

The buildings themselves are more or less stock, with some bits added here and there to give it a low-tech feel. Being laser-cut clear acrylic, they were somewhat difficult to assemble, especially the corners which have several butt joints with larger gaps. I filled the gaps with some spackle which seemed to do the trick, though that added a lot of time to the assembly process. 

I then primed the entire building white, inside and out and airbrushed a graduated basecoat of Vallejo Dark Sand. I then blended and streaked the white and sand color together using a drybrush technique working vertically. This give the buildings a weathered appearance as if dust and grime had accumulated on the upper surfaces, whereas the ground floors had been left a bit cleaner due to the density of other buildings, regular cleaning, or simple human contact. I then added darker chips of Golden Brown and Beige with a sponge (to simulate pock marks and sections of flaking stucco) and painted all the smaller details. 

To simulate graffiti and commercial signage, I used random decals from GW, GF9, and Italeri. Once dry, I sealed the entire building and added clear plastic (with a layer of semi-gloss sealant on the reverse side) to simulate glass doors and windows, as well as the "holographic" billboards. To finish them off, I added some dry pigments applied as a wash to simulate dirt and grime buildup on the roofs.


Wednesday, March 14, 2018

Tutorial: Quick and Easy Bronze Statues

It's Adepticon crunch time and that means repainting old terrain - one of which is this Deathwatch Marine I made years ago from an Inquisitor-scale Artemis and a plinth from an old Tamiya figure. I've done a lot of bronze statues over the years and people keep asking me about my methods so, along with the repaint comes a tutorial. I'll start out by saying that this statue is going to get the works, including heavy weathering. You can skip certain steps to make the statue look newer or less oxidized and I've denoted these steps by placing an asterisk before the number.

Materials needed:

  • A statue (if this is your first time, I recommend a scrap mini. If it turns out great, you've got a statue. If it doesn't, you didn't waste a great mini!)
  • A plinth (this is the stone or cement base the statue sits on. It can be anything from wood to plastic to old bitz. It should just look reasonably big enough to anchor your statue)
  • Black primer
  • 2 shades of Bronze paints (I use Tin Bitz for my dark base and Vallejo Bronze for my highlight)
  • Verdigris paint (I mix my own using mid-tones of green, blue and white but there are ready mixed colors on the market)
  • Vallejo Glaze Medium
  • Secret Weapon Cool Grey Wash
  • Off-White paint (for bird poop)
  • Black or VERY Dark Brown paint (for engraving text)
  • Colors for the plinth (I use Pewter Grey and Pure White)
  • Brushes (one for detail painting, one for washing, one for drybrushing)
  • Sponge


1. Prime your model black. Be sure to cover the model completely. All bronze statues have a black base color, so any bare metal or plastic will stick out if missed.


2. Heavily drybrush your dark Bronze color, covering all raised areas equally. It's OK to leave deep recesses a black color, for the reason I mentioned above.

3. Using your lighter Bronze color, lightly dryrush the higher areas and edges. It seems redundant but it will show through slightly, even with fairly heavy weathering.


4. Mix together your verdigris color and some of the glaze medium and cover the entire statue using the wash brush. You can vary the amount of weathering by varying the wetness of your brush - if the brush is fairly dry, weathering will be heavy; if it's wet, weathering will be lighter. Focus more weathering on the upper surfaces than lower, as rain causes more oxidation on upper surfaces.

5. Once the verdigris is thoroughly dry, wash the entire statue with SW Cool Grey Wash. 


6. While the wash dries, paint your plinth. Cover the entire plinth in your base color.

7. Using the sponge, stipple successively lighter shades unto the plinth. This is a quick and easy way to fool the viewer's eye into thinking its a stone effect. When finished, use a detail brush to highlight the edges with pure white.

*8. For a more heavy weathering effect, apply a second coat of verdigris glaze, applying it solely on upper surfaces. You can simulate drip stains by using the detail brush and applying the verdigris in vertical strokes, applying heavy pressure at the top of the "drip" and lightening the pressure towards the bottom "end".

*9. To simulate engraved text, apply horizontal squiggles of black paint for the text shadow. For the text highlight, apply horizontal squiggles of verdigris mixed with white immediately below the text shadow.


*10. To simulate bird (or other xenos avian) poop, dab off-white color in spots on the uppermost surfaces, applying drips in the same way as Step 8. You may add small lines of solid poop in some spots, but do so sparingly. Apply a glaze of off-white around each spot, especially in areas where spots are grouped together.

Thursday, February 22, 2018

Necromunda Freight Hub: Freight Train

All aboard! I forgot to share pictures of the completed freight train for the freight hub table. As many of you know, most of my Necromunda terrain was inspired by Ironhands' work and, ever since he posted his excellent converted train, I wanted my own.

This is made (almost) entirely of old O-gauge Lionel cars that I received via Facebook train sale groups or Ebay lots. In addition to gaming, I'm also a model railroad fan, so I've amassed a pretty good selection of O-gauge trains over the years. As more model railroad fans upgrade their tracks to the more realistic tracks with plastic ballast bases, these old 3-rail tracks continue to drop in price, usually about $10-15 for a 6' oval, and the lack of ballast actually makes them fit in better with the futuristic look of science fiction games. To make them look even better, I sprayed them all over with Krylon Rust Red primer and then used sandpaper on the top of the tracks for a worn look (and to provide better electrical contact between the transformer and engine).

I held off doing any type of graffiti on these trains because I wanted this to look like the Guilders put some energy into security and didn't let taggers run amok in the freight yard.


The locomotive itself is a Ready Made Trains' "BEEP" engine, which is a super-deformed version of the eponymous GP-7 locomotive. This is an excellent engine for 28mm gaming because it's less than half the size of most realistically-proportioned O-gauge locomotives without looking diminutive next to the cars themselves. It also has an easily removable body shell that just clips on and off, so it allows you to switch between weathered, painted bodies for gaming and nice bodies for railroading (mine has a spare Chicago and Northwestern body). I painted this body using salt weathering (actually old toothpaste!) and spray paint, with decals from the old Imperial Guard transfer sheet, and weathering done in acrylics.

There was some possibility that RMT would end production last year, but it appears that they are back in business.


This was originally a Lionel gondola car with covered coil hoppers. I had it for years but never used it since I pretty much only run trains and cars consisting of midwestern US lines (it's a model railroad fan thing, you wouldn't understand). I don't use the coil covers since it makes the car look too big and then figures can't be placed inside the car, which provides a great deal of hard cover.

I painted this body using salt weathering (actually old toothpaste!) and spray paint, with decals from some old 1/48 aircraft transfer sheets, and weathering done in acrylics.


This is an old Lionel plastic flat car. This (and the tank car) are SUPER cheap because they're from the late 70s when Lionel switched most of the materials over to plastic to save on production costs. You want to search for "MPC" or "MPC-era" lots on Ebay, as these usually go for ~$3 per car.  I painted this body using Krylon Red primer spray paint, painting the wooden deck in tans and greys, with decals from some old Imperial Guard transfer sheets, and weathering done in acrylics. I added crates from the Munitorium Containers set, leaving just enough room on each side to position 2 figures with partial cover.


Another Lionel MPC "three-dome" tank car. These are actually really rare cars in reality but I love the look of them so much, I have about 4 for my model railroad. Since they were rare, they actually look much better in fictional settings. This one actually came to me missing the hatches (really common because they're just separate plastic pieces that weren't glued in well during production), so I made new ones using 25mm washes, 20mm washes, and plastic hex nut covers from IKEA. I painted this body using Krylon Red primer spray paint, with decals from some old 1/48 aircraft transfer sheets and old Imperial Guard transfer sheets, and weathering done in acrylics.


Wednesday, February 21, 2018

Crashed Aquila Lander

Battle of Macragge was a pretty awesome starter set for 40K, even it was a little underwhelming. Though I don't have the rest of the set anymore, I did keep the excellent crashed Aquila Lander terrain pieces, which tend to get a lot of use in skirmish level games. My initial paintjob wasn't fantastic and, after several years making the Adepticon rounds, it was looking a little worse for wear, so I decided to give it a repaint.

I went with a Reaper Dark Elf skin purple for the exterior and Vallejo Olive Green for the interior. I also used various decals for both the old Imperial Guard and Cadian transfer sheets. I then did some little wear around the damaged pieces and airbrushed some Territorial Beige and Khaki for the churned-up ground.


Monday, February 12, 2018

Necromunda Freight Hub - Container Loader

In the process of building a Freight Hub table for Necromunda, I realized that - while I have a lot of Munitorium Containers - I don't have anything to load or unload them. Not wanting to spend $50 on a GW loader, I hit up some of the old toys my son used to play with. This is a plastic Erector-style building set where you can build a couple different construction vehicles. I think it's called Caterpillar Max Builder or something like that. Mostly this is straight out of the box with the addition of a skull crane and stack from the Sector Mechanicus kit and a Land Raider engine, as well as some granny grating to cover some of the windows and vehicle walkway. Though a little large, this does work well as a piece of terrain.

As for painting, this won't win any awards. I did the priming and yellow undercoat with spray paints and weathered with acrylics. 


Friday, January 19, 2018

Redemptionist Encampment Necromunda Board

We're about 60 days out from Adepticon 2018 and I was finally able to fully complete one entire board. Most of what I've been working on has been used and re-used for the tournaments and events over the past 8-9 years and was pretty beat up and a lot of it was just a mish-mash of random pieces that I'd completed at different times, so they didn't exactly meld together properly when put on the table. As such, I wanted to go back and fix what I could, re-purpose what I couldn't, and combine them all into one coherent table. For this table, I chose a Redemptionist encampment theme. As the crusades pass through various domes and settlements, they'll often stop for a bit, cleanse the area of heresy, and exact some tithing from the locals. I really wanted this to look like a settlement where the Redemption has just recently settled in for what would likely be a few cycles. As such, there's a lot of religious graffiti and iconography but it hasn't become too out of control....yet. I also wanted a strong color theme throughout that evoked the furor of the Redemption, so I went with an orange-red rust color throughout, as well as picking out many pieces for some bright red paint schemes. As many of these pieces are re-purposed, I'll try to link to the older posts so you can see the changes below. 

"Alright, Arch Zealot - show us around the place!"

First are the entrance gate, settlement fence, tithing kiosk, and pilgrimage pulpit. Most of this was simply repainted for the table with some very minor additions. Unfortunately, during a loan to another person, they had lost several of the original pieces.


My (and apparently everyone else's) favorite piece is the Redemptionist Chapel and its "gospel" board. Initially, this had a small side shed and gibbet. The gibbet was re-used on another piece below and I removed the shed in favor of a large Promethium tank. After all, all those flamers require a lot of refills! Other than that, I just did some repainting on this piece.


The "Sin Tank" and weapons store. These were two pieces that had parts swapped between them, initially the store had the water tank but both proved to be very fragile and broke almost completely after last year's events. As such, I lowered the height of the water tower in an attempt to make it more durable and focused the theme of the other structure on weapons sales. The Sin Tank is sort of like a sensory deprivation cell that sinners and heretics can be imprisoned and, if unrepentant, lowered into the sewers below.


The pipe shelters. Really just something I threw together at the VERY last minute in 2013, these pieces did grow on me more as years went on - they're cheap, easy to make, and present a host of opportunities during play. Most of the work on these were expanding the platforms on top and repainting the pipes themselves to give them a more concrete look.


The Yellow Pulpit and ruined Chapel. Really not much new on these besides repainting - the chapel received more highlights to make it pop, whereas the Pulpit got a wash of Tamiya Dark Yellow wash to tone down the brightness, as well as some suitable graffiti. I held off on graffiti for the Chapel because even the most hardcore Redemptionist would defile holy ground!


The classic Necromunda towers. Probably the least changed of all the pieces here, since they were the first custom pieces I had ever made. Not bad for being 10 years old, right? Mostly just some washes, chipping, and jewel effects for buttons and screens.


Lastly, the "Blue" Tower - with the color scheme, this structure does stand out and I really wanted it to. It being tall, blue, and yellow; I wanted to give the impression that maybe...just maybe, the Redemption had taken in the wrong town. After all, who dwells at the top? And in what ways will he change it? Really the only thing new here was the addition of the crane and ladder to make it more accessible during play.


And, here's the finished settlement of Royston Vasey. You'll never leave!


Tuesday, January 9, 2018

No One Expects The Emperor's Holy Inquisition

Tremble before the fires of vengeance, all ye heretics, for an agent of the Emperor's Holy Ordos reveals himself!

One of my resolutions for the new year was to start setting aside 4-6 figures every month to work on. I have a fairly sizable backlog of unpainted or partially completed figures and models sitting in boxes and it seems like such a waste to buy more when they remain unfinished. I'm going to attempt to do this in addition to other projects that I'm working on, as I think that about 5 miniatures every month should have me completing most of the backlog before 2019. So, back in December, I dug through the lead pile and pulled this Ordos Hereticus team together - the Ratling was new, the familiar, redemptor, and sage had been stripped, and the Inquisitor I had painted about 8 years ago and never really liked how he turned out. Once completed, I mounted them on custom bases and here they are!


Inquisitor Alfonse Wojnik - Not much is known of Wojnik's life before he was taken into the Schola after being found as an orphan in the Underhive of one of the lesser hives on Necromunda. It became apparent earlier on, however, that the young man had an aptitude for rooting out possible corruption amongst his peers and even Schola staff members - incidents which led to his quiet disappearance. He would return to his homeworld decades later, inveigling himself in Hive Primus' Arbites garrison, from which he continues to perform the holiest of the Emperor's work.


Jonas, Redemptor Deacon - Much to the Arbites' consternation, Wojnik decided upon including a full-fledged Deacon of the Redemption Cult in his strike team. Unlike his brethren however, Jonas has some level of self control over his violent zealotry. His customized flamer rig - said to be styled on that of Klovis the Redeemer - has proven a valuable asset when dealing with large mobs of heretics and mutants. 


Index Prohibitorum & Familiar - Wherever Wojnik goes, this secretive red book accompanies him. Exactly what knowledge it holds is unknown, though the Inquisitor seems to gain some innate knowledge of the enemies he is currently facing from it. How this is possible is also unknown. The familiar who carries it is unnamed and, though it never speaks, is rumored to whisper in Wojnik's ear when things seem most dire.


Martus Palimp, Sage - Formerly a scrivener for House Ulanti, Martus has recently found his way into the Inquisitor's employ due to his cybernetic cortex, capable of enhanced his cognitive abilities seven-fold. Though powerless to do anything, Ulanti claims that he is their property and was stolen from them. Though he often finds himself in mortal danger, Martus prefers the company of Wojnik to that of his former employers.


Hamish, Ratling Sniper - The only member of the team not from Necromunda, Hamish was originally a sniper in an Armageddon Guard regiment. Familiar with hive architecture and combat conditions, Wojnik has found his skills invaluable, especially in the confined passages of the Underhive. In addition to his martial prowess, Hamish is also a good cook and tends to have food on his person at all times - something the team has appreciated while out in the field.