Thursday, February 26, 2015

Tutorial: 15mm Telephone/Telegraph Lines

By the 1930s, much of Europe was criss-crossed with a wide array of telegraph and telephone overhead wires. Telegraph lines were common, usually accompanying the growth of railroads and their depot and maintenance buildings. As such, they could be found as far west as Portugal, as far south as southern Italy (there were even some lines in Egypt), as far north as northern Norway, and as far east as the Russian steppes.

Telephone lines were common in prosperous Western Europe, but grew increasingly rare the further south and east the fighting advanced. Whatever technology they used, communication lines were vital and important strategic assets to all armies. Usually located alongside roads and rails, often at the edges of cultivated fields, communication line poles quickly became rocky and overgrown. As such, they make great linear obstacles that provide useful concealment to infantry and AFVs alike.


Materials


  • Wide popsicle sticks ("tough depressors") - the thicker the better!
  • Bamboo sticks or wooden dowel rods
  • Thin basswood strips
  • Tiny round beads or plasticard rod
  • Wood glue
  • Construction adhesive (optional)
  • Sand, ballast, and small pebbles
  • Clump foliage
  • Static grass
  • Earth-tone acrylic paints
  • X-acto knife
  • Black nylon thread (optional)

1. The first step is to choose the basic shape and contruction of your poles. 99% of poles were simply tree trunks, denuded of bark with wooden line support crossbars nailed on (Some were treated with pitch or tar to make them relatively weatherproof, giving them a dark brown appearance). Some, especially at the end of lines (near a town or structure) had a wood support beam added to take the extra weight and pull of the lines (see the pics above for an example). The crossbars weren't always at the very top of the pole either - many lines were carried alongside the pole at various heights.

I should point out one exception to the above and these were the concrete poles and metal crossbars installed throughout northern France in the 1930s. These poles are very distinctive, having a ladder-like construction. From what I understand, these lines were installed because the high soil acidity rotted the wood bases, causing the pole to collapse (great soil for wine grapes, not so much for wood). There are some manufacturers of these poles on the market.


2. For this tutorial, I'm doing a very basic, common construction of one pole and one small crossbar at the peak.

Start by marking each popsicle stick at various intervals for where the main pole will be glued. Above I've divided each stick by thirds. You may divide each stick at whatever length you'd like. You may also want to sand down the edges of the popsicle stick so it blends in more evenly with the game mat.

3. Cut each bamboo stick into 2" lengths - these will be the main poles. Glue each pole on the popsicle sticks where marked and let thoroughly dry.

If you want shattered and broken poles, just snap the poles at various heights. Communication poles are thick and tough and will often not break completely. Often they will snap and hang to one side from several pieces of wood. If you do snap the pole completely, leave the top portion off the base until after the next step.

4. Once the poles are dry, spread a thick layer of construction adhesive on the popsicle stick and apply basing material. I place several small pebbles along each stick to represent large rocks and boulders farmers have pulled out of their fields and dumped along the edges. This also adds weight to the stick to help it stay upright.

If you have any damaged tops of poles, push them slightly into the basing material now.


5. If you find the bases warping too much (a little warping is OK, they will straighten out when dry), paint the underside of each base with acrylic paint. Allow the paint to dry. Keep applying more coats to even out the warping.


6. Once everything is dry, it's time to move unto the crossbar supports. I cut small (~10mm) lengths of basswood strips. I then cut small notches to flatten out one side of the top of the pole and then glued each strip at the top of each pole.


7. Paint the bases using whatever earthen-tone acrylic paints you'd like.

8. To accurately weather the poles, paint them using a combination of brown, grey, and black. I used artist's ink, but washes or watered-down acrylic paint is fine. Try to avoid areas where the pole has snapped or broken as much as possible - the inside wood  is often lighter in color.

9. Once the paint is dry, install the insulators. I cut very small lengths of plasticard rod and glued one on each side of the pole with CA glue. I did not bother painting them - many insulators were made of ceramic or glass, which was glossy in appearance. You can also use small craft beads. Common insulator colors included white (for ceramic or milk glass), clear green, clear red, brown, and black.

10. Add static grass and clump foliage to the base. The bases should like wild and overgrown, high enough to hide most infantry and conceal a good deal of most AFV hulls.

11. If you want, you can add wires using black nylon thread, glued around the insulators. You can also add road signs to the poles.


Tuesday, February 24, 2015

Snow-covered Woods

If I could give new gamers one tip for terrain making it would be this - always remember to check after-Christmas clearance sales for stores that sell hobby supplies and/or decorative Christmas collectible tchotchkes. The forest below cost me less than $20, was quick to assemble, and looks effective at multiple scales.

All the pine trees are "small" Lemax trees that came in packs of two. I got them at Menard's for less than $.070 each. As they are glued to large, heavy snow-covered bases, they required no effort to place. The forest bases themselves are made from beige felt (pine forests usually lack much undergrowth and are blanketed in dead pine needles, which are a beige-brown color), liberally spray-painted with black, brown, and rust red paint. I then cut irregular holes out of a piece of cotton fabric and glued the felt to it. When the glue dried, I added some static grass to the open sections.

The best part is all the trees and bases fit in a one gallon ziploc bag for easy storage.


Wednesday, February 18, 2015

15mm Cobblestone Roads

A quick post for today, nothing in-depth. I've been struggling with urban roads since I started the 15mm terrain project and ran across someone mentioning using faux patterned leather as stand-ins for cobblestone roads. Oddly, we had about 3 yards of good quality faux leather we'd ordered about 6 years ago for a home decorating project that never got done - bingo.

The hardest part was cutting everything to size and keeping the width consistent throughout. Lots of measuring, marking, and careful cutting. The base leather was plain black and I drybrushed a medium shade of the color I wanted, then did a highlight drybrush of a lighter color. I then flipped the leather over and painted the reverse side - this helps protect from the road warping (somewhat). I painted several sets - 1 2" wide set of beige cobbles (the set pictured below), 1 2" wide set of grey cobbles, and 1 3" wide set of grey cobbles.


Monday, February 16, 2015

Tutorial: Flexible Plowed Fields

I have a love-hate relationship with the Battlefront Plowed Fields - I love how awesome they are and they're useful in many more games outside of Flames of War, but I hate the cost. $20-something should get you more than two small rectangular fields. So I decided to try making my own and the results are awesome. 

The felt backing for these fields is essential. Without it, the latex caulk will curl and roll. While the latex still lifts the corners while in storage, they can easily be bent back before play and will stay down due to the field's weight.


Materials
  • 1 piece of single-layer corrugated cardboard
  • Paintable acrylic latex caulk
  • Caulking gun
  • Aluminum foil 
  • Felt fabric
  • Plastic or metal paint scrapper
  • Packing tape
  • Earth-tone acrylic or latex paints
  • Scissors and/or utility knife

1. Carefully wet one side of the cardboard and let the water soak in a couple minutes. Holding one corner, slowly and carefully peel away the wet side to expose the corrugated insides. Clean any leftover paper remnants. 

2. Before the cardboard dries, tape down all sides to a flat level surface you will not need to use for several days. Let the cardboard dry.


3. Pull off enough aluminum foil 1.5-2x the length of the cardboard and lay on top. Starting on one end, push the foil into each corrugation until you reach the end. When complete tape down all edges.

You could use wax paper or plastic wrap but foil will hold it's shape between, especially when you push and pull it around when applying the caulk.


4. Apply the latex caulk over the foil (Be sure to use a brand listed as "paintable"). Using your paint scraper, push the caulk around to cover most, if not all, of the foil. Be sure to "push" the caulk into the corrugations. Smooth out as much as possible and let stand for a couple of minutes (not more than 5-10 minutes).


5. Cut enough felt fabric to fully cover the caulking and apply to the caulk, smoothing out any rough spots and using enough pressure to push the felt into the caulking to make it bond.


6. Let dry for at least 12 hours. Because it is exposed to very little air, the caulk will take much longer to cure than what is listed on the package, especially towards the middle. You can slightly speed up the process by turning a hair dryer on low and blowing over the felt (but it will still be many hours before the caulk starts to cure enough).

7. Test the cure by attempting to SLOWLY pull up one corner. You want the felt and caulk to remain sticking together and the caulk to pull away, at least slightly, from the foil. If the felt is pulling away from the caulk, push it back down, smooth all the felt out again and let cure for several more hours.

This is very much an intuitive step. My advice is to be patient - best to let it sit for several days and wait, then pull it up too early and destroy the field.


8. When you're happy with the cure, pull up the field. Portions of foil may still stick and will have to be removed little by little. Using a knife or scissors, cut out whatever size fields you'd like.

9. If the furrows are still damp, you can make tracks in them by using a miniature of your choice.


10. Paint the fields. I used some leftover latex house paint samples we had, making them earth-tone by mixing in some dry pigments and stirring well.


Thursday, February 12, 2015

Cork Tile Houses

While I don't really need more North African style buildings, I just can't seem to stop building them. I found a few old offcuts of cork flooring tile and decided to try my hand at building some cork terrain. The basis of these buildings are Matakishi's amazing cork buildings, specifically his Afghan Buildings. While these are nowhere near on par with Matakishi's stuff, I'm really pleased with how these turned out. 

Everything but doing the stucco texturing was easy and, even using the 2 tiles I had left, I was able to make enough houses for a small settlement. I used offcuts and damaged pieces to make the ruined buildings. The ripped cork fairly closely resembles stucco-covered stone buildings, common to Tunisia and Malta. I will probably end up making more in 28mm when I start building my 28mm Operation Herkules Italian Airborne.

Enjoy!


Friday, February 6, 2015

Tutorial: Vineyards

Vineyards make excellent, useful terrain features in all kinds of different games. They limit maneuverability, provide concealment for infantry, and nicely fill table space. For WW2 gaming, they can be included in nearly every theater in which the war was fought. Wine-producing regions include NW Europe, Belorussia, Italy, Greece and the Balkans, Crete, the Levant, and even French Morocco and Syria.

I'll be honest, I've always wanted to make vineyards but have been rather daunted by getting it "just right" - the perfect balance between playability and realism. While the Battlefront FOW version is nice, it's rather clunky. Well, I finally threw caution to the wind and tried my hand at it....and now I wonder why I waited so long. Really the only problem was the "fiddliness" of affixing the wire trellising to the end posts, but I'll show you how to tackle that problem. 


Materials

  • Wide popsicle sticks ("tongue depressers")
  • Toothpicks
  • Dry, thin tree branch shoots
  • Medium Ballast in various colors OR sand
  • Thin gauge metal wire OR black upholstery thread
  • Foliage-Fiber Clusters OR Clump Foliage
  • Felt
  • Static grass (optional)
  • White, wood, & CA glues
  • X-acto knife and/or utility knife
  • Black primer
  • Clear flat spray sealant
  • Dirt-tone acrylic colors

1. Using a knife, cut the spiky ends off a series of wood toothpicks. Then, cut each toothpick into thirds -measurements don't have to be exact. Glue one section of toothpick on to the end of each popsicle stick, leaving about 1/2" of space at the end for the post supports. I used CA glue for this step.


2. Using a cutting mat grid or the corner of a piece of scrap paper, line toothpicks on a 45 degree angle, cut off the ends along the grid lines (or paper edges if using paper). Each piece should resemble the picture below once cut. Once cut, glue these post supports between each end post and the popsicle sticks. This will provide additional support and stability when tying the the wire trellises.


3. The trickiest part! Using thin gauge wire or black upholstery thread, cut a piece about 2.5x the length of the popsicle stick. Begin by winding the wire around one end post below the post support, use a drop of CA glue to secure it once wound.


4. Keeping the wire tight, wind it around the opposite end post, below the post support. Use a drop of CA glue to secure it. Then, wind the wire up around the post over the post support, as picture below. Keeping the wire tight, wind it around the first post above the post support. Use CA glue to secure it, then clip the excess.


5. You should now have two wire trellises one atop the other, running between each end post. Do this for the rest of the sticks. Don't worry if it seems fragile - reinforcement will come when you add the vine trunks.


6. Spray all the sticks with black primer and let dry.

7. Take a couple dry, thin tree branch shoots from your yard and cut off pieces just about the height of the top wire trellis on each stick. Glue several in a row alongside the wire trellising on each base using wood glue. Don't worry about painting them - they're already the perfect color!


8. Once dry, paint each end post a greyish-brown color to resemble weathered wood. Try to avoid painting the wire trellising. Let thoroughly dry.


9. Mix various colors of medium railroad ballast to resemble the harsh, often rocky soil grapevines thrive in. I'm using grey, white, and buff colored ballast. Spread wood or white glue evenly over each base, then sprinkle liberally with ballast. Allow to thoroughly dry before shaking off the excess ballast.


10. Once the ballast is dry, mix your preferred earth toned acrylic colors. I use a base of medium grey, mixed with equal parts medium brown and biege, with a small drop of dark red. Dip your brush in water to dilute the paint into a heavy wash and apply to the base. The wash should soak into the crevices between the stones and just slightly tinge the stones themselves, helping to blend them together.


11. Allow to dry, then seal well with flat spray sealant.

12. Pull long thick strands of fiber-foliage apart. Place drops of white glue on the top of each vine trunk, then a long line on the underside of the foliage strand. Place down along the top of the trellising and vine trunks. Try to fold the foliage over each side and push together. If you want, once the foliage is dry, apply static grass to the base. Just don't use too much - a good vintner wouldn't want grass stealing the nutrients from the soil that the grapes could use!

13. Cut enough pieces of felt fabric to accommodate your bases. I've cut three pieces, large enough to fit four bases in single rows, with enough room in between to accommodate a medium FOW base. I used beige felt, then did a light overspray of grey and brown with spray paint.

That's it - you're done! Though I made these vineyards for 15mm, if you cut the end posts a little higher and added a third wire trellis - these could easily be used for 28mm gaming. If you cut the end posts down a bit and only used one wire trellis, these could even be made for 6mm!


Wednesday, February 4, 2015

Tutorial: Marshes

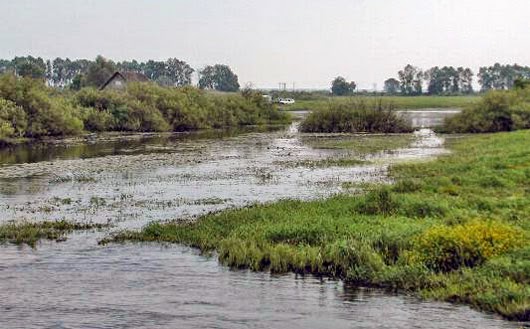
Another tutorial for making Eastern Front terrain - this time I'm focusing on Belorussia, an area characterized by extensive forests, waterways, and marshes. The most well-known is the Pripyat Region of modern-day Ukraine, home of the Chernobyl nuclear powerplant. I was inspired by the excellent Nova documentary "Radioactive Wolves".


Materials

  • 2-3mm MDF/hardboard base
  • Semi-rigid/rigid clear plastic
  • Brown, black, tan, green acrylic paints
  • Black spray primer
  • X-acto knife or Utility knife
  • Permanent Marker
  • CA glue and/or construction adhesive
  • White glue
  • Drill with bit larger than sabre saw blade
  • Sanding paper
  • Sabre saw and/or Dremel multi-tool
  • Clear casting resin OR Acrylic gloss medium
  • Fake fur fabric (I used Vicuna)
  • Flocking and/or static grass
  • Clump foliage


1. Cut irregular shapes out of the MDF with a sabre saw. To ease sanding later on, position the saw on a slight angle to give the base a slightly beveled edge.


2. Once cut, draw several irregular shapes inside the bases. These will later form the areas of open water. To cut them out, use a drill with a bit slightly larger than your sabre saw and drill a hole anywhere on the edge of your drawn shapes. Insert the sabre saw in this hole and cut the hole out. If your saw is on an angle, make sure the angle slopes inward (see pics for reference).


3. Sand down the beveled edges to give the base a gentle slope on the edges to aid figure placement. I like using the sanding band on my Dremel, but you can also using a palm sander or just basic sandpaper.

Once sanded, flip the bases over and glue sheets of rigid or semi-rigid clear plastic to the bottom. I used clear plastic 8.5" x 11" page dividers and construction adhesive to save money. Make sure no glue is exposed under the water holes. Allow to dry. Once dry, cut off any excess from the outside of the base with a sharp blade.

4. Now to add the illusion of depth to the water holes! With the bases still flipped upside down, take the darkest color you'll be using on the top of the base itself. I used a dark brown acrylic craft paint called "Melted Chocolate"; mixed with a little grey it makes an excellent wet mud color. Using a sponge or brush, paint around the edges of the water holes. Don't go too far out. Allow to dry.


5. Keep adding successively darker colored rings to the water holes. I just kept adding more and more black to the first brown-grey color. Allow to thoroughly dry. Once completely dry, spray the entire base bottom with black spray primer. Apply a few coats to really seal in the paint and protect it from damage.


Using the same color from Step 54 flip the base rightside up and paint the bases, being careful to avoid the water holes. It should look like the water holes get deeper towards the middle, giving the illusion of more depth than is really there. (Yes, I know the first coat inside my water holes is lighter than the base color - I accidentally mixed the base color incorrectly. So be sure to mix your paint correctly!)


6. Mix your clear casting resin according to manufacturer's direction, being sure to work in an adequately ventilated area while wearing disposable gloves. Depending on the brand, you should be able to mix in tinted colors to give the water a murky appearance. Browns and greens work well. I used a green tint color which doesn't show up in the pictures. Whatever colors you decide to use keep in mind that, contrary to popular belief, healthy wetlands usually have fairly clean (though somewhat murky) water. Dank, stagnant mud pits are rare and usually a sign of environmental stresses or pollution. Place the bases on a clean, level surface and fill the water holes about halfway with the resin. Allow to cure for 24 hours.
If you do not want to use resin, you can use acrylic gloss medium in several shallow layers. Be sure to allow each layer to thoroughly dry.

7. Cut large irregular shapes from the fake fur fabric to represent areas of tall, dry grass. Have a vacuum cleaner close at hand - this is the messiest part of the build - fur gets everywhere, especially if it's low quality. Before gluing, place the fabric on the bases to make sure it fits correctly. You don't want to cover the entire base or have the edges hanging off the base or into the holes. Glue down and allow to dry. (I used wood glue here, the resin helps to polyester backing adhere better to base)


8. Once the fabric drys, remove any excess "fur", apply a thin layer of white glue around the base (again, being sure to avoid the water holes), and apply flocking. Allow to thoroughly dry.


9. Shake off the excess flocking. Apply a thin layer of white glue over the flocking, concentrating on areas around the tall grass and water holes. Apply static grass. Wait a few minutes, shake off the excess, then apply a little more static grass over the areas you've already applied the glue to. This 'fills in' any voids on spots and makes the grass look denser than it really is. Allow to thoroughly dry.


10. Apply small clusters of clump foliage around the base. I use this as an opportunity to hide any areas where paint or fabric didn't get adequate flocking or static grass coverage. Allow to dry.


Here it is all finished - at a fraction of the cost of ready-made swamps and more realistic as well. Though, I've built and pictured these marshes with 15mm WW2 miniatures, they can easily be used with 20mm and 28mm miniatures in nearly every time period and place. If you want to make these marshes solely for use with larger-scale miniatures, I'd suggest buying two lengths of fake fur fabric - using on to represent areas of high grass and the other for areas of lower grass. 

Enjoy!