

This tutorial is really rather easy. Even if you're very new to airbrushing, this is easy and effective once complete. This project can easily be completed in a day, even if broken up into multiple sittings.
What You'll Need
-An airbrush & compressor
-Airbrush paint or thinned paints (I use opaque Badger airbrush-ready paints here)
-Dullcote or "Satin" Clear Sealant (I used Krylon Satin Clear Sealant)
-Gloss Sealant (I used Ace Premium Gloss Clear Sealant)
-A dust mask/respirator
-Templates (here I'm using GW Flamer, Large Blast, & Small Blast from the Necromunda boxed set)
A note on paints: You'll notice that I'm using opaque airbrush paints for this projects. This does mean that the templates will lose some of their transparency. The application of color should be so fine though that the templates don't become fully opaque (i.e. you can't see minis below them). I used opaques here simply because they show up better in pictures and the colors are much more bold.
You certainly CAN substitute transparent paints for this project but do know that your colors may not be as bold as those shown below.
Blast Templates

1. Prep all templates by washing in warm, soapy water & allow to fully dry
2. In a well-ventilated area, evenly apply a coating of Dullcote or Satin sealant & allow to fully dry (usually 1-2 hrs)
3. Using your airbrush, start by applying the lightest color (in my example above - white) to the very center of the template. Some overspray and/or spattering is fine, you won't see this layer once completed (unless you turn the template over).
If you want a brighter explosion, apply more white now.
 4. Using your airbrush, apply the next less-bright color (above - yellow) over the previous layer. You should be overspraying this color out further from the center, so that it blends into the next layer.
 5. Notice how I'm now holding the template. I'm doing this so that I can 'walk' the template in a clockwise motion with my fingertips while spraying.
Starting from the outer edge of the template, apply the next color layer (above - orange) inwards and in a circular pattern. Don't overspray the previous layer too much, and avoid spraying the center.
 6. Still cradling the template, apply the next color layer (above - red) from the outer edge inwards and in a circular motion, as before.
Notice how this color is not applied evenly. I let the previous layers come through almost to the edge in some spots and push the red towards the center in other spots. I did this because explosions aren't symmetrical.
 7. Using grey or black, lightly spray the outermost edge of the template.
 8. Using the same color from Step 6, overspray the grey area slightly. This helps blend the "smoke" layer into the template.
 9. Using the color from your first layer (Step 3), spray just around the center hole, being careful to avoid overspray.
10. Seal with Gloss Sealant.
Flamer Templates

1. Prep all templates by washing in warm, soapy water & allow to fully dry
2. In a well-ventilated area, evenly apply a coating of Dullcote or Satin sealant & allow to fully dry (usually 1-2 hrs)
3. Using your airbrush, start by applying the lightest color (in my example above - white) from the tip up towards the bulb in squigly Dagger Strokes. Use more paint when starting a line and then slowly taper off towards the end of the line (above, I believe I started at position 5 and went down to position 1 at the end of my stroke).
Don't be overly concerned with making perfect dagger strokes or highly defined lines now, because....
 4. Here you define your "flames" more, going back over your previous lines with the initial color (again, above - white).
If you want more defined flames in the finished template, go over these lines twice before moving on to the next step.
 5. Using the next less-bright color (here - yellow), do some more squiggly Dagger Strokes from the tip up towards the bulb. Concentrate on the center of the template with this color, as the finished template should graduate from brightest at the tip and center, to coolest at the end of the bulb and edges.
 6. From the end of the bulb, apply the next less-bright color (above - orange) in squiggly Dagger Strokes as before. Try to concentrate on areas which have, so far, not received any paint.
 7. Again, starting from the end of the bulb, apply the next color layer (above - red) in squiggly Dagger Strokes. If you've missed overspraying any of the initial color layer (white), do so now.
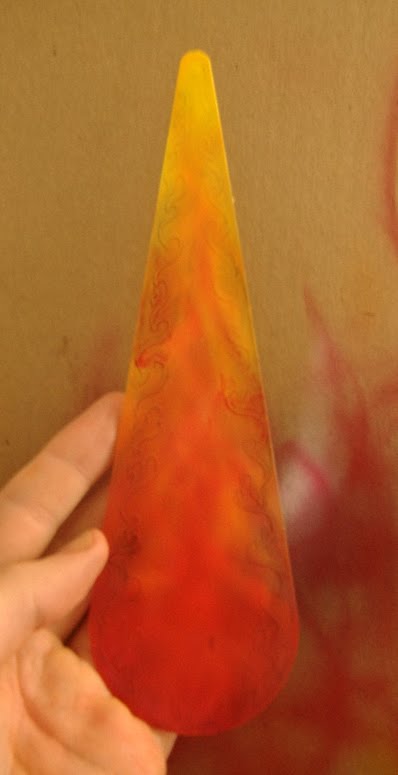 8. Using the color from Step 7, apply a light to medium overspray in a U-shape around the edges of the template bulb.
 9. Using your initial color, apply a few small, straight Dagger strokes from the tip of the template, terminating about 1/2" to 3/4" from the tip.
10. Apply a light overspray of grey or black along the very edges of the template, taking care to stay away from the tip itself.
11. Seal with Gloss sealant.
No comments:
Post a Comment