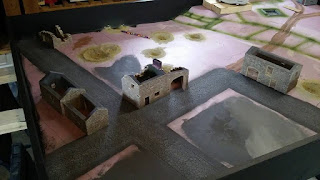
UPDATE 4/24 - So, unfortunately, the client failed to pay for or pick up this completed table. As such, I'm now forced to sell it on the open market. Due to the nature of the board, it cannot be shipped and must be picked up in Woodstock, IL. Looking for $300 and I can provide written evidence that this project was abandoned by the client and that he has forfeited any claims to ownership or reimbursement.
If you are interested in purchasing this board, please contact me at ancientsociety79@gmail.com
So if you're subbed to my Facebook page (if you're not, the link is in the sidebar...*hint, hint*), you'll have seen my progress on building a full gaming board based around the Battle of the Bulge on commission. The client wanted a full board, with protected sides; one side consisting of pine forest on a ridgeline and the other side consisting of a town at a lower elevation. To break up two dense terrain on either end, the middle portion would consist of open fields divided by low walls and fences. To provide extra cover in the open fields, I added some artillery craters.
I started by building an open-topped box out of lumber. To cut down on weight, the bottom is 5mm hardboard supported by 1x2 slats laid underneath. Everything is glued and nailed to ensure rigidity, then any small gaps are sealed, and the entire box is sanded to remove sharp edges and roughness.
I then cut and glued in the bottom sheet of 1/2" foamboard for the groundwork. Once dry, I cut and glued in two pieces of foamboard to a height of 3" for the ridgeline. Once everything was dry, I sketched out the locations of all buildings, roads, walls, and craters. Using a dremel, I gouged out all the craters, the rutted dirt road, and the bunker interior and sanded down the ridgeline, filling in any cracks.
I built up the edges of the craters (as well as around the bunker exterior) slightly with clay for both realism and to provide a little more cover for minis. Using 1/2" foamboard, I made the "Belgian bunker", as well as several intact and ruined stone buildings that are common to the area. While nice, these buildings are heavily labor-intensive and a tad large, so I limited their inclusion here.
The stone houses are cut using a steel rule and very sharp Xacto and 1" utility knife, joined together with toothpicks (for strength) and construction adhesive. I then mark out the horizontal line of every third or fourth course of stone with a steel rule and dull pencil, filling in the rest of the courses afterward. I then take the pencil's erasure and lightly push in a couple of stones here and there, then press a large stone on the walls to texture them.
The bunker is similar but the walls are cut horizontally and sandwiched together to give a cast concrete appearance. I then drew out the cobblestone roads in the same way as the stone house technique...and I never want to draw another circle again! Once all these items are dry and assembled, I "prime" them with acrylic gesso then drybrush successively lighter tones of paint.
To fill out the village, I used Sarissa's European houses, as well as cutting out several ruined houses myself from 3mm MDF, as well as cutting roofs and additional floors for the stone houses. I also added some premixed vinyl spackle to smooth out and texture the craters while adding sand and gravel. I used two miscast Warlord vehicles for vehicle wrecks and tried to integrate them into the crater areas.
The low stone walls are a mix of plaster and Durham's rock putty. I "cast" them by laying the wet mixture in a low dish, then once dry, snapping irregular small chunks from the slab with my hands and by hitting it with a steel rule. I then glue these pieces together with construction adhesive, coat them with white glue to "seal" them, and then add just a little sprinkling of sand here and there. I also installed barbed wire fenceposts using basswood.
Next was to install the pine trees and, while I like the look of the "bottle brush" pines, they aren't particularly realistic. So I took regular pine trees, sprayed them with spray adhesive, and then sprinkled light flocking over them. While I do like the look, they took over a day to dry (on a project like this, that is a long time). I laid down the earth texture using a mixture of acrylic paints, some gesso, and a touch of white glue applied very thick and then sprinkled with a mixture of sand, model railroad ballast, and just a couple small stones. Once dry, I drybrushed with lighter colors of browns and tans.
On the ridgeline, I created a few areas of rocky outcroppings using premixed vinyl spackle mixed with small stones, then painted these grey and drybrushed in white. In the village, I added debris around each ruined building, again using the spackle/sand mixture. I also fully painted all the timber frame houses and the stone house roofs.
Areas of mud and debris were airbrushed to give them an irregular feel, as well as to feather their color into the surrounding groundwork.
Finally, I added areas of static grass and snow drifts. And, here is the completed board.


5 comments:
What a huge project. With great result! Very impressive. /Mattias
Very nice. Will work pretty well for moderns also.
I like it even though the walls on the houses are a bit thick.
Lovely work...looks very cold...i.e. perfect
Have been looking for clients for commission work for nearly a month now, but I doubt I'll ever produce anything as worthy as that table. That's going to be one happy customer! I'm jealous.
Post a Comment